Resurrected 93 XLT | Ford Explorer Forums - Serious Explorations

  • Register Today It's free!

Resurrected 93 XLT

aaron81006

Active Member
Joined
August 15, 2013
Messages
90
Reaction score
4
City, State
Pueblo, Colorado
Year, Model & Trim Level
94 explorer XLT
My 93 Ex has been in the family since day one. My step father-in-law bought it new. He used it nearly every day to haul his pontoon boat to the res until '09. We bought it from him for my daughters first vehicle and it survived two years with her remarkably well. When she was ready for something new, I figured it was a decent temporary replacement for my 1500 Ram gas hog.

I drove it for about a year talking trash about it the whole time. There were quite a few little plastic things and levers that weren't working due to years of no maintenance. A few years ago a friend and I went camping in it and my opinion of the truck was transformed.

Since then I have been happily (mostly) driving it every day and doing mod's as I'm inspired or can afford to. It's been a good multi-purpose vehicle for cruising around town, going camping and getting to remote locations for my volunteer firefighting, SAR and Dive rescue.

First thing I had to do was loose the factory wheels. These were an improvement but not great.
imagejpg1_zpsd52938cf.jpg


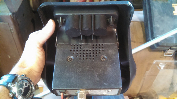
I cruised it this way for a while. Next project was an EB glass moonroof. Came out pretty good but I was a little ambitious on the headliner cut out. It is different from the one I had done before. I had to do a custom trim piece on the inside but it's out of wood paneling and not really up to par. I have a nice piece of aluminum that I need to take to the water jet to get cut to size. I need to do that soon. If anyone is interested, I can do a write up with pics.

I found these wheels on Craigslist last year and bugged the guy for a few months until I got him down to 4 bills - ready to mount. Now we're talkin'. This it with the new wheels but no lift yet. I did paint the grill flat black.

imagejpg1_zps6d9ee024.jpg


So, now I gotta get some clearance. Again, I followed the "find something on CL and wait until they want to sell for my price" technique. A trip to Denver, a few hours in the garage and it's 4" higher. (Write up on lift and lift kit mod in separate thread. Don't know how to link the two YET)

98feeecc4eecd1757e7178df4e44e9ad_zps146af975-1.jpg


Future / in progress upgrades: tires, emergency lights, custom center console, custom rock sliders, bumpers and winch.

That's it for now.


Join the Elite Explorers for $20 each year.
Elite Explorer members see no advertisements, no banner ads, no double underlined links,.
Add an avatar, upload photo attachments, and more!
.


Electric fan install

Last year a friend and I were going camping at Hermit Lake. Now this road is not very bad as far as steepness or anything tricky goes. What's bad about this road is that it is extremely rocky. Lots of pointy, loose and large (bowling ball or so) rocks. So, the old Ex had a week fan clutch and promptly began to overheat. Luckily, we had lots of water bottles and the road goes next to a creek in quite a few places. Nearly 6 hours later, we made it to camp and had a great time.

Fast forward to back home. I change out the clutch with a new one but am not really happy with how loud it is and have been really interested in the electric fan swap anyway. Back to the internet. I finally stumble upon a thread by monstar_est87 on www.gmfullsize.com titled "How to MarkVIII your OBS on a budget..!" This was finally what I was looking for. Now I've seen quite a few other posts about doing this swap but I'm the kind of guy that can't just put this here and that there because some guy said so. I have to understand the what's and why's of it.

Monstar had this great little diagram that finally made the whole thing make sense.

imagejpg3_zps2068263f.jpg

What I figure out from this is that the BMW temp switch is like a directional controller for the ground wire. So, power goes into the Volvo relay (I'll get to that in a minute) from the battery and the Volvo switch also has two ground wires coming in from the BMW temp switch (again coming up) witch is grounded to the battery and opens the "gate" for the ground to travel down one wire at the first temp and the other wire at the higher temp (don't remember the numbers). So, once a temp is reached, the ground wire tells the Volvo relay to send power thru the correct wire to control the high and low speeds on the Taurus fan (you guessed it, coming up). Ok, got your mind around all that?

Back to monstar. He has all of the parts laid out.
imagejpg4_zps0a5a1829.jpg


I used the Volvo relay and the BMW T-switch. I didn't use his green wires or the temp switch cap because at $7 a piece for the wires, I knew I could do it a lot cheaper. I had the wire in the garage and bought some bullet connectors from Autozone for something like $3. The rest of the electronics I got from Ebay for less than he shows. :biggthump

imagejpg5_zps0e1debe6.jpg


imagejpg2_zpsd9bf5abe.jpg


The fan I picked up at my local PnP for around $25. I couldn't find a Taurus with the right fan but they did have a Sable. Ever seen a dork with an ipad in the middle of the junk yard? Well, that's me comparing part numbers on autozone.com. They match. Here's an example.

imagejpg1_zpsb1492684.jpg


I got this little gem on Ebay for $15 not $50 like some of the big guys want. And, they come in all kinds of colors. I did have to drill and retap the hole. No biggy.

imagejpg1_zpse329eb31.jpg


Well everyone, I apologize but the install will have to be continued tomorrow. The ipad is dying.

Toodles


For starters, if someone knows how to make pics the correct size, plz let me know.

You're sharing the thumbnail of the picture, not the actual picture. Go into Photobucket and use the share link to generate forum tags like [ IMG ] without the spaces.


photobucket_zpsace9df58.jpg


You're sharing the thumbnail of the picture, not the actual picture. Go into Photobucket and use the share link to generate forum tags like [ IMG ] without the spaces.

Awesome Nate. Thanks for the info


Thanks FR. I can use that too.


Now with everything together and a good understanding of the mechanics, this project only took about three hours. Spent most of the time on the trial and error of fitting the new shroud on the radiator.

First I remove the fan clutch. This took time too because Autozone loaned me the five piece clutch tool set but the two piece set is the one I needed. Extra trip to the store.
Once that's out of the way I did a test fit with the new shroud and realized that the threaded stud for the clutch was going to be in the way. I don't expect to ever go back to a manual fan so out comes the grinder.
This pic shows the stud ground smooth and the radiator removed. I did remove the unibelt and the water pump pulley to do this work.

imagejpg23_zps1a749bf6.jpg


I removed the brass bushings that hold the motor and ground down some of the plastic. I reinstalled the bushings with some washers as spacers. This gave me more clearance from the pulley.

imagejpg15_zpseedb1fae.jpg


imagejpg13_zps5b74b626.jpg


Now to mount it I decided to make brackets out of some aluminum stair nosing that I had in the garage. It had an arc on one of the legs that I just smashed flat with a hammer. I screwed these right to the plastic. They slid nicely into the radiator frame. This was the long part. I took quite a while moving the shroud off and on the radiator until I had a good fit.

imagejpg19_zps68a18d31.jpg


imagejpg17_zpsedf01c11.jpg


e6fd7965-75b2-4232-96be-a0e92379628d_zps36abea1e.jpg


imagejpg8_zps27ea8158.jpg


imagejpg21_zpsaef554a8.jpg


Here it is all trimmed out and it fits in nicely.

imagejpg11_zpsd5d727ab.jpg


You can see the clearance between the electric fan and the pulleys. This is extremely important because the pulleys still turn and would trash anything they touch. It looks close from this angle but there is over 3/4". See previous pic.

ebaff3d8-5236-4976-af4e-fc242e3239b0_zps9dd5d301.jpg


I decided to mount my Volvo switch on the outside of the radiator wall. This gave me easy wiring and access. Had to cut a new hole.

imagejpg26_zpsd79f0ed8.jpg


Here's the final setup of the BMW switch and the wiring with a 30 resetting link. I just connected it straight to the battery. This causes the fan to run for a while after the truck has been turned off until the water cools enough for the switch to deactivate. I kind of like to hear it just to make sure it's working. I have had no issues with battery drain but in think I will move it to a ignition switched location someday.

imagejpg1_zps1643ebb5.jpg


I've been running this setup for about 6 months now and the temp needle never gets above half. The real test will be in August when it's 110*. So far I'm really happy with it.


I was working on something else on day and noticed that the inner structure of the steering wheel looked pretty cool. This week I took off the rubber cover, plastidipped all of the metal parts and wires and built a horn button out of some heavy press board panel I had laying around. I think it came out pretty sweet and it was basically free. Always a bonus.
 

Attachments

  • ForumRunner_20140525_114141.png
    ForumRunner_20140525_114141.png
    352.4 KB · Views: 286


That's actually pretty cool. Kinda tempted to do that myself :)


I wanna know how that relay doesnt burn up?? I know many have used them and worked fine but its rated at 30 amps.that Taurus fan should pull that running on high and seen them spike up over 50+ amps on start up.I personally have burnt up many relay and controllers with higher than 30 amp ratings. .Volvo must under rate them..

You have a fuse on yours??is a slow start relay?


Don't really know, JD. I used that one bc it was recommended in another thread. I just went into Autozone and asked for a 30 amp and that's what they gave me. It was hooked straight to the battery. I've had it in for almost a year now and it works great.

I did work on it again a few weeks ago and added a relay. Being wired directly off of the battery, the fan would stay on when the keys were turned off until the engine cooled down. I left it like this for a while because it brought back memories of my folks Audi Fox that I used the steal back when I was 13. Once the nostalgia wore off, I did the relay install and worked on a more finished looking install. Now it turns off with the key and all is peachy.

P.s. The hardest part about the relay install was finding a switched lead near the battery. After a few hours of thinking about it and testing a bunch of wires, I was just about to pull a wire from inside the cab and I realized that the MAF is switched. The relay uses very little power to switch the higher amp lead so this worked out well.


Thanks Nate. I'm all about using what I got.


One other cool little trick that I came across when installing the relay:

I flipped the positive battery clamp upside down and added wing nuts to the remaining portion of the wire clamp. Now I have a quick connect for more relays or anything else I my be tinkering with. When doing this, I had to shave the bottom of the battery post a little and open the clamp as wide as it would go bc the clamp is tapered.


Not a great pic because of all the people but this at the top of Pikes Peak. The drive is fun, a little Harry at times, and the scenery is fantastic.

8b10a9cf2bdc76d96e52f80d3c5fc130_zps9a0cf952.jpg


ae9b4bd8b1d5fe0785fad5b60c812ecc_zpseaabc406.jpg


Also got to spend some quality time with my son and teach him how to use the low gears on the downhill.

25b1272232afd0ecdf4b63864c401243_zps0d54f92d.jpg


1067d298cdc0e24a5a0e2fde6164a87f_zps10778546.jpg


Win, Win!!


Cool build, I love stuff like this.. Makes me want to go wrench on mine haha. I started with one that needed new heads though :)


Back
Top