Desert_AIP
Active Member
- Joined
- January 25, 2017
- Messages
- 97
- Reaction score
- 53
- Year, Model & Trim Level
- 1998 Explorer XLT 4WD
About 2 years ago I broke my original roof rack cross bars. I was carrying a load of 1x4s, was probably around 200lbs, which is over the 100lb OEM limit.
The original cross bars with aluminum struts across the middle attached to plastic sliders that run in a track on the roof.
The plastic only extends about 2" or so into the aluminum bars, which are hollow.
With the roof rack basket on the OEM sliders, it created point loads right at the junction of the plastic and aluminum and snapped three of the four plastic sections.
I have had had loads of three sheets of MDF (98 lbs per sheet) up there before, but the sheets were resting fully on the bars, and the load was spread evenly.
The cross bars were also a bit newer then, they hadn't been out in the UV for as many years.
I really like the cargo basket for camping.
But it rides too high using the OEM cross bars, and there are only two cross bars.
Plus the weak spot I mentioned with the mounting brackets.
Also, the screws on the mounting brackets are too long. So they protrude above the bottom of the basket when tightened down and I'm worried they are going to tear the cargo bag. Finally, they are attached with manual threaded knobs. So I can't use a tool on them to remove them.
It's a real pain to take the basket off, or put it back on.
I originally replaced the broken cross bars with a couple taken off other Explorers at the Pick-a-part yard. So I got back in business.
But I just don't trust them. I don't want to carry a whole lot of weight up high, but I want something I can trust.
When camping it's usually light bulky items like a tent and sleeping bag, etc.
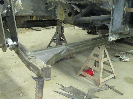
So I built new roof rack cross bars.
I built four. I used half height aluminum strut channel.
The original tracks that run along the roof are solid. The OEM sliders and tie down eyes cinch up to some 6mm T nuts that run in the track.
I was able to connect the new cross bars to the track with those T nuts. I got some additional T nuts at the wrecking yard since I needed 8 on each side.
I mocked up the cross bars. They're more than an inch lower than the originals, and more rigid.
The cross bars are 48" long. They overhang the rack rails a couple of inches.
That allows me to connect other things outboard of the basket, and gives me rope tie off points. I will probably add eyes for rope tiedowns.
Everything was painted black after fabricating. I have black rubber caps for the raw ends of the channel.
I used Unistrut "U" connectors to affix the basket to the cross bars. That means I can use a driver or a ratchet and get the basket on and off quickly.
I also won't have any protruding bolts to puncture the cargo bag. The steel brackets made for the steel channel are 1/4" thick, and super heavy. Unistrut makes this bracket in 1/8th inch steel, but it's impossible to find. All the hardware is stainless.
All the brackets were fabricated from solid strut, the crossbars are from slotted strut.
I removed the rail end caps and slid in the extra track hardware. There are 1/8" shims on the outboard side between the brackets and track to get the top of the bracket level.
Another great thing about using aluminum rails, I can machine it with woodworking tools.
I had to mill some 1/4" slots in the channels to install the mounting bolts since the span across the roof fell in-between the milled slots.
Easy task on my router table
I did notice the rails start to curve down at the rear. I needed to shim the entire bracket back there with 1/4" aluminum.
I needed to lift up the rear cross bar 1/4", I couldn't find any 1/4" aluminum flatstock locally and didn't want to wait on an order.
I had some 1/8" x 1 1/2" flat aluminum, so I made four risers to get me to the needed 1/4".
They're captured by the bolts so they aren't going anywhere, and it was easier (and safer) to machine the 1/8" aluminum on my router table.
I routed a 1/2" slot down the middle of each one.
The original cross bars with aluminum struts across the middle attached to plastic sliders that run in a track on the roof.
The plastic only extends about 2" or so into the aluminum bars, which are hollow.
With the roof rack basket on the OEM sliders, it created point loads right at the junction of the plastic and aluminum and snapped three of the four plastic sections.
I have had had loads of three sheets of MDF (98 lbs per sheet) up there before, but the sheets were resting fully on the bars, and the load was spread evenly.
The cross bars were also a bit newer then, they hadn't been out in the UV for as many years.
I really like the cargo basket for camping.
But it rides too high using the OEM cross bars, and there are only two cross bars.
Plus the weak spot I mentioned with the mounting brackets.
Also, the screws on the mounting brackets are too long. So they protrude above the bottom of the basket when tightened down and I'm worried they are going to tear the cargo bag. Finally, they are attached with manual threaded knobs. So I can't use a tool on them to remove them.
It's a real pain to take the basket off, or put it back on.
I originally replaced the broken cross bars with a couple taken off other Explorers at the Pick-a-part yard. So I got back in business.
But I just don't trust them. I don't want to carry a whole lot of weight up high, but I want something I can trust.
When camping it's usually light bulky items like a tent and sleeping bag, etc.
So I built new roof rack cross bars.
I built four. I used half height aluminum strut channel.
The original tracks that run along the roof are solid. The OEM sliders and tie down eyes cinch up to some 6mm T nuts that run in the track.
I was able to connect the new cross bars to the track with those T nuts. I got some additional T nuts at the wrecking yard since I needed 8 on each side.
I mocked up the cross bars. They're more than an inch lower than the originals, and more rigid.
The cross bars are 48" long. They overhang the rack rails a couple of inches.
That allows me to connect other things outboard of the basket, and gives me rope tie off points. I will probably add eyes for rope tiedowns.
Everything was painted black after fabricating. I have black rubber caps for the raw ends of the channel.
I used Unistrut "U" connectors to affix the basket to the cross bars. That means I can use a driver or a ratchet and get the basket on and off quickly.
I also won't have any protruding bolts to puncture the cargo bag. The steel brackets made for the steel channel are 1/4" thick, and super heavy. Unistrut makes this bracket in 1/8th inch steel, but it's impossible to find. All the hardware is stainless.
All the brackets were fabricated from solid strut, the crossbars are from slotted strut.
I removed the rail end caps and slid in the extra track hardware. There are 1/8" shims on the outboard side between the brackets and track to get the top of the bracket level.
Another great thing about using aluminum rails, I can machine it with woodworking tools.
I had to mill some 1/4" slots in the channels to install the mounting bolts since the span across the roof fell in-between the milled slots.
Easy task on my router table
I did notice the rails start to curve down at the rear. I needed to shim the entire bracket back there with 1/4" aluminum.
I needed to lift up the rear cross bar 1/4", I couldn't find any 1/4" aluminum flatstock locally and didn't want to wait on an order.
I had some 1/8" x 1 1/2" flat aluminum, so I made four risers to get me to the needed 1/4".
They're captured by the bolts so they aren't going anywhere, and it was easier (and safer) to machine the 1/8" aluminum on my router table.
I routed a 1/2" slot down the middle of each one.
Attachments
-
 Loaded.jpg211.5 KB · Views: 194
 -
 Roof Rack - 01.JPG175.4 KB · Views: 206
 -
 Roof Rack - 02.JPG120.1 KB · Views: 175
 -
 Roof Rack - 03.JPG124.7 KB · Views: 162
 -
 Roof Rack - 05.JPG99.6 KB · Views: 182
 -
 Roof Rack - 13.JPG219.6 KB · Views: 251
 -
 Roof Rack - 22.JPG118.6 KB · Views: 180
 -
 Roof Rack - 23.JPG166 KB · Views: 257
 -
 Roof Rack - 26.JPG222.3 KB · Views: 240
 -
 Roof Rack - 28.JPG175.7 KB · Views: 783
 -
 Roof Rack - 24.JPG72.9 KB · Views: 189