Front door lock actuator, "helper spring" replacement | Ford Explorer Forums - Serious Explorations

  • Register Today It's free!

Front door lock actuator, "helper spring" replacement

Blk2kXLT

Well-Known Member
Joined
September 2, 2015
Messages
130
Reaction score
37
Year, Model & Trim Level
Explorer 2000
My mind is blown. Instead of having to replace the entire lock assembly $1XX which I have dreaded for years, you can replace the broken internal actuator helper spring with an external one!

History on this is that I knew of course something was messed up with my door lock assembly. It was not working as well as it always had and then there was the need to hit unlock ten times to get the door to unlock. I have replaced all the actuators in the doors of the car so I knew it was not the actuator that was bad but I could never quite place my finger on the issue. I got by for years with a lot of teflon spray and patience.

Well I stumble upon a YouTube video that I could not believe. guy somehow figured out that later explorers had fixed this issue of the broken internal actuator helper with an external one!

Here is my efforts and wow works awesome. I did not use the same "mount" point since my door insides were different or it seemed that guy was going to block his window track so I made a new hole that had the slight tension needed to help the lock pop up. The electric actualtor muscles down the lock like a champ and with the external helper spring, the lock pops up everytime.
 

Attachments

  • IMG_20200714_1544223.jpg
    IMG_20200714_1544223.jpg
    136.3 KB · Views: 340
  • IMG_20200714_1539198.jpg
    IMG_20200714_1539198.jpg
    187.5 KB · Views: 318
  • IMG_20200714_1539105.jpg
    IMG_20200714_1539105.jpg
    123.9 KB · Views: 415
  • IMG_20200714_1539334.jpg
    IMG_20200714_1539334.jpg
    164.5 KB · Views: 406
  • IMG_20200714_1540305.jpg
    IMG_20200714_1540305.jpg
    194 KB · Views: 351


Join the Elite Explorers for $20 each year.
Elite Explorer members see no advertisements, no banner ads, no double underlined links,.
Add an avatar, upload photo attachments, and more!
.


Good writeup.:thumbsup:
I did this mod several years ago, when my
passenger door failed to unlock. It's worked
like a charm, and much easier than replacing
the latch mechanism.


Update, turns out I put the spring in not the best spot. Just adjusted it to the proper spot on the other side of the window track, like in the YouTube linked. I finally realized that when it stopped popping reliably and checked the video again.

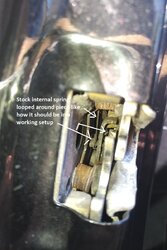
You want to loop under the rod in the area circled. Then I used the same spring stretched up to where the external lock handle is. Fixed!

Driver side, looking backwards towards the lock from inside the access port
lock.jpg


COULD YOU ELABORATE on your update.... it seems you're saying to hook BOTH ENDS at the SAME spot as in video, but since the generic (extra long) spring is being used in your application we should route it under the rod that hooks into (circled in picture) hole .....to take up extra slack / add more tension.....IS THIS A CORRECT understanding of your update?
Thanks.


The video is correct but I could not tell what piece he was connecting to and I had a long spring. In my old post I had the spring attached to inner door area (original post pic3) and then the hole I cut (original post pic2) since I could only find a long spring at Home Depot in a pack. That worked for a year or so.

2nd try ended up being closer to what was done in the video. When I finally ordered a lock I could figure out what part he was talking about. So loop one end of the spring around the end of the rod which would be on the outer (in terms of the window track) area shown in my newer post with the green circle. That matches the picture there (left of updated post) since when installed in the door there is a rod and yellow plastic piece in that open area (green circle). Then given the length of the home depot spring, I attached the other end to the external door handle area. (adjusted slightly so that you don't poke yourself reaching into the handle from normal use)

I just updated the thread post #3 picture to be less confusing. You can tell that big window track is there in the original post #1 and also my update. This was on a driver side door so the right side of the picture is actually the exterior of the door. Aimed a shot looking into the "access port"

Below is what I think it will look like looking backwards into the passenger lock inside the access port. I imagine reaching in with your left hand to the outside of the window track to hook the spring bottom then reach up to a suitable hook spot on outside shell of the door like the external handle hole.

lock2.jpg


COULD YOU ELABORATE on your update
Updated both posts to be more detailed. The external spring is doing exactly what the failed internal spring is doing. Holds tension upwards on that one piece of the lock setup. Make sure to fish out any busted spring from your existing lock. I ended up not using the replacement lock setup I bought once I was able to better understand the mechanism. The 4.5" spring from that Everbuit home depot pack has proper tension w/o adjustment.


Thanks for the elaboration BUT it turns out it's my lock motor/solenoid that failed.....just had it opened up and made this discovery..... was going on spring issue assumption being more common issue. Hearing the solenoid working right behind it (passenger rear) didn't clue me in off the bat.
Now I have two bad solenoids....this and drivers rear. Cheap drivers door jamb metal bent out where solenoid connects / rivets to ...thus removing needed resistance/mounting and being like that for a bit then taxed that solenoid into failing before I could fix door / ripped metal.
Oh well !


The riveted-in piece is actually a metal bracket that can be re-used. You leave it in the door and kind of tease out the actuator. Actuator has two plastic bumps that hold it in. I have found the need to break the original actuator rod (plastic part) to get it out. Then put in the replacement one.

I think I have replaced all actuators and a rear one twice. Factory ones were better but at least works. Teflon spray the lock setup to try and make it easier on the actuator. I know the helper springs are needed for good unlock.


^ Good tip. BTDT.


The riveted-in piece is actually a metal bracket that can be re-used. You leave it in the door and kind of tease out the actuator. Actuator has two plastic bumps that hold it in. I have found the need to break the original actuator rod (plastic part) to get it out. Then put in the replacement one.

I think I have replaced all actuators and a rear one twice. Factory ones were better but at least works. Teflon spray the lock setup to try and make it easier on the actuator. I know the helper springs are needed for good unlock.
Thanks for the info...AGAIN....at a glance one wouldn't guess that... I just found some replacement actuators/ solenoids on Ebay...as mentioned without a bracket.....put on watch list.
I didn't mention on prior post but I did do a McGuyver repair on damaged door for rear one AFTER that solenoid started sounded like one at main security door at NORAD.....turns out it was shot at that point.... a lesson in procrastination. Well at least now I know I can just mount replacement inside of brackets on these .....does seem like a tight little headache to get in there and replace them though...but doable. 👍


Yeah make sure you are relaxed and not in direct sunlight but have a headlamp or something. Can be frustrating at first.

FYI about my amazement is that he totally nailed the understanding of the Gen2 front lock mechanism by chance (all while not wearing a shirt). He grabbed a spring from a later model but correctly attached it to the proper spot, which I did not do at first. I wish I had been paying better attention originally and wanted to update my post.


Back
Top