410Custom's builds a 2007 Ranger V8 - custom truck build - Project "Ranger Premier" | Page 26 | Ford Explorer Forums - Serious Explorations

  • Register Today It's free!

410Custom's builds a 2007 Ranger V8 - custom truck build - Project "Ranger Premier"

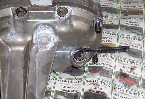
Exhaust downpipe supports built to sit in the factory 5.0 hanger

171_021217_120000000.jpg


Parts removed and ready for final welding
Holley provided 02 sensor wiy bung also in place, requires drilling a 7/8” hole

Holley provided bung
171_021243_490000003.jpg


5.0 exhaust hanger in place
You can also see the Holley transmission wiring harness has been installed

Here is the harness as shipped

171_021230_440000003.jpg


171_021217_140000001.jpg


171_021217_150000002.jpg


There are several loose wires included with the holley, reverse trigger, od on off, and others
You can also see the included harness for the optimal transmission line pressure transducer which I plan to add to our 4r70w


171_021217_180000004.jpg


I thought it was interesting that all 10 pins are populated in the 4r70w connector, this is the 98-01 4r70w harness


171_021217_160000003.jpg

Interesting, during setup we will be telling the new computer what trans we have so I assume this works with both 92-97 versions of the 4r as well as our 98-01
Style solenoids
Hard to wrap your head around when you are the guy always moving these pins around and deleting power feeds? How can the Holley computer move battery power from one wire to a different one and replace it with the solenoid trigger wire?? It maybe that the wiring changes for our 98-01 specific model happen upstream and they just leave all 10 pins in place.
Yes I have a tendency to over think things.

More on the “loose wires” in the 4r70w Holley harness


171_021230_390000000.jpg


171_021230_410000001.jpg


Compared to the wiring I normally have to do for a v6 to v8 conversion this is a breath of fresh air. Getting the 07 truck can bus system to be happy with it is another story since the 07 sohc pcm was part of the system. More on that later as we get deeper into this
This Holley system would be perfect for say a 1988 bronco ii that was going 5.0 lol lol 20 years later!!

171_021230_420000002.jpg

The Holley harness includes connectors for both types of 4r70w oss sensors just fyi

CF321528-2587-4399-BF85-23DC2BD7818F.jpeg


Holley wiring harness is very high quality


Join the Elite Explorers for $20 each year.
Elite Explorer members see no advertisements, no banner ads, no double underlined links,.
Add an avatar, upload photo attachments, and more!
.


Now more on the exhaust pipes and how they fit a ranger I have them tucked up higher then the frame rails and there is a ton of room in here compared to a stock 5.0 system, very good for keeping the trans cool!

02 sensor mounting info from holley
Basically within 10-12” of the header collector on one bank and mount it so no moisture can hit the tip


I picked a nice spot where the wires can reach easily, plenty of room for 02 sensor socket, and it’s tucked up where it won’t get sprayed by road grime or hit by rocks, also does not impede your access to other fasteners

Whew a lot goes into these simple things when you type it out

1648919241255.jpeg

171_021243_500000004.jpg

171_021317_400000000.jpg


I left these bends in place in case the superlift is ever removed it should still clear the front pinion. Why would you ever? Who knows, these trucks can be on the road for 20-30 years you never know what will happen….


171_021303_230000001.jpg


171_021317_410000001.jpg

More pics of starter area


171_021303_240000002.jpg

171_021243_460000001.jpg


Lots of space for a larger/taller setup on pass side


171_021243_470000002.jpg


Here is where the dual 2.25” pipes are headed on the ranger i take one over and one in the factory spot of the crossmember

171_021243_440000000.jpg
171_021317_410000001.jpg


yes, please update with the holley system. i just picked mine up today, and opened up the box. first thought was........what the hell did i just get myself into.....
but that was first glance. i havent really looked it over too much just yet. i will be using the factory coils, iac, tps, but using different coolant temp, crank trigger, iat. i also will have to get a 3 bar map sensor. i might try and find a knock sensor because the block that is in the truck was drilled for one when the motor was at the builder. most of them i and getting from here Lowdoller Motorsports


The terminator x also has a built in map sensor you can use if you don’t want to source a 3 bar one

I just lowered the truck down on the lift = the exhaust is done for now

Next I can assemble the engine bay
The Holley will be going in now

Read the quick start guide it is very helpful

Exhaust pipes were removed one more time for final welding
171_022138_230000000.jpg


cleaned up and re installed, x pipe will go in when it gets here
171_022138_230000001.jpg


first the passenger side pipe, slides into the 5.0 factory hanger assembly
171_022141_300000000.jpg


followed by the drivers side, slides into the lower spot of the same hanger, from the other side


171_022145_470000000.jpg


The drivers pipe support also includes the first clamp, which will allow this exhaust to come out in 3 sections
171_022145_470000001.jpg


The little heat guard on the side of the 4r70w that protects wiring harness was slightly bent to clear new support
171_022158_150000000.jpg


171_022158_150000001.jpg


tons of airspace between trans and new downpipes!
171_022145_470000002.jpg


time to install the Bosch wideband
171_022148_310000000.jpg


171_022148_310000001.jpg


pipes tucked up nice and tight
171_022148_310000002.jpg


pretty
171_022148_320000003.jpg


171_022150_510000003.jpg


some final shots before I lower the truck
171_022150_510000000.jpg


171_022150_510000002.jpg


4406e clearance in a ranger using my crossmember/mount
171_022150_510000004.jpg


and she's down!
171_022154_180000000.jpg


Next up lets complete the 5.0


It appears as though you were laying on the floor looking up for a few of those pictures.
I think that a fairly high percentage of the general public, those who would never attempt any of this themselves, don't realize how much planning, fitting, installing, take apart again, re-fit, install, remove, finish welding or fitting then the final installation is involved to achieve the end result/s.
Very good work Jamie, you have a very high level of perseverance. :thumbsup:


Thank you very much

You nailed it
Yup Lying on a creeper checking it all out

The exhaust pipes were in and out of the truck about 15 times while fabricating

I have an special 19mm swivel socket on 3/8” drive extensions with Milwaukee 12v powered ratchet that makes short work of getting them in and out, but Patience is needed for this sort of work to get everything placed where it won’t bang around, won’t melt anything, won’t heat up the floorboards or boil the atf. A good mechanic has much much patience and working over your head all day on your feet…. Well you could say I sleep good at night during the spring time!

Now I will be cleaning, detailing, modifying and installing 302 parts for a while time to get out the soldering iron!


You ready for an update? Lets do this. Few pictures to get through
Some of this maybe boring........... unless you are installing, thinking of installing, or even just wondering how you install, a Holley Terminator in your RBV, :)
In that case this will be very interesting, just like it was to me!

First up, the magnaflow 2.25" X pipe arrived, what a neat piece this is, perfect spread for our twin 5.0 pipes
171_121954_440000000.jpg

Yes those are new Beltech Chevy rear 1" lift shackles, these will actually give the rear of this truck a .5" lift at the axle.....this truck needs them...........more on that later

after much deliberation and checking the perfect location for the crossover pipe was chosen
171_121951_140000000.jpg


slipped right in place just after the transmission crossmember
171_121951_140000002.jpg


171_121951_140000001.jpg


Now I was able to measure and mock up a set of imaginary mufflers
Which lead me to actually ordering two mufflers....I settled with Spintec 3000 series 2.25" low inlet and 2.5" centered outlets.....
This thing is going to sound sooooooo good
171_121957_320000000.jpg


They are nice and compact (4x8x13.5), I love the spintec design, I have heard good things........I have wanted to try one of these mufflers behind a 5.0 for some time and now we are going to try two :)
I know Eddie Money will approve...cammed 302 tuned and run through this exhaust? I can't wait!


Now for the Holley install, this thing is so sweet, once you see what is possible with this Holley system for these conversions it is easy to justify the $$$ spent. The wiring is simplified BIG TIME if you want to convert a v6 truck to the Ford gt40/4r70w setup
That does not mean there is not some wiring, because there is.
And there is a complex installation happening here, but the end result is going to be oh so sweet. I am now saving my pennies so I can put one of these in my daily driven Bronco, and one in my upcoming Sport Trac project too.....

The Holley EFI terminator PCM and harness kit we got for this truck starts right here
171_122007_590000000.jpg


This is the main harness (558-104).
This connects our drivetrain/truck to the Holley PCM
There are also sub harness that connect the truck and more drivetrain to the Holley main harness and thus PCM
These include:
Power harness
Injector harness
Transmission harness (4r70w)
Input and output harness
(for controlling e fans, ac, more)
Ignition input harness (558-304) (in our case this has leads for a CPS camshaft position sensor and CSS crankshaft position sensor)

Ignition output harness and then there are several various ignition harness' available from Holley.
This is where the majority of the wiring will take place depending on which ignition system you decide to control. We are going to stick with the factory Explorer EDIS waste spark ignition and the Ford coil packs.
To do this with the Holley you will need an ignition harness to connect the Holley PCM and some coil drivers to handle the two coil packs.
Our ignition is waste spark, which means it actually fires two cylinders at a time, one spark is simply wasted on a cylinder that is on exhaust stroke, wasted.

Holley does not make a plug and play ford EDIS coil pack ignition harness, instead we have to build it ourselves. This is true for many of the ignitions the Holley is capable of controlling. To run a coil near plug ignition is also very possible with the Holley.
When our kit was purchased many of the options they have now did not exist, but that is okay.. we are not afraid to do some wiring here.

For the ignition I am using a universal coil on plug harness (558-307) from Holley that plugs the terminator PCM into our 4 channel coil drivers (554-123) and then will be wired into the stock coil packs. This took a little bit to sort out, but has been done now, I even made a map in Autocad.

This is the PCM side of the main harness, you can also see the main power harness (coiled up) and I am holding the small plug where the Holley handheld 3.5" controller plugs in.
171_122041_400000000.jpg


This is the ignition adapter harness for HEI ignitions, (ignition signals in) it includes connections for a 3 wire CPS and crank sensor. I had ordered a motorcraft 2 wire cam synchro (98-01 5.0) but during my research I would learn that other Holley efi users have a difficult time getting a reliable signal from the 2 wire. As a result I ended up ordering a 3 wire cam synchronizer and sensor…(96-97.5 5.0)
171_122041_400000001.jpg


Here is the inputs and outputs accessory harness
171_122041_410000003.jpg


main harness connections for various engine sensors listed below, on top n the pic the WB02 lead
171_122041_410000004.jpg

I will cut these ends off and solder in the factory ford connectors

Here are the 4 channel coil drivers needed to run the ford coil packs
171_122041_400000002.jpg

Again I will be removing many of these plugs and simply soldering the wires, making a tailored to fit streamlined drivetrain harness.


The Holley main harness (558-104) in addition to the sub harness above, will have connections to:
CTS (coolant temp sensor, PCM)
WB02 (bosch wideband 02 sensor)
Fuel Pressure Monitor (I ordered a transducer for this to add to our fuel rail)
Oil pressure monitor (ordered transducer to add to 5.0)
MAT (manifold air temp, for us Ford dudes this is the IAT intake air temp sensor)
Knock sensor (optional, we are not going to add one)
MAP (the terminator PCM has an internal MAP sensor that will work for non boosted setups) We may or may not add a separate map sensor depending on plumbing to the PCM
TPS (throttle position sensor, stock 98 explorer)
IAC (idle air control valve, stock 98 explorer)

Stock Explorer 5.0 systems that we will be deleting:
MAS
, no more mass air flow sensor to plumb in
EGR, no more EGR system, a simple block off will be fabricated at the intake and passenger header
Canister purge and canister vent solenoids (I am working on adding separate holley module that can control a simple canister purge solenoid. I like to retain the stock charcoal canister and use a purge valve to burn off EVAP emissions into the intake just like the stock systems do)

Loose wires
Included in the main harness are several inputs and outputs, like for controlling AC WOT relay, electric cooling fans.
There are also two CAN BUS wires, I am not sure what these are capable of talking to or from just yet. aside from communicating with the Holley handheld or Smartdash (yes please!)
The transmission harness has wires for OverDrive on and off controls, NSS Neutral safety output (good for E shift t cases), and reverse light trigger.
Other loose wires are for power connections, fuel pump control, and some ignition stuff we do not need.

On my PC now are many Holley wiring diagrams and instruction pages. I have spent much time researching, plugging in and stretching, identifying and getting myself familiar with every single wire, until I was ready to finally begin the actual installation of the equipment.

I have been putting together Autocad drawn diagrams/Maps of the Holley wiring that will be going into this truck, once they are confirmed they will be posted.

stay tuned!


sick!!!! wish those were legal here ;)


I was glad to see in Holley's dozens of makes and models that Ford 1992-1997 was a different option than Ford 1998-2001. Those 2 different kits are designed for the different 4R70W transmission connectors. I just looked through all of the available options for Ford, GM and Mopar and man when I say dozens of options, it is. Coyote, LS varieties, Mopar HEMI, 4bbl, TBFI... on and on.
Looking good Jamie!


The plugs you have circled are (left to right)
Ignition adapter for tachometer feed, (not used)

O2 sensor adapter (used)

And the inputs and outputs accessory harness

Thank you! I can’t wait to get this sucker purring


well, it started snowing here.......again.....looks like its going to be a couple more weeks now until i can start on this......joy.

in the meantime i will watch this thread (like i have for the past two years lol) for its updates


Some delays! Holley ignition harness came in
So did the Spintech mufflers

Wiring is happening now
171_261156_430000002.jpg


These mufflers are built very stout! Compared to most this size, these are way beefy!!
Here is a look inside the inlet, you can see the path the exhaust takes into the "spin" chambers
171_261156_430000003.jpg


And from the outlet, how the exhaust exits the chambers
171_261156_430000004.jpg


unfortunately, I had to wait for the Holley ignition harness to get here
I am using coil on plug universal harness


171_261156_430000001.jpg


This harness plugs into the coil drivers the other side comes with pins on the wires, and this will get pinned into the existing PCM connector


So now I was able to lay out the entire Holley system! Please note the transmission harness and wideband 02 sensor were already in the truck, so not pictured.
171_261202_440000000.jpg


you can see bottom right, this is one of the two transducers I purchased on Amazon, one is for transmission line pressure and the other is for fuel pressure. Both will get plumbed into the truck and give us info on the Holley 3.5" screen interface.
The black "PCM" will get mounted in the center console (or under pass seat), the main wiring will run through the floor plate and up the spine of the transmission

The new ignition harness is pictured plugged into the coil drivers, ignition wires for our Ford coil pack setup will get pinned into the pcm
up close
171_261202_440000001.jpg


ignition side of things
171_261202_440000003.jpg


fuel injection harness, connectors are for 96-97 style injectors, I changed these over to EV46 connectors for our 98-01 "returnless style" 19# 5.0 injectors

171_261202_440000004.jpg


the rest of the drivetrain connections
171_261208_330000000.jpg


on the right is our GM HEI ignition input harness, this hooks to the stock 5.0 THREE WIRE (3) CAM POS SENSOR (do not use the 2 wire) and the stock 5.0 crank sensor

Above it are connections for oil pressure, IAT (intake air temp), MAP (3 bar map sensor, unless you use the one built into the PCM), IAC (idle air control), TPS, knock sensor (not using), fuel pressure, and coolant temp sensor (CTS, for the computer)

I hit up the junk yard to get factory pigtails, this way I did not have to hack up one of my harness since some connectors are 96-97 and some are 98-01. I nabbed several connectors off of a v6, no difference
'
This system is now going in the truck, stay tuned.


Oh yeah.... I almost forgot........ the most important part

This is the chart I built in AutoCAD showing the Holley Terminator X to Ford DIS coil pack ignition

171_261301_000000000.jpg


I took pictures directly from each Holley component installation manual as well as my trusty Ford wiring book and inserted them directly into the cad file. Then I drew a simple chart so we can make sure to have a perfect understanding of each circuit and each wire.

THIS HAS NOT BEEN TESTED YET
I take no responsibility for you wiring up your project
I am simply sharing with you guys my build and how this all plays out.

With that said, the wiring shown is very straight forward (no guesswork involved) thus I expect this to be how the truck gets wired final

Anyone who wants this chart PM me and I will send PDF file
I will host the pdf file and make it available here too.... I will also get a .jpg posted that can be read!! LOL


That's great work and thanks for the reference, for the time to do that. I would love to have an aftermarket EFI, for the COP and advanced tuning, but the pricing and that none can yet run a 6R80, hold me back. If they did add the trans control, I would have to buy it.


Quick 6 Kit Builder found this when looking for a standalone for other usage :D
That's great work and thanks for the reference, for the time to do that. I would love to have an aftermarket EFI, for the COP and advanced tuning, but the pricing and that none can yet run a 6R80, hold me back. If they did add the trans control, I would have to buy it.


That's the go to controller for a 6R trans now. I'm hoping that Holley or Pro M develop one of their EFI systems to include the 6R instead of the 4R trans. That Quick 6 controller is $1300+, so it would be very helpful if an EFI system had it included.
what else was the 6r made in? i assume the trucks made the 4r popular, so if we can make the 6r popular w demand i assume it would be done someday!


You guys know the 5.0L starter location interferes with the 6r. You'll need to modify the 6r housing to accommodate the starter and thus voiding any warranty on the expensive trans. I looked into the 6r about 2 years ago for this build and that, plus the price of the extra controller made this a no go for me.


Join the Elite Explorers for $20 each year.
Elite Explorer members see no advertisements, no banner ads, no double underlined links,.
Add an avatar, upload photo attachments, and more!
.


You guys know the 5.0L starter location interferes with the 6r. You'll need to modify the 6r housing to accommodate the starter and thus voiding any warranty on the expensive trans. I looked into the 6r about 2 years ago for this build and that, plus the price of the extra controller made this a no go for me.
That's where I started also, seeing what others did with the adapter kits and cutting on the trans. Then I saw youtube videos of people making their own thin adapter plates. I didn't like the $700+ adapter kits, especially the weak looking TC stud extensions. So I asked one of those people making a 1/4" spacer(they welded a nut for the two bolt starter onto that), what is the interference area. That man had pictures of the interference, a drawing he made.

From that I thought, why use any adapter, why cut the trans at all, why not use the three bolt starter, 6R torque converter, and cut the block instead? So I will see how well a spare 302 HO engine I have will bolt to the 6R, cutting off the lowest block bolt hole where the starter is. The other bolts all line up, five should do fine unless you're aiming for 1000hp etc. Then the 6R is all bolt in using the OEM parts, back to the transfer case(late model bolt pattern). I'll see if I can make an extension there for the AWD or a BW4406 etc. That Quick 6 controller adds another $1300 to the swap, which is not cheap counting the other steps. I figure a good $4k may be a close estimate given the required controller, two new R&P gear sets, driveshafts, and the extension and TC. I did already order the 3.08 rear gears.

I'll delete my last post about the 6R, clean up your thread a little.


Back
Top