Got timing cover off and didnt find a bad tensioner. Pics and vid inside. need advise | Page 3 | Ford Explorer Forums - Serious Explorations

  • Register Today It's free!

Got timing cover off and didnt find a bad tensioner. Pics and vid inside. need advise

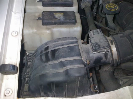
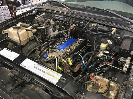
thanks for the reply man. those peices in my picture are deffinately from the balance shaft tensioner. The small peice of plastic in my picture was actually still mounted by itself on the tensioner. i pulled it off to take the picture. When i put the bad tensioner together, it fits ttogether perfectly. those strips indeed fit in with the old balance shaft tensioner. There was nothing in the motor or pan that belonged to my primary tensioner. I also had to undo the primary tensioner to install the new guide and it felt good. Everything is tight and there was no play in the primary chain at all. It is super tight with no metal to metal conact. The cam chain and tensioner are very solid as well. I pulled the oil cap while the engine was running and there was nothing out of the ordinary with the chain that would be causing the sound. I see what your saying about my primary though. I shoiuld say also, that i was looking at it earlier and didnt see anything that would be broken on the primary tension. Very odd but i cxant rule that out. Its just that when i was looking at everything before i buttoned the motor up, everything looked solid. Houston we have a problem. dammit lol


Join the Elite Explorers for $20 each year.
Elite Explorer members see no advertisements, no banner ads, no double underlined links,.
Add an avatar, upload photo attachments, and more!
.


the part in question was also orange in color as was the rest of the broken tensioner. in the pic, it does look black but it isnt.


The closeup helped

From the closeup Bob posted I can tell that the plastic end piece is definitely missing but that the metallic strips are still there. I guess the metallic strips found in the oil pan were from the balance chain tensioner. The metallic strips in the jackshaft tensioner have a slot in them for the plastic to pass thru. The photo below is an end view of the tensioner.
PrTiEnd.JPG

The red arrow identifies the plastic end that is missing. The green arrow identifies the position of the metallic strips with the pin still inserted. I am hesitant to pull the pin not knowing if I will be able to reinsert it. The hole for the pin is the weak point in the plastic and I think the location of the break. The yellow arrow identifies where the plastic passes thru the slots in all of the metallic plates. I haven't yet determined how the spring pressure is actually generated but it is obvious that the chain contact area should be exerting force on the chain. In the photo of the broken one the metallic strips are against the mounting bracket backing because the plastic end piece is missing. It looks like one of the strips is turned at an angle because there is no plastic to keep it in position. Tomorrow morning I will inspect my broken tensioner to see if I can better understand how the thing is designed to work.


I agree about the pieces

I now agree that all of the pieces shown in the photo found in the oil pan are from the balance chain tensioner. The hole in the small piece is too large to be from the primary tensioner and the slot matches the other end. My old primary tensioner was not exerting any force at all against the chain and had only about the equivalent of 15,000 miles of wear instead of 150,000. I can't tell what besides the upper piece of plastic keeps the metal strips from slipping up and out. About an inch from the lower end the metal strips reduce in width to about one third of the upper end. I know on my broken one that they pivot freely with the plastic about the lower metal pin. If the lower section prevents them from slipping out I would be less concerned about leaving the situation as is.


I now agree that all of the pieces shown in the photo found in the oil pan are from the balance chain tensioner. The hole in the small piece is too large to be from the primary tensioner and the slot matches the other end. My old primary tensioner was not exerting any force at all against the chain and had only about the equivalent of 15,000 miles of wear instead of 150,000. I can't tell what besides the upper piece of plastic keeps the metal strips from slipping up and out. About an inch from the lower end the metal strips reduce in width to about one third of the upper end. I know on my broken one that they pivot freely with the plastic about the lower metal pin. If the lower section prevents them from slipping out I would be less concerned about leaving the situation as is.

I agree with you that something is deffinatly up with my tensioner. What do you think about the idea of pulling my valve covers first? It shouldnt be a problem to just pull the timing cover if the primary is indeed the problem right? We know my oil pan is clean and free of debris so we dont need to go through that hassle agian thank god lol. Is the valve cover removal a pain in the ass? Im used to workin on pushrod motors so everything i do with this motor is new to me. First things first, pull both valve covers? thanks fellas for everything


Pick up a Mechanics Stethoscope and see if you can pinpoint where the nose is.
It could be that the balance shaft chain and sprockets are just worn.

41UyUj6cq1L._SL500_AA280_.jpg


Handy tool to have even if it doesnt help.


Pick up a Mechanics Stethoscope and see if you can pinpoint where the nose is.
It could be that the balance shaft chain and sprockets are just worn.

41UyUj6cq1L._SL500_AA280_.jpg


Handy tool to have even if it doesnt help.

i have a doctors stethoscope. my dad is a doctor and he gave me one for this purpose but i dont think it will work as good as the one pictured. im gonna look into the truck a little more tomorrow and then report back. i will also try the scope. thanks


tensioner comparison

The photo below compares the new tensioner with the old tensioner. The blue arrows indicate where the tensioner base keeps the tensioner in position and prevents it from working it's way off the pivot post. The yellow arrows indicate a lip on both sides of the chain contact area that result in the chain keeping the tensioner in position.
TCompare.jpg

The red arrows indicate how the plastic end pieces keep the metallic strips (only three instead of six) from sliding endways. The green arrows indicate plastic tabs that keep the metallic strips from sliding sideways. I was able to easily lift the old tensioner piece off the pivot post. I should point out that I detected no broken pieces on my old tensioner but it was not exerting any force against the chain.

In your case I believe that the timing chain will keep the tensioner in place because of the plastic lips. As the plastic wears a groove the width of the chain will be cut further keeping it in position. My concern is that without the plastic end piece the metallic strips might work their way up and out of the tensioner.


retainer pin?

Please take no offense but did you remember to pull the retainer pin from the balance shaft chain tensioner?

Removing either valve cover is a pain and takes several hours. The upper intake manifold must come off for either side. The driver's side requires disonnecting the coil pack connections, disconnecting the DPFE (don't disconnect the hoses, they are brittle and might break) and loosening the dipstick tube mounting bracket. Removing the passenger side requires disconnecting the water hose that goes to the heater control valve. I had to use two 1/4" drive wobble extensions to loosen one of the rear cover bolts because of the bulge for the rear camshaft sprocket.

I bought one of the mechanic's stethoscopes and still couldn't locate the source of the chain rattle which was the rear chain contacting the guide assembly upper positioning post. I had as much luck with a length of flexible hose as with the stethoscope. My rear timing guide assembly was destroyed but it looks like almost all of the pieces were trapped in the upper rear of the block and never made it to the oil pan. I'll know for sure when I pull the pan today. When I started pulling guide pieces out of the block I was amazed how fortunate I was that the chain never broke.

In my opinion, if you plan to keep the vehicle for several more years I suggest that you pull both valve covers and inspect the guides. You'll need a rectangular mirror and a light to see into the rear cassette area. I used a replacement rear view mirror I purchased many years ago for one my vehicles but never installed. Even if the rear cassette is still in good shape, the time spent to inspect it is worth the piece of mind of knowing it is reliable.


no offense taken man. yeah i pulled the pin. i just have to figure how im gonna tackle this.


*higher quality vids this time but i just uploaded them so they may take a couple more minutes to optomize*
I took some videos this morning. The first couple of starts and idles were quiet with minimal to no noise. Then after i shut it down a few times, i got it to start rattling. it will do it from start, idle, and all rpms. I used the stetheoscope and narrowed it to the drivers side front valve part of the valve cover. It was loudest there. you coiuld here a tad bit of noise on the passenger side, but it was only the noise vibrating over to there. The last video shows chain slack when i rotate the engine. I beleive i made an error while talking in the last video. I was rotating the clutch fan bolt at the water pump. So when im saying that im rotating the engine clockwise, I wasnt doing it at the crank but actually i was rotating it at the water pump, which would be the opposite way. The last video shows the valve cover open and the tensioner moving in and out causing slack. Is this normal? I owe you guys big time for your time and patience. FYI, i did rotate the engine when i was doing the balnce shaft to see if there was any play in the primary tensioner. it never had any slack, although, if we can kick this problem in the butt, i will replace the primary for preventitive measure.


Video 1- quiet start and idle
http://www.youtube.com/watch?v=ITG-U2g40YI


video 2- noisy start 1
http://www.youtube.com/watch?v=d3Jo9AbvJA4


video 3 - noisy start 2
http://www.youtube.com/watch?v=bklgjflpUxU


video 4- inside oil fill with engine running
http://www.youtube.com/watch?v=5GNvigGrPg8


video 5- Valve cover off and inspection of cam chain
http://www.youtube.com/watch?v=mxZlY_-ZhGc


The shiny silver cylinder you are wondering about in video number 5 is the hydraulic chain tensioner. There is a kit for replacing it which includes an anti drainback piece to keep it from losing oil when the engine is shut off. Search for "00M12" or check out 2000StreetRod's excellent thread

Things looked good under the valve cover. The hydraulic tensioner could be bad, can't tell by looking. I don't know if there is a spring inside that one. If so, yours looks like the spring is weak.

While you've got the valve cover off, check for bad lash adjusters.


on the intake side off the left head is the primary chain tensioner, the part you saw moving when the chain was compressing it. Take your vin and head to the ford store and get that. youll also want upper intake seals as you'll need to unbolt the upper to slide the tensioner out. You'll see what I mean. The guy/gal at the parts counter should know exactly what you need as these are done daily by the techs. I always replace this tensioner first as an attempt to reduce chain noise after a cold soak, as the oil tend to leak out and cause tremendous and terrible noise as the loose chain bounce off everything until the tensioner refills. Best of luck.

T


Can you not get to that without removing the upper intake?


YL-2Z-9E473-AA ($48.39 from Tousley Ford) includes the left head primary tensioner and seal, upper and lower intake gaskets/seals, oil drain restrictor and access plug.

This is the kit that Ford offered to reduce start-up chain noise. Oil would drain from the tensioner when the engine was off. At start-up, there is chain slap until the tensioner is pumped up again. The oil drain restrictor is meant to reduce or eliminate that cause.

This thread really is required reading for 4.0 SOHC owners.

mine does the noise ffor as long as the engine is running. not just at start up. As shown in the first video, some times it wont make the noise. Does sound like a tension problem though, just not the problem as exactly described by the tsb


mine does the noise ffor as long as the engine is running. not just at start up. As shown in the first video, some times it wont make the noise. Does sound like a tension problem though, just not the problem as exactly described by the tsb
In my experience the tensioner kit fixes 80% of the vehicles or at a minimum makes it bearable. for the price and the minimal amount of work its worth a shot. I dont believe the tensioner will come out without removing the intake. Dont let the intake scare you it really comes off quite easily, careful with reassembly as not to cross thread any of the bolts that go into the plastic or create any vacuum leaks with misplaced rubber seals. pretty strait forward job, much less involved than what you've already been through. as vargas said purchase the kit, Youll need all the parts.


In my experience the tensioner kit fixes 80% of the vehicles or at a minimum makes it bearable. for the price and the minimal amount of work its worth a shot. I dont believe the tensioner will come out without removing the intake. Dont let the intake scare you it really comes off quite easily, careful with reassembly as not to cross thread any of the bolts that go into the plastic or create any vacuum leaks with misplaced rubber seals. pretty strait forward job, much less involved than what you've already been through. as vargas said purchase the kit, Youll need all the parts.

Ya, why not try something easy for a change. I don't know if you noticed the other thread about the main chain before it got deleted but, one of guys had a service manual Im trying to get to share with you guys that are in the middle of this.


Join the Elite Explorers for $20 each year.
Elite Explorer members see no advertisements, no banner ads, no double underlined links,.
Add an avatar, upload photo attachments, and more!
.


mine does the noise ffor as long as the engine is running. not just at start up. As shown in the first video, some times it wont make the noise. Does sound like a tension problem though, just not the problem as exactly described by the tsb


I'm thinking that the drain restrictor might be a help if installed in conjunction with a new hydraulic tensioner. Without it, there is oil exchanged in the tensioner for every starting cycle. If the tolerances in it are close, then contaminants brought in during that exchange could cause it to stick. The restrictor would reduce the exchange.

My SOHC has the start-up clatter until the tensioner pumps up. Normally lasts a second or so. On occasion it persists for about 5 seconds. I'm guessing the variation is due to a worn/sticky tensioner. I've ordered the kit and will be installing it next weekend, hopefully. It would be wonderful if the restrictor takes care of the 1 second clatter. I suspect the new tensioner will eliminate the 5 second occurrences.

Kit will also allow me to address the intake leak that has been messing with warm-up rpm.


Back
Top