1996 Ex repowering 1949 Mercury M-47 | Ford Explorer Forums - Serious Explorations

  • Register Today It's free!

1996 Ex repowering 1949 Mercury M-47

frosh1

Member
Joined
November 21, 2010
Messages
12
Reaction score
0
City, State
Great White North
Year, Model & Trim Level
1996 Eddie Bauer
Hi all,
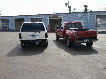
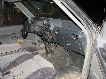
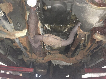
I saw the thread on the 1959 F-100 and couldn't resist sharing my own similar venture. I purchased an old hot rod 'project' many years ago because I loved the body style. It's a M-47 Mercury, same as a F-47 Ford pick up but slightly different trim and very rare. Problem is the 'project' had no drive train and very little of the original trim so I'm thinking 'rat rod'. Originally, I was think of finding a rolled Dodge full-size with the Cummins 5.9L in it, but this would have involved a huge amount of customization since the body would not be an easy fit to the modern dodge frame.
Long story short after much more research over the past couple years, the First and Second gen Explorer are a natural fit for this type of project.
Here's the M-47 Pick-up the Explorer will be upgrading:
040uz.jpg


Join the Elite Explorers for $20 each year.
Elite Explorer members see no advertisements, no banner ads, no double underlined links,.
Add an avatar, upload photo attachments, and more!
.


Ah, you figured it out...


REALLY BIG!!!

Anyways, looks like a really fun project.
Good luck and keep us updated, taking pictures along the way!


Explorer teardown Progress

This Fall I finally found an explorer for cheap enough... it could not pass a vehicle inspection. I really wanted a V8 Ex, but they are rare enough around here that I could not find anything for less than $2500-3000(for a V8), certainly not for just a few hundred bucks like this 1996 Eddie Bauer.

pa060002o.jpg


It needed some work which we have almost completed before we tore it down... rear parking brakes, rear shock absorbers, plugs, plug wires, drive belt.

Also did the throttle body shaft mod to it... seemed well worth it, but haven't driven it anywhere since.

pb010035.jpg


Still have the upper and lower ball joints to do.

This is the body after the intitial strip every thing that could be unbolted/unfastened is taken off.

pb040002g.jpg


In this pic the front dog house has been removed... spot welds were drilled... lot's of grounds and connections had to come apart as well.

pb130015.jpg


This pic shows the body removed except for the firewall... bare frame the rest of the way... look at all the electrical hanging.

I don't have the next picture to go with it... but a few quick mounts were fabbed up so key electrical components could be grounded and suspended. The frame is driveable again.

Winter has set in here during the end of last week so it is now undercover again untilt he snow melts. Hopefully in about March I will be able to dust it off again. I am hoping to start customizing the original M-47 cab over X-Mas to accept the Ex firewall, but the original truck firewall is 45" and the engine compartment tapers towards the front the Ex firewall is 55" and stays square to the rad support... I know I can make it work, but it won't be pretty. I am already planning to remove the original hinges from the M-47 hood so I can gain another 3"... this means a flip front end. This is just one of the many creative solutions I will need to do to make the truck appear reasonably 'stock' with the full Ex powertrain and accessories functioning within it.

Fell free to drop comments and questions, but I doubt any more progress reports will happen until the Spring. Cheers!


Tire Options

Couldn't resist one more thing I played with before it snowed.
I saw one of theose you tube videos on making your own whitewall tires.
I thought it might work for the 'look' I will be going for so I sprayed an orginal set of Ex Alloys with some Red I had sitting around and exposed the whitewalls on a set of good used Continentals I had sitting in the tire pile out back... pretty cool looking if you compare to the stock 16" rim setup I had. Should look kind of 'period' correct using all modern parts and very inexpensive. Curious to see what others think.
Stock 16"
pb130012.jpg

Stock 15" painted red, with white wall and original cap
pb130014.jpg

Cheers!


I've always heard that exposing the white inner wall of the tire was bad to do.


MASSIVE PICTURES!!!

Try resizing them I can only see like a fourth of the picture at a time.

Looks like a cool project tho.


Fun/interesting project though!


Lord, what have I started, lol just kidding bud! :)

Awesome project man, keep it up! What frame are You planning to use, or are you clipping the pickup frame?

Interesting side note....I'm using a mountaineer for my ford f100, and you're using an explorer for your mercury 47...that kind of irony makes me smile :)

Anyway, show detailed photos of how you will be intergrating the explorer firewall into the truck cab...I'm very interested in this...


You guys are crazy!!! J/K I just wish I had the place to work on projects. Good luck to both of you with these builds, I'm definitely subscribed to both now!


Nice59,

I'm using the full frame from the Ex. I want all the modern suspension and 4WD since I plan on using this truck mostly in the Winters when it's done. That's the other reason I'm desperately trying to keep the stock firewall intact so I can have modern heaters/defrosting and wipers, etc. So far it looks like I will have to relocate the power distribution box and cut about 5" from the driveside firewall to make it happen... unfortunately it's going to be a few months before I get back to it.


Please adjust your pics. Sheesh


Image sizing fix

Sorry about the huge pictures, I've tried some resizing and this is my first go at it... picture from almost a month ago now... it's well covered in snow now. I have been working on the old Mercury bodywork... spent sometime fixing the grille. This should make it all easier when I go to assemble in the Spring.
pb130011o.jpg


Project out of Hibernation!

Most of the snow has melted here in the Valley bottom so I dug the Explorer out to do some more frame prep before the new bodywork gets attached. First on my list was the exhaust, since it is easy to get at without the body in the way.
Here what it looked like:


After much cutting here is what I had to start with:


This oblong collector is a pain to match.
I cut my own flange with a plasma cutter. Then I took a 3" piece of exhaust and crushed the end in the vice to make it oblong so the shape was about right, but it was to small. So next, I cut a 6" slot on each side and stretched the end apart until it would slide over the existing collector. Finally, I bolted the flange on and slide th pipe into place, then proceeded to weld the works together at the angle I liked. That is what you see here... my 3" collector pipe.


The rest of the exhaust takes shape quickly; 2 1/2" magnaflow cat with an O2 bung I added, and 2 1/2" Glasspack muffler.


I am hoping to finish the tailpipes with a dual 2" set up, but this requires reworking a few more items around the back of the frame. I'm removing the useless spare tire carrier and putting in a remote battery and underbox storage in it's place. More to follow shortly.


Exhaust Finished

Finished the dual 2" Exhaust, after another trip to the local parts place to pick up little pieces. I've got just under $200 and 6 hours into it, but it's finally done save for the exhaust tips, but they will have to wait until the body goes on so I can get it just right.


I'm already further ahead on the remote battery/storage box, but the evap canisters are proving to be a real pain. I'm just over half done and will post some pics when it's finished. You can see the piece of angle iron in the above picture that serves as the back of the box.


Exhaust Tone

Realized I forgot to mention how it sounded... I was looking for a "hot rod" sound; mellow at idle with a bark when you give some gas. I like the sound now, but I think it may be a little too loud. Unfortunately, I can only guess because until I have a cab on the truck with all the sound deadening, what I think is too loud now might be just right.

Kinda frustrating especially since I'm going to have to tarp this project for a couple months again after I finish with it tomorrow... motorcycle weather and drag racing season start soon and I've got to be ready.


Remote Battery Box/Storage

Only had an hour today to try and finish the box today. Welded in some angle iron supports. Cut the 20Ga sheet metal. Gives me a box 20 x 23 and almost a foot deep. I just need to finish mounting the battery tray, but the picture shows the mock up. I will also build a new heat sheild for the fuel evap lines. Not much else I can do with this setup until the bed goes on and I need to figure out how to seal this and hid it in the floor.


I also fixed the various grounds. Put in a new 2Ga wire from the transmission to the frame and you can see the new ground from the battery to the frame. That just leaves a smaller ground to the cab once it is mounted. Heading out on vacation tomorrow... I'll give another update in about a week.


Back
Top