z0lt3c
Member
- Joined
- March 11, 2010
- Messages
- 13
- Reaction score
- 0
- Year, Model & Trim Level
- 06 Explorer EB V8
I went ahead and ordered an aftermarket Class III hitch for my 2006 Ford Explorer V8. I purchased the truck used about 4 months ago and for some reason the original owner opted to keep the standard class II hitch w/ the V8 engine. I have a boat, car and tractor that I like to tow around so a class II hitch was not gonna cut it for me.
Since I liked everything else about the truck, I decided to remedy the hitch situation by purchasing a CURT CUSTOM FIT REAR TOWING HITCH MODEL 47. I ordered the hitch from Cabela's, where they have it listed for $150, but after discounts and club credits I got it for under $100. This particular model mounts under the factory class II hitch, leaving the factory hitch exposed. It's finished in a shiny black powder coat and is constructed mostly of tube stock. It's quite a hefty piece with the following specifications;
Weight Carrying 5000 lb.
Tongue Weight 500 lb.
Weight Distribution (WD) 8000 lb.
WD Tongue Weight 800 lb.

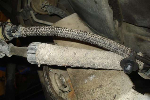
The installation was simple but took me quite a bit of time to complete fully. The hitch installation involves bolting the hitch onto the two rear frame rails using a "fishwiring" technique to position the bolts into place. This technique makes use of the existing access ports and bolt holes in the rails so no additional drilling is required.
I was able to fish 3 of the 4 bolts into position no problem using the tool provided in the kit, the instructions and this video from etrailer.com: fishwiring video. However, the last bolt got stuck in the frame rail and fell off the tool. I was delayed while I had to wait for this tool to arrive to fish the hardware back out: link to ebay tool. After getting the bolt out and re-curling the fishwire tool I was finally successful in installing the 4th bolt.
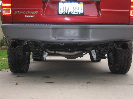
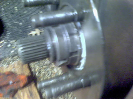
The finished product looks like the below. I still need to figure out a more elegant solution to handle the 4 flat wiring connector. So far I am much happier with this new hitch, and compared to how the factory hitch is welded onto the ends of the frame rails, this attachment solution looks more robust. My future plans include converting this to the round style connector and exploring options to add a transmission cooler.

Thanks,
Z
Since I liked everything else about the truck, I decided to remedy the hitch situation by purchasing a CURT CUSTOM FIT REAR TOWING HITCH MODEL 47. I ordered the hitch from Cabela's, where they have it listed for $150, but after discounts and club credits I got it for under $100. This particular model mounts under the factory class II hitch, leaving the factory hitch exposed. It's finished in a shiny black powder coat and is constructed mostly of tube stock. It's quite a hefty piece with the following specifications;
Weight Carrying 5000 lb.
Tongue Weight 500 lb.
Weight Distribution (WD) 8000 lb.
WD Tongue Weight 800 lb.
The installation was simple but took me quite a bit of time to complete fully. The hitch installation involves bolting the hitch onto the two rear frame rails using a "fishwiring" technique to position the bolts into place. This technique makes use of the existing access ports and bolt holes in the rails so no additional drilling is required.
I was able to fish 3 of the 4 bolts into position no problem using the tool provided in the kit, the instructions and this video from etrailer.com: fishwiring video. However, the last bolt got stuck in the frame rail and fell off the tool. I was delayed while I had to wait for this tool to arrive to fish the hardware back out: link to ebay tool. After getting the bolt out and re-curling the fishwire tool I was finally successful in installing the 4th bolt.
The finished product looks like the below. I still need to figure out a more elegant solution to handle the 4 flat wiring connector. So far I am much happier with this new hitch, and compared to how the factory hitch is welded onto the ends of the frame rails, this attachment solution looks more robust. My future plans include converting this to the round style connector and exploring options to add a transmission cooler.
Thanks,
Z