black91EB
Well-Known Member
- Joined
- August 24, 2008
- Messages
- 465
- Reaction score
- 1
- City, State
- Millington, TN
- Year, Model & Trim Level
- '92 XLT 5spd 4wd
I recently had to replace the injector O-Rings on my '91 Explorer. I could not find a good write up on it, so here is mine. Sorry about the picture quality, if I have the chance I will get better ones.
Note: This is for a non-EGR engine. The EGR equipped OHV is slightly more complicated due to having to disconnect the EGR tube from the upper intake. Also, I am not a professional mechanic, so follow directions at your own risk.
The first step is to remove the air intake tube and the throttle cable assembly from the upper intake. The air intake tube is removed by loosening the 8mm clamp bolts at each end of it. The throttle cable bracket is removed by removing the 2 bolts, one of which is indicated by the arrow. The other is not visible from this angle as it is behind the cables. Both bolts have 8mm heads. Once you remove the bolts, pry the cable off of the throttle body with a flat screwdriver or similiar, it just pops off.

After you have removed the throttle cable, the next step is to unbolt the coil pack bracket so that it can be pushed aside to get the upper intake off. This is accomplished by removing the 2 bolts indicated in the picture, as well as the third one that is located down by the pass. side exhaust manifold. Just follow the bracket down and you will see it. All 3 bolts use a 13mm

After you remove the coil pack, you need to disconnect the throttle position sensor (TPS), the Idle Air Control (IAC), and one other electrical plug on the driver's side of the manifold. (Sorry, haven't gotten a pic yet, will add later) Also, the vaccum tree is at the back of the manifold on the driver's side, and all the lines will either need to be disconnected at the tree, or at their respective accessories, whichever is easier. I will get pictures of these and update as soon as I can.
The next step is to remove the nuts that hold the upper intake on. There are six of these, all 13mm and they go over studs that thread into the lower intake. The front one is indicated in the picture, the others are similiar. The ones not visible in the picture are located between the intake runners, and are easily accessed from the top. You will need a deep well 13mm and will most likely need a universal and a 6" extension for the rear most nut, and a 6" extension for the others. I completed the whole repair with 1/4" drive tools.

After disconnecting the wiring and vaccum lines and removing the nuts, the next step is to lift off the upper intake manifold. This can be difficult, as the intake gaskets adhere to the sealing surfaces really well. A light tap with a hammer just behind the throttle body will usually unstick the manifold, if not, careful use of a pry bar will also work. After you get the manifold off, you will see something like this:

(Note, I have already removed 2 of the 6 studs in this pic, you can see the 2 closest to the front are missing. Something about forgetting to take a picture...)
The studs have to come out next. The studs use a female torx driver that is difficult to find. However, a 5.5mm 6 point socket works really well, and saves you from having to find the special driver. Four of these studs are pointed out in this photo:

The next step is to remove the fuel rail from the lower intake. My Chilton's Manual said to remove the fuel lines, however, I found this unecessary. There is enough slack in the lines to allow you to move the rail over to the driver's side.
After removing the fuel rail, you can remove the injectors. Depending on your engine's mood, the injectors will either stay in the rail, stay in the lower intake, or some combination therof. (both 4.0s I have done had option 3, but I have seen others that were one or the other)
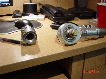
After removing the injectors, you need to remove the old O-Rings. A single edged razor blade works very well for this. Also, one or more may stick in either the lower intake or the fuel rail, and a small dental type pic works well for this.
This pic shows proper order of assembly on the nozzle end. The small plastic orange spacer comes off with the O-Ring, as does the black nozzle. Be sure to keep track of these parts. You can also see in the pic the condition of my 19 year old O-Rings. The second picture is of the box, showing the Borg Warner part number for the O-rings. They come 2 to a box, so you will need 6 boxes. They run around $1.30 a box.


After putting new O-rings on, it's time to reinstall the injectors. VERY IMPORTANT: install the injectors in the rail, not the intake. If you put the injectors in the intake and try to put the rail over them, you will be making a parts store run for more O-Rings The correct procedure is to press the injectors into their seats on the rail, then guide the nozzles into the intake. I would have taken pics of the cut O-rings caused by doing it the wrong way, but I was too busy hurrying off to get more... A small amount of lubricant is helpful in inserting the injectors. Just about any lube will work. (Thanks ranger7ltr for that catch)
After that, reassemble in reverse order, making sure to replace your intake gaskets and torque everything to the proper specs. Also, make sure you get all the vaccum and electrical hooked back up.
Feel free to add to this.
Note: This is for a non-EGR engine. The EGR equipped OHV is slightly more complicated due to having to disconnect the EGR tube from the upper intake. Also, I am not a professional mechanic, so follow directions at your own risk.
The first step is to remove the air intake tube and the throttle cable assembly from the upper intake. The air intake tube is removed by loosening the 8mm clamp bolts at each end of it. The throttle cable bracket is removed by removing the 2 bolts, one of which is indicated by the arrow. The other is not visible from this angle as it is behind the cables. Both bolts have 8mm heads. Once you remove the bolts, pry the cable off of the throttle body with a flat screwdriver or similiar, it just pops off.
After you have removed the throttle cable, the next step is to unbolt the coil pack bracket so that it can be pushed aside to get the upper intake off. This is accomplished by removing the 2 bolts indicated in the picture, as well as the third one that is located down by the pass. side exhaust manifold. Just follow the bracket down and you will see it. All 3 bolts use a 13mm
After you remove the coil pack, you need to disconnect the throttle position sensor (TPS), the Idle Air Control (IAC), and one other electrical plug on the driver's side of the manifold. (Sorry, haven't gotten a pic yet, will add later) Also, the vaccum tree is at the back of the manifold on the driver's side, and all the lines will either need to be disconnected at the tree, or at their respective accessories, whichever is easier. I will get pictures of these and update as soon as I can.
The next step is to remove the nuts that hold the upper intake on. There are six of these, all 13mm and they go over studs that thread into the lower intake. The front one is indicated in the picture, the others are similiar. The ones not visible in the picture are located between the intake runners, and are easily accessed from the top. You will need a deep well 13mm and will most likely need a universal and a 6" extension for the rear most nut, and a 6" extension for the others. I completed the whole repair with 1/4" drive tools.
After disconnecting the wiring and vaccum lines and removing the nuts, the next step is to lift off the upper intake manifold. This can be difficult, as the intake gaskets adhere to the sealing surfaces really well. A light tap with a hammer just behind the throttle body will usually unstick the manifold, if not, careful use of a pry bar will also work. After you get the manifold off, you will see something like this:
(Note, I have already removed 2 of the 6 studs in this pic, you can see the 2 closest to the front are missing. Something about forgetting to take a picture...)
The studs have to come out next. The studs use a female torx driver that is difficult to find. However, a 5.5mm 6 point socket works really well, and saves you from having to find the special driver. Four of these studs are pointed out in this photo:
The next step is to remove the fuel rail from the lower intake. My Chilton's Manual said to remove the fuel lines, however, I found this unecessary. There is enough slack in the lines to allow you to move the rail over to the driver's side.
After removing the fuel rail, you can remove the injectors. Depending on your engine's mood, the injectors will either stay in the rail, stay in the lower intake, or some combination therof. (both 4.0s I have done had option 3, but I have seen others that were one or the other)
After removing the injectors, you need to remove the old O-Rings. A single edged razor blade works very well for this. Also, one or more may stick in either the lower intake or the fuel rail, and a small dental type pic works well for this.
This pic shows proper order of assembly on the nozzle end. The small plastic orange spacer comes off with the O-Ring, as does the black nozzle. Be sure to keep track of these parts. You can also see in the pic the condition of my 19 year old O-Rings. The second picture is of the box, showing the Borg Warner part number for the O-rings. They come 2 to a box, so you will need 6 boxes. They run around $1.30 a box.
After putting new O-rings on, it's time to reinstall the injectors. VERY IMPORTANT: install the injectors in the rail, not the intake. If you put the injectors in the intake and try to put the rail over them, you will be making a parts store run for more O-Rings The correct procedure is to press the injectors into their seats on the rail, then guide the nozzles into the intake. I would have taken pics of the cut O-rings caused by doing it the wrong way, but I was too busy hurrying off to get more...
A small amount of lubricant is helpful in inserting the injectors. Just about any lube will work. (Thanks ranger7ltr for that catch)After that, reassemble in reverse order, making sure to replace your intake gaskets and torque everything to the proper specs. Also, make sure you get all the vaccum and electrical hooked back up.
Feel free to add to this.