Fbird
Well-Known Member
- Joined
- December 11, 2021
- Messages
- 105
- Reaction score
- 41
- City, State
- Atlanta, GA
- Year, Model & Trim Level
- 2006 Explorer Limited
Finally got around to actually installing the mirror dash cam with rear camera. YAY
My 06 back up lights have a black/green wire and a Brown wire (Brown is 12+)
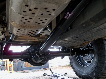
Only had to remove passenger visor. upper console, A,D and E-pillar, Center rear top, and the lift gate trim. Using a fish-tape we ran the rear camera line up to the front then had to remove the the wiring sleeve from the body to the lift gate. This was about the hardest part of the entire install. Seems Ford uses seam sealer in the inside portion of said "BOOT" so once you untape it from the harness, push the sleeve assembly INTO THE TRUCK so you can then remove the clob of sealer. THEN push it out of truck (while liftgate is half way down) so you can work on threading the camera harness through it. Be sure to have ALREADY extended your "rear view 12v wire. (I chose to solder and shrink and extra spool so I could cut what I needed when done) I used a piece of solid core 8 ga wire as a fishtape to pull the camera connection thru. Then reassemble sleeve/boot. Simply wrap the camera wire (and back-up activation wire) around current wire harness to get down to the license plate light area. Remove the license plate light assembly by 4 bolts AND the plastic clip (from the inside of gate) behind the FORD emblem. I chose the only option I could come up with for location...BOTTOM OF license plate. (not what I wanted but...oh well) Its easy to get camera connection into the grommet with the light harness then reassemble. Note there are 2 screws in the tail lights.
NOTES ON TRIM REMOVAL:
Note little METAL clip on B-pillar front door weather strip!
All interior trim panels pulled off TOWARD CENTER OF TRUCK.
Liftgate trim.......bottom and top pull straight off......THERE IS 1 clip on each side of the glass ..IT PULLS TOWARD CENTER OF GLASS (sideways)
My 06 back up lights have a black/green wire and a Brown wire (Brown is 12+)
Only had to remove passenger visor. upper console, A,D and E-pillar, Center rear top, and the lift gate trim. Using a fish-tape we ran the rear camera line up to the front then had to remove the the wiring sleeve from the body to the lift gate. This was about the hardest part of the entire install. Seems Ford uses seam sealer in the inside portion of said "BOOT" so once you untape it from the harness, push the sleeve assembly INTO THE TRUCK so you can then remove the clob of sealer. THEN push it out of truck (while liftgate is half way down) so you can work on threading the camera harness through it. Be sure to have ALREADY extended your "rear view 12v wire. (I chose to solder and shrink and extra spool so I could cut what I needed when done) I used a piece of solid core 8 ga wire as a fishtape to pull the camera connection thru. Then reassemble sleeve/boot. Simply wrap the camera wire (and back-up activation wire) around current wire harness to get down to the license plate light area. Remove the license plate light assembly by 4 bolts AND the plastic clip (from the inside of gate) behind the FORD emblem. I chose the only option I could come up with for location...BOTTOM OF license plate. (not what I wanted but...oh well) Its easy to get camera connection into the grommet with the light harness then reassemble. Note there are 2 screws in the tail lights.
NOTES ON TRIM REMOVAL:
Note little METAL clip on B-pillar front door weather strip!
All interior trim panels pulled off TOWARD CENTER OF TRUCK.
Liftgate trim.......bottom and top pull straight off......THERE IS 1 clip on each side of the glass ..IT PULLS TOWARD CENTER OF GLASS (sideways)