mechjames
Well-Known Member
- Joined
- September 27, 2007
- Messages
- 511
- Reaction score
- 2
- City, State
- Richmond, BC
- Year, Model & Trim Level
- 1994 Explorer XLT
These instructions were mostly followed by the Chilton's manual, but I took photos and added tips.
I have been combating a squealing noise in my truck. It comes and goes, usually quiets down when the truck gets warm, but not all the time. I thought it was the alternator, and would be most likely the alternator bearings, but after removing the drive belt, and spinning it over, it is fine. Checked the power steering pump, it is ok. Grabbed the fan and spun the pump over, WHOA, lots of slop in the bearings. I was surprised it was not leaking. At least I caught it now.
So here we go. 10 Steps to getting your water pump off.
1. Disconnect the negative battery cable. You're working under the hood, and don't want to accidentally put a wrench or ratchet by the battery, then boom, it touches the frame, blowing a $6 huge fuse.
2. Drain the cooling system by removing the petcock under the passengers side of the radiator. I recently did a couple coolant flushes last summer, 1 to combat cooling trouble, and 1 more with a new radiator install. I have only driven a couple thousand km on the truck since, so I saved the coolant. The only time you should replace the coolant if it is a few years old, or if it gets contaminated (Head gasket, transmission cooler, etc).
I used kitty litter containers, after being washed of course. They also have tight fitting lids, so animals shouldn't be able to get into them.

3. Remove your intake air tube. Disconnect the hose clamps at the throttle body and air box.


4. Loosen & Remove the serpentine belt. On earlier first gens, lock a wrench or socket on the tensioner at the top, and loosen the belt, and remove. On the later first gens, your tensioner is under the alternator. Lock a ratchet and socket on the back of it, and loosen the belt. I believe on my Dayco improved tensioner, you use a 1/2" socket on the tensioner bolt to move it.
5. Loosen the bolts on fan cover, but don't remove it. You can remove the bolts, but leave the shroud in. It is easier to remove the shroud after the fan clutch has been disconnected. The bolts are 8MM.

6. Remove the fan and clutch assy. This is where it's easier to buy special tools. I bought these fan clutch removal tools for about $22 from the local auto parts store. The brand is "Performance Tool" and they do carry a lifetime warranty. Bonus.

Also, a bonus, is that these work on 1984-87 Ford 4.9 LE and F series, 84-87 Ford Bronco and Rangers 2.8, 88 3.0 Aerostars, and 89-current Dodge B Series Cummins Diesel Trucks. So if you own those vehicles, another bonus. They might even work on the EFI 2.9's.
So, they have a 1/2" drive hole stamped into them. This is so you can use a breaker bar or socket wrench for more torque.

Use the long small wrench for the big nut behind the fan, and the big small wrench to hook around the four bolts holding the pump on. This allows you to hold the pump shaft and fan clutch, so you can loosen the bolt.


Some clutches turn counterclockwise to loosen the bolt, some turn clockwise according to the service manual. Look on your radiator fan shroud. Mine said it is right hand thread, so you simply loosen it in the direction of any nut, counterclockwise.

Now the fan clutch is off, you simply pull the shroud out and the clutch at the same time. The radiator shroud is just clipped in at the bottom. Simply pull up, as long as the bolts at the top have been removed.

7. Remove the lower radiator hose from the water pump.

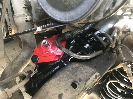
8. Loosen the water pump pulley bolts. Since we removed the belt, you can either use a strap wrench to remove the bolts, or use a socket as well as a wrench to hold the pulley so the bolts can be loosened. Where I positioned the wrench, i turned it clockwise, and the socket wrench counterclockwise as below:

Now some manuals say to remove alternator bracket bolts, a/c bracket bolts, power steering bracket bolts, but I didn't have to do anything like that. Maybe it applies to the earlier first gens, i'm not sure. Maybe it has something to do with installing the new pump on, i'm not sure yet. It seems as if the whole job can be done by leaving all brackets in place.
9. Disconnect the heater hose at the pump. I couldn't disconnect the hose, it was so worn and bulged, I had to cut it off. If your heater hoses have never been changed recently, it is a good time to do it. You do not want to repeat this job to get at the hoses easily again. I am changing it before I put a new pump on.

10. Remove the pump bolts and remove the pump. Use a 10mm socket to get the bolts off. There is 12 bolts total, so if the pump won't come off, count your bolts.
Its pretty easy, just feel around for the bolts. Hardest one to do on mine was the one behind the belt tensioner. Just simply use a 1/4" drive ratchet with 10mm socket and it comes off.

And then you have a water pump.

Now, contrary to popular belief, people have said that bolts snap and that they are not all the same size, so do not mix them up. On my truck, none broke, no corrosion, and they are all the same size.

Scroll down to post #15 http://www.explorerforum.com/forums/showpost.php?p=2424911&postcount=15 to see how to reinstall.
I have been combating a squealing noise in my truck. It comes and goes, usually quiets down when the truck gets warm, but not all the time. I thought it was the alternator, and would be most likely the alternator bearings, but after removing the drive belt, and spinning it over, it is fine. Checked the power steering pump, it is ok. Grabbed the fan and spun the pump over, WHOA, lots of slop in the bearings. I was surprised it was not leaking. At least I caught it now.
So here we go. 10 Steps to getting your water pump off.
1. Disconnect the negative battery cable. You're working under the hood, and don't want to accidentally put a wrench or ratchet by the battery, then boom, it touches the frame, blowing a $6 huge fuse.
2. Drain the cooling system by removing the petcock under the passengers side of the radiator. I recently did a couple coolant flushes last summer, 1 to combat cooling trouble, and 1 more with a new radiator install. I have only driven a couple thousand km on the truck since, so I saved the coolant. The only time you should replace the coolant if it is a few years old, or if it gets contaminated (Head gasket, transmission cooler, etc).
I used kitty litter containers, after being washed of course. They also have tight fitting lids, so animals shouldn't be able to get into them.
3. Remove your intake air tube. Disconnect the hose clamps at the throttle body and air box.
4. Loosen & Remove the serpentine belt. On earlier first gens, lock a wrench or socket on the tensioner at the top, and loosen the belt, and remove. On the later first gens, your tensioner is under the alternator. Lock a ratchet and socket on the back of it, and loosen the belt. I believe on my Dayco improved tensioner, you use a 1/2" socket on the tensioner bolt to move it.
5. Loosen the bolts on fan cover, but don't remove it. You can remove the bolts, but leave the shroud in. It is easier to remove the shroud after the fan clutch has been disconnected. The bolts are 8MM.
6. Remove the fan and clutch assy. This is where it's easier to buy special tools. I bought these fan clutch removal tools for about $22 from the local auto parts store. The brand is "Performance Tool" and they do carry a lifetime warranty. Bonus.
Also, a bonus, is that these work on 1984-87 Ford 4.9 LE and F series, 84-87 Ford Bronco and Rangers 2.8, 88 3.0 Aerostars, and 89-current Dodge B Series Cummins Diesel Trucks. So if you own those vehicles, another bonus. They might even work on the EFI 2.9's.
So, they have a 1/2" drive hole stamped into them. This is so you can use a breaker bar or socket wrench for more torque.
Use the long small wrench for the big nut behind the fan, and the big small wrench to hook around the four bolts holding the pump on. This allows you to hold the pump shaft and fan clutch, so you can loosen the bolt.
Some clutches turn counterclockwise to loosen the bolt, some turn clockwise according to the service manual. Look on your radiator fan shroud. Mine said it is right hand thread, so you simply loosen it in the direction of any nut, counterclockwise.
Now the fan clutch is off, you simply pull the shroud out and the clutch at the same time. The radiator shroud is just clipped in at the bottom. Simply pull up, as long as the bolts at the top have been removed.
7. Remove the lower radiator hose from the water pump.
8. Loosen the water pump pulley bolts. Since we removed the belt, you can either use a strap wrench to remove the bolts, or use a socket as well as a wrench to hold the pulley so the bolts can be loosened. Where I positioned the wrench, i turned it clockwise, and the socket wrench counterclockwise as below:
Now some manuals say to remove alternator bracket bolts, a/c bracket bolts, power steering bracket bolts, but I didn't have to do anything like that. Maybe it applies to the earlier first gens, i'm not sure. Maybe it has something to do with installing the new pump on, i'm not sure yet. It seems as if the whole job can be done by leaving all brackets in place.
9. Disconnect the heater hose at the pump. I couldn't disconnect the hose, it was so worn and bulged, I had to cut it off. If your heater hoses have never been changed recently, it is a good time to do it. You do not want to repeat this job to get at the hoses easily again. I am changing it before I put a new pump on.
10. Remove the pump bolts and remove the pump. Use a 10mm socket to get the bolts off. There is 12 bolts total, so if the pump won't come off, count your bolts.
Its pretty easy, just feel around for the bolts. Hardest one to do on mine was the one behind the belt tensioner. Just simply use a 1/4" drive ratchet with 10mm socket and it comes off.
And then you have a water pump.
Now, contrary to popular belief, people have said that bolts snap and that they are not all the same size, so do not mix them up. On my truck, none broke, no corrosion, and they are all the same size.
Scroll down to post #15 http://www.explorerforum.com/forums/showpost.php?p=2424911&postcount=15 to see how to reinstall.