aldive
Elite In Memoriam
- Joined
- January 17, 2001
- Messages
- 24,569
- Reaction score
- 30
- Year, Model & Trim Level
- 1999 XLT
In my never-ending quest for better gas mileage, I decided to install an Airaid ( http://www.goairaid.com/Poweraid.htm ) Poweraid Throttle Body Spacer.
The manufacturer claims, “incorporates a helix bore that spins the incoming air charge. The increased combustion efficiency provides tremendous torque and mileage increases:”
My interest is mainly in improving mileage but the other potential benefits would, if true, be beneficial. I have friends who have gained up to 3 MPG using this device. I shall keep an open mind….
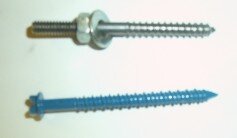
The “kit” ( $109.95 ) includes all you will need to do the install. The TB Spacer, about 1 inch thick, is red anodized aircraft grade aluminum. However, the hanger bolts have the weird Ford thread ( looks like self tapping screw thread ) on one end and ¼” on the other, are a pain in the arse to install. The company should have simply supplied the correct bolts instead of these “hanger” studs. A CARB certified decal comes with the kit.
First step in the install is to disconnect the battery so the computer will reset.
Next comes the removal of the TB and disconnecting the cruise control linkage ( 1 bolt ) as well as the throttle linkage ( 1 bolt ). The plastic intake pipe ( for lack of a better term ) leading from the MAF is removed to gain access to the TB. The TPS is disconnected. I did notice the backside of the throttle valve was rather carboned up and cruddy looking whereas the front side was pristine; this was cleaned with TB cleaner.
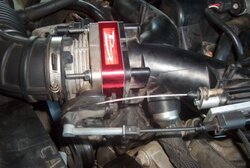
The TB Spacer is installed on the hanger studs with a gasket on each side. The throttle body is then installed. The nuts are tightened and the TPS is reconnected.
The cruise control plate is installed, as is the throttle spacer. The throttle is checked for operation; full opening and closing as well as binding.
The complete install took about 40 minutes with no rush; the hanger studs were the most time consuming.
The battery is connected and the truck is started. It fired immediately but did not want to idle for about 1-2 minutes ( had to keep revving the motor to keep it running ), and then it smoothed out and idled perfectly. A leisurely cruise through the neighborhood was done to get the computer back up to snuff. The truck performed in its normally flawless manner.
A 500-mile road trip is set for Friday….
The manufacturer claims, “incorporates a helix bore that spins the incoming air charge. The increased combustion efficiency provides tremendous torque and mileage increases:”
My interest is mainly in improving mileage but the other potential benefits would, if true, be beneficial. I have friends who have gained up to 3 MPG using this device. I shall keep an open mind….
The “kit” ( $109.95 ) includes all you will need to do the install. The TB Spacer, about 1 inch thick, is red anodized aircraft grade aluminum. However, the hanger bolts have the weird Ford thread ( looks like self tapping screw thread ) on one end and ¼” on the other, are a pain in the arse to install. The company should have simply supplied the correct bolts instead of these “hanger” studs. A CARB certified decal comes with the kit.
First step in the install is to disconnect the battery so the computer will reset.
Next comes the removal of the TB and disconnecting the cruise control linkage ( 1 bolt ) as well as the throttle linkage ( 1 bolt ). The plastic intake pipe ( for lack of a better term ) leading from the MAF is removed to gain access to the TB. The TPS is disconnected. I did notice the backside of the throttle valve was rather carboned up and cruddy looking whereas the front side was pristine; this was cleaned with TB cleaner.
The TB Spacer is installed on the hanger studs with a gasket on each side. The throttle body is then installed. The nuts are tightened and the TPS is reconnected.
The cruise control plate is installed, as is the throttle spacer. The throttle is checked for operation; full opening and closing as well as binding.
The complete install took about 40 minutes with no rush; the hanger studs were the most time consuming.
The battery is connected and the truck is started. It fired immediately but did not want to idle for about 1-2 minutes ( had to keep revving the motor to keep it running ), and then it smoothed out and idled perfectly. A leisurely cruise through the neighborhood was done to get the computer back up to snuff. The truck performed in its normally flawless manner.
A 500-mile road trip is set for Friday….

") ). Do tell your story after your trip, I'd be interested in how she performs. Does she 'feel' any different now?
). Do tell your story after your trip, I'd be interested in how she performs. Does she 'feel' any different now?