-
Performance Upgrades - Maintenance - Modifications - Problem Solving - Off-Road - Street Trucks.
Covering the Explorer, ST, Sport, Lincoln Aviator, Sport Trac,
Mercury Mountaineer, Mazda Navajo, Ford Ranger, Mazda Pickups, and the Aerostar.
Featuring H.I. - Human Intelligence.
Register Today It's free!
- Forums
- Generation Specific Forums
- 1991 - 1994 Explorer Ranger Navajo 1st Generation
- Modified 1991-1994 Explorers
You are using an out of date browser. It may not display this or other websites correctly.
You should upgrade or use an alternative browser.
You should upgrade or use an alternative browser.
I am ready to start my eddie project...'94
- Thread starter JGarrison
- Start date
Elite Explorer members see no advertisements, no banner ads, no double underlined links,.
Add an avatar, upload photo attachments, and more!.
JGarrison
Active Member
- Joined
- April 6, 2009
- Messages
- 93
- Reaction score
- 0
- City, State
- Middleburg------Just out side of Jacksonville, Florida
- Year, Model & Trim Level
- '94 Eddie Bauer
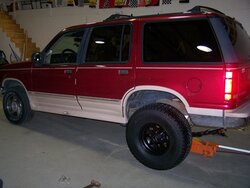
heres a tease pic
i actually some how deleted all my "during lift" pics Sorry really but i did take this one on my phone. i did rear springs first it was cake what took so long was the rivets on the passenger half of the front axle those four little *&^&%#$%^ ^#$%# took three hours. i also broke a shock i guess its a bolt that is welded to the radius arm (i think) and still have to repair so if anyone has a how to on that i would appreciate it. it was fun and a pain all at once. i took it to get a front end alignment today and i need new "cambers" but i did not have the money for them... but they are only a fraction in the neg. so any tips for them would help.. this is going to be a super fun project i have a good image in my head for the finished product..
i actually some how deleted all my "during lift" pics Sorry really but i did take this one on my phone. i did rear springs first it was cake what took so long was the rivets on the passenger half of the front axle those four little *&^&%#$%^ ^#$%# took three hours. i also broke a shock i guess its a bolt that is welded to the radius arm (i think) and still have to repair so if anyone has a how to on that i would appreciate it. it was fun and a pain all at once. i took it to get a front end alignment today and i need new "cambers" but i did not have the money for them... but they are only a fraction in the neg. so any tips for them would help.. this is going to be a super fun project i have a good image in my head for the finished product..
Attachments
red.EDDIE.4x4
Well-Known Member
- Joined
- May 26, 2009
- Messages
- 697
- Reaction score
- 12
- City, State
- Tulsa, Oklahoma
- Year, Model & Trim Level
- '93 Eddie Bauer 4x4
Oh man! I'm just as excited as when I started on my truck. Looks like mine too...good work. I found that if you grind off the head of the rivit using a 4 1/2" electric grinder, then using a punch or air hammer knock out the little stubs. Took me about 30 min on the first one then from then on about 10 Min for every other.
Currency
Well-Known Member
- Joined
- September 11, 2009
- Messages
- 611
- Reaction score
- 3
- City, State
- Bedford Indiana
- Year, Model & Trim Level
- 94 XLT 4x4
i actually some how deleted all my "during lift" pics Sorry really but i did take this one on my phone. i did rear springs first it was cake what took so long was the rivets on the passenger half of the front axle those four little *&^&%#$%^ ^#$%# took three hours. i also broke a shock i guess its a bolt that is welded to the radius arm (i think) and still have to repair so if anyone has a how to on that i would appreciate it. it was fun and a pain all at once. i took it to get a front end alignment today and i need new "cambers" but i did not have the money for them... but they are only a fraction in the neg. so any tips for them would help.. this is going to be a super fun project i have a good image in my head for the finished product..
It's looking pretty nice, I can't wait to work on mine. Working on finding a job atm and getting an 2nd vehicle going so my ex can sit and I won't have to worry about doing a rush job.
I broke off the shock stud on the passenger side RA. I just torched it out and put a bolt in it's place. RA bracket needs replaced now but the shock bolt is still holding up
")
- Joined
- February 9, 1999
- Messages
- 12,050
- Reaction score
- 131
- City, State
- Vail, Arizona
- Year, Model & Trim Level
- 1992 XLT 4x4
You can also pick up a lower shock mount from the Help section at the parts store. Its basically a bolt in lower shock mount..
The other option is to find a good parts house (not autozone etc) and pick up a lower shock mount for a chevy 3/4 ton. The shaft for the shock is the same size, but the bolt that goes through the RA is bigger, for more strength..
IIRC, the Dorman/Help section mount will fit in the hole left by the old mount once you smack it out. The 3/4 ton chevy mount will require you to drill the hole out more.
~Mark
JGarrison
Active Member
- Joined
- April 6, 2009
- Messages
- 93
- Reaction score
- 0
- City, State
- Middleburg------Just out side of Jacksonville, Florida
- Year, Model & Trim Level
- '94 Eddie Bauer


red.EDDIE.4x4
Well-Known Member
- Joined
- May 26, 2009
- Messages
- 697
- Reaction score
- 12
- City, State
- Tulsa, Oklahoma
- Year, Model & Trim Level
- '93 Eddie Bauer 4x4
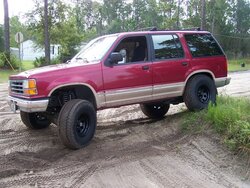
yeah buddy! nice lookin rig now that its in the air. you notice any handling difference? looks ALOT like mine...
this is an older pic, my skirts are gone now as well.

this is an older pic, my skirts are gone now as well.
Slowlyvverot
Well-Known Member
- Joined
- August 27, 2009
- Messages
- 790
- Reaction score
- 4
- City, State
- Greensboro, NC
- Year, Model & Trim Level
- 93 ExElTee
looks pretty mean. Good colors going on with that truck 
JGarrison
Active Member
- Joined
- April 6, 2009
- Messages
- 93
- Reaction score
- 0
- City, State
- Middleburg------Just out side of Jacksonville, Florida
- Year, Model & Trim Level
- '94 Eddie Bauer


JGarrison
Active Member
- Joined
- April 6, 2009
- Messages
- 93
- Reaction score
- 0
- City, State
- Middleburg------Just out side of Jacksonville, Florida
- Year, Model & Trim Level
- '94 Eddie Bauer


red.EDDIE.4x4
Well-Known Member
- Joined
- May 26, 2009
- Messages
- 697
- Reaction score
- 12
- City, State
- Tulsa, Oklahoma
- Year, Model & Trim Level
- '93 Eddie Bauer 4x4
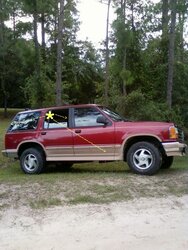
like those flex shots :biggthump
JGarrison
Active Member
- Joined
- April 6, 2009
- Messages
- 93
- Reaction score
- 0
- City, State
- Middleburg------Just out side of Jacksonville, Florida
- Year, Model & Trim Level
- '94 Eddie Bauer
I'm scared to think what it's going to be painted.
same color red but solid no two tone, the trim on bumpers will be black them i am going to put these newer model x decals where the f150 ones are...the undercarriage will be all black with the red color on the dif covers
Attachments
JGarrison
Active Member
- Joined
- April 6, 2009
- Messages
- 93
- Reaction score
- 0
- City, State
- Middleburg------Just out side of Jacksonville, Florida
- Year, Model & Trim Level
- '94 Eddie Bauer


deamon3
Well-Known Member
- Joined
- July 27, 2008
- Messages
- 978
- Reaction score
- 1
- City, State
- Wisconsin
- Year, Model & Trim Level
- 94 Eddie Bauer
I'll admit , explorer owners bunch together. its funny.
I went to a grocery store here once and parked next to another first gen , when I came outside , another first gen parked next to mine , 3 total , lol.
I went to a grocery store here once and parked next to another first gen , when I came outside , another first gen parked next to mine , 3 total , lol.
Spdrcer34
Explorer Addict
- Joined
- March 14, 2002
- Messages
- 3,873
- Reaction score
- 13
- City, State
- Bremerton, WA
- Year, Model & Trim Level
- 1992 Explorer XL
I think the one vehicle does that THE MOST, are Prius owners.
Hands down the most 'Look, I drive one too' vehicle owners..
I just wish they would realize that they are actually WORSE for the environment than say a Ford Explorer, or F-150
Ryan
Hands down the most 'Look, I drive one too' vehicle owners..
I just wish they would realize that they are actually WORSE for the environment than say a Ford Explorer, or F-150
Ryan
Elite Explorer members see no advertisements, no banner ads, no double underlined links,.
Add an avatar, upload photo attachments, and more!.
red.EDDIE.4x4
Well-Known Member
- Joined
- May 26, 2009
- Messages
- 697
- Reaction score
- 12
- City, State
- Tulsa, Oklahoma
- Year, Model & Trim Level
- '93 Eddie Bauer 4x4
I think the one vehicle does that THE MOST, are Prius owners.
Hands down the most 'Look, I drive one too' vehicle owners..
I just wish they would realize that they are actually WORSE for the environment than say a Ford Explorer, or F-150
Ryan
how are they worse for the environment?
Featured images


Featured images
Similar Threads
- Replies
- 6
- Views
- 1,182
- Replies
- 11
- Views
- 1,644
- Replies
- 15
- Views
- 12,746
- Replies
- 6
- Views
- 2,467
- Replies
- 18
- Views
- 2,550