410Fortune - 96 5.0L XLT refurbish (making 1 great Ex from 2) | Page 25 | Ford Explorer Forums - Serious Explorations

  • Register Today It's free!

410Fortune - 96 5.0L XLT refurbish (making 1 great Ex from 2)

Okay here we go 09/13/05

In march of 05 I rolled my new to me 96 5.0L AWD 86K miles, just after driving it back to CO from OR and putting $1000 into it. You see I bought this truck from my brother with 86K miles on the clock, it would not pass emissions for him and he drove it into the ground. This was the same explorer he bought new when I got the BII from him for $500 12 something years ago.
Well I payed him $500 for the green Explorer and $1000 later (shocks, tune up, 02 sensors, etc) it was in primo condition. Then I rolled it in an ice storm...
RIP 96 EB:
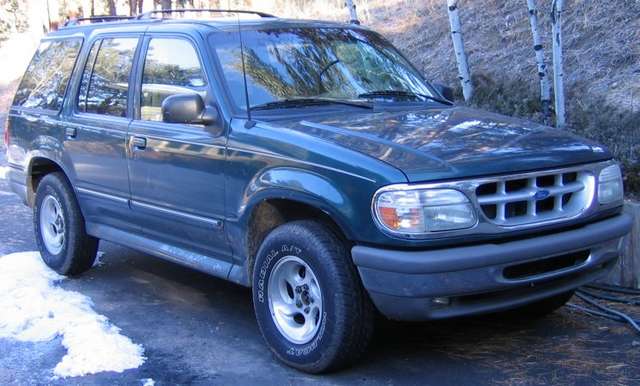
2893expldr-med.jpg

exafter.jpg


So in April my buddy Brett found this great deal here in town for a 96 XLT 5.0L AWD, $900 is what I paid, it has front end damage and air bags deployed, picked it up from a fellow board member:
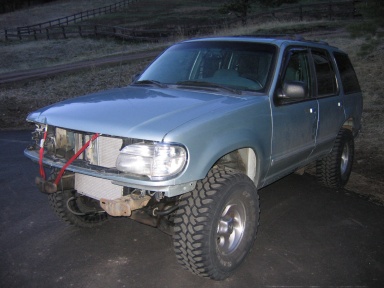
2893drives.jpg


After the wreck the owner put in a new radiator and battery so it could be driven.
The truck has sat since April of this year, untouched, until this morning.
I have been preparing my new garage to accept my new project, and well she's ready, so today is the day I am driving this truck home.
To my disbelief this truck had no problem and started right up after sitting since April!

Here are some "before" shots:
Font end damage, sagging T bars, new rad:
beforework1.jpg

No airbags, interior is in great shape! (just needs TLC):
interiorbefore1.jpg

Rear:
rear.jpg

It has some "issues". Like steering extension is rubbing the manifold (3" body lift), no dipstick:
dipstickmissing.jpg

No fan, No ac condensor, and no trans cooler:
nofan.jpg


This is a 1996 5.0L AWD XLT with 151K miles on the clock.
Truck is loaded with sunroof, leather, tint, etc.
Previous owner installed 3" body lift and 33" tires.
Alot of things have been "rigged" but it runs and drives fine!

I will be completely removing the front clip, everything except the frame and inner fenders will be cut out. The entire drivetrain will be pulled (too many miles), the entire front end will be fixed, new bushings, bearings, new steering rack, torsio bar twist, shocks, brakes, etc.

the body lift will be fixed and or reduced to 1-2". the rear bumper will be re-located.

The drivetrain from my green 96 will be installed into this truck, along with alot of other "donor" parts.

The front clip will then be replaced using factory metal replacements, welding in new rad support, and then prepped for paint.

truck needs new windshield, airbags, and alot of TLC.


My long term plans for this truck include: "long travel" 4x4 IFS suspension lift (dixon bro's Camburg, etc). Stereo, tow package, SOA, low range T case, and custom everything else.
This is my "other" baby, and in keeping with tradition she will have the heart of my brothers old truck, just like the BII was his and run into the ground, so was "part" of this one.

Still no car payment after 12+ years.


Join the Elite Explorers for $20 each year.
Elite Explorer members see no advertisements, no banner ads, no double underlined links,.
Add an avatar, upload photo attachments, and more!
.


the lights I used have the yellow lens and a chrome reflector for the factory bulbs, there are all black housings on the market with no yellow and no light reflector.

And a lawn mower? hahaha we would have to "mow" 23 acres, we do have a John deer with a mowing attachment but this part of the property is not near the house or anything that gets mowed :)


Join the Elite Explorers for $20 each year.
Elite Explorer members see no advertisements, no banner ads, no double underlined links,.
Add an avatar, upload photo attachments, and more!
.


That color is medium wedgewood blue, I think. My mom's was deep wedgewood blue, much darker.

Whatever though, it is going to look great. Those lights make me jealous--in a bad way.


I am not sure what exact light blue color that is, but it isn't medium wedgewood blue. That is the color of my X.


wedgewood may indeed just be the name of the interior color

Not sure what my paint color is but I am gonna find out!!


It's really 'shaping up' well 410Fortune......I like the mods you have made, it will look real good when you've got the paint all to match, not that it looks all that bad now..:).....it'll just look better :)


okay been out of touch for a bit, went on vacation!
Girl has a lake house in Nebraska, it's been sitting for 2 years, she was going to sell it but her brother and I (both have boats and she has jet ski's) convinced her to keep it :)

I have been up there basically the last three weeks/weekends working on that sucker, new floors, plumbing water, tear out the old, install swamp cooler, etc etc we have been driving a new well (ever drive a drive point and 1-1/4" well 35'?) and going boating just a bit when we can.

rigpic07.jpg


The Explorer is leaking coolant, and its been getting worse, when I got back from Nebraska last week it was leaking a steady flow, she has been parked for about a week.
Both of my Fords are down! hahaha

I will finally be getting some time to fix it today. I believe its coming from the radiator...luckily i have a spare :)
My pressure tester does not fit the explorer radiator, I have already tried to pinch the pinch welds a bit to no avail.
The leak is coming from above the lower hose port, but I also suspect the factory spring style clamp must go


Throw my B2 parts in the mail too, if you don't mind sir as well:p:


Nice boat:thumbsup:


thanks!!

My baby, I saved 3 years while I had my first boat (a 78 Bayliner Mosquito) then got an incredible deal on this sucker in 2003........I see them for sale still without mods for more then I paid...

its a 2002 Anniversary addition Bayliner Capri 195 LX (sport) with a 4.3L merc and alpha one outdrive. I have added a Monster Tower, some board racks, custom lighting, stereo, 800# hidden ballast, a turbo II 4 blade tow prop, some misc gadgets and we are just getting started...she has 200 hours on her, I love this boat

She is the reason I have a 4 door explorer as a daily driver, built this toy to tow that toy

I also refurbished two Kawasaki ZXI jet skis this spring, she had those "sitting" around a bit too (2 years)

Jetski 101:
PCWtoday.com

95 900 ZXI and 96 1100 zxi will both be getting the 3 cyl 2 strokes bored and built this winter as well as pump rebuilds and some hull repair.
Jet Ski parts are cheap in comparison to truck habits hehehe twin 1250's should be alot of fun next year!


OKay the coolant leak is fixed, I installed my "old" radiator, a spare I had laying around.

The Gen II explorer with AC is a PITA to change the radiator in because the AC radiator is attached to the cooling radiator with plastic clips that are like 3" long and there is no room to wiggle them together. They are made to be removed as one unit = discharge the AC system = stupid design IMO.

I managed to get the radiator in but it was a chore compared to the normal 30 minute swap out I am used to with the BII and other cars....

Those sideways clips, and the hole through the driver side one for ac lines, man they suck!! I want to change the whole setup, and install a "normal" radiator--please come up with something-:D


zip ties! Bam solved


:notworthy ZIPTIES~!


Where is the lake house in Nebraska?


Near Machonahey :)
228 miles from my house

Lots of great sand dune wheeling up there too......


Okay yesterday I picked up:

Moog lower ball joints
Ford OEM upper control arms and ball joints
Ford OEM 96 4x4 hub assemblies
inner and outer tie rods
torsion bar bolts (M12, 100mm)


My ex has 170K miles on it, the front end is about the only thing that has not gotten any attention aside from a mild t bar twist (until the bolt bottomed out), an alignment, Rancho RSX shocks, and new brake pads.

It rides like crap, ball joints are freid, tie rods are fried, etc

So the rebuild begins
I plan to use the B rated t bars off my rolled truck, also grabbing the leaf springs...that truck has only 80K miles on it.
Wish I had the $$$ for the RCD brackets and some coil overs to ditch the t bars! but that will have to wait......

truck is also leaking front diff and some ATF up near the cooler so I need to fix those


Pull the front carrier and do all three seals then also. They cost $50 from Ford, my left seal started leaking within a month of driving it. I've got to do a busted boot lower ball joint, and the seal, lower more, so another alignment.

The shocks are about the only thing lost in value by changing to coil overs. Keep an eye out on those brackets and other parts. Hopefully soon it will be a more common application, thus a kit, and less cost. Regards,


I have a brand new diff I need to install, Brett gave it to me just because he was sick of looking at it.

2004 Ranger Edge, 4.10 gears open with 3000 miles on it :)
I will be installing that sucker as soon as I have the $$$ to re-gear the rear 8.8

Thanks for the advice! My front IFS leaks a bit ever since the 4406 converison, its leaking from the pinion seal....


4.10's and 33's is perfect with the 5.0.


Check junkyards for a 8.8 with the gears in it. I know where there is one 4.10s, open diff that I could get for ~$150, too bad I didn't know about it when I regeared. I could have saved some cash.


truck is getting alot of front end work, what a PITA!!! truck has 169K miles on the chasis :) The previous owner beat it up pretty good, I am surprised the front end has held up until now!!

Yesterday I replaced the pass side upper control arm (new ball joint), lower ball joint, inner and outer tie rods and the hub

I found my 96 OEM hub in BAD SHAPE, its got rouge! Its metal on metal...good thing I found this in time.
The factory ball joints are sloppy as can be
Surprisingly the tie rods were not too bad but I replaced them anyway.

WARNING: If you have TM headers on a Gen II truck you will not be able to get the upper control arm bolts and shims out (passenger side). I ended up cutting the front bolt to get it out, I have spare bolts from my parts truck so its okay. I will probalby just install them backward when I put it back together.

I fought this for 2+ hours

Today I am doing the drivers side, I will take pictures.....

The truck is also getting longer torsion bar bolts (to even out my lift) and then alignment on Monday


Okay here are some pictures from my front end IFS rebuild

My truck needed alot of new front end parts, so I finally had the $$$ and the time to replace them. This was the first time I have worked on the Explorer IFS in depth. I have worked on many front ends, but I still got some help from this forum. There are some great write ups on this forum for replacing the ball joints, hubs, torsion bars, brakes, cv's, tie rods, etc. There is no need for me to add anything to this and I was very thankful when I had questions, a quick search answered them no problem.

First I marked the position of the upper control arms on the frame mounting brackets for reference when putting the new control arms in place:
alignmark.jpg


Disconnect the sway bar:
swaybaroff.jpg


I used a 8# sledge and removed the tie rod from the knuckle (if yours is stuck you may try using a pickle fork) If you plan to re-use your outer tie rod you should leave the castle nut on the stud when you hit it with a hammer:
tierodoff.jpg


remove the 2 caliper retaining bolts, the rotor then slides off the knuckle (rubber mallet can be useful here):
rotorcaliperoff.jpg


remove the upper control arm bolts:
upperbjoff.jpg


With the Torque Monster headers you cannot get the pass side camber bolts and shims out, there is not enough clearance. So I bought new bolts with the 2.5 degree correction, because I also have a torsion twist.
I used a 4" grinder to cut the bolts so they would clear:
boltcut.jpg


Before you remove the knuckle from the lower ball joint now is the time to crack loose the hub retaining bolts:
3bolts.jpg

ask me how I know....

Then with the hub removed or the bolts loose at least, you can remove the knuckle off the lower ball joint. Again the 8# sledge will do the trick:
knuckleoff.jpg

You need to remove the lower shock mount if you plan to pull the cv axle out

Easy trick for getting the upper ball joint out of the knuckle:
upperbjtrick.jpg


My stock hubs were in BAD shape...lots of rouge and when you spin them its apparent they are metal to metal.
New hubs include the ABS sensor and wiring:
huboff.jpg


I also replaced the inner and outer tie rods, I did not get any pictures of this. But in order to retain a pretty decent alignment I made sure to build my new inner and outer assembly by measuring the old parts that were removed.

After all this work, I cleaned everything and put it back together. I got in a hurry because it was getting dark/cold, so I didnt get pictures of this process...but again there are plenty of perfect threads for that on this forum.

I also replaced my torsion bars and adjusters with the ones from my parts truck, it had half the miles on it. The kevlar wear pads were history, I ditched them completely after attempting to locate some similar kevlar/aramid material to no avail.
I cleaned the adjusters and the frame bracket and just put a bit of wheel bearing grease in there. I plan to run some coilovers in the ner future so investing in new torsion bar adjusters was not worth it to me.

Notes:
- I picked up some 90 degree grease zerks (1/4" size) for the new moog lower ball joints, otherwise the cv axle is in the way of adding grease.

- If your front diff IFS grease seals are leaking (at the cv axle) now is the time to replace them

- Because of the headers I ended up installing the new 2.5 degree camber bolts and shims backwards, so the nut is on the shock tower side. This caused a bit of confusion for the alignment guy who is used to putting his ratchet on the outer side, I showed him how I used a 21mm wrench and ratchet in oder to loosen/tighten them. My regular alignment guy was not available so I bit the bullet and went to Big O for $60.. they did a decent job

- a pickle fork and a ball joint/ u joint service kit is required for this job IMO. Pressing the lower ball joint out and in with my $25 Harbor Freight press made it a breeze. The pickle fork will get most stuck upper ball joints or tie rods apart if needed (will likely ruin the boot)

I also performed a final torsion twist to even out my trucks stance. Then it was off for an alignment...
To the lip of both my fenders from the ground (center of the hub, 33" tires, 3" body lift, 1/2 tank gas, 1.5" torsion twist) is 38-1/4"

The truck runs great now! no more vibrations and fuel mileage has increased (due to alignment and new hubs/bearings)

For the torsion twist I learned a few unique things about the Ford parts and the EF.com recommended 100mm long bolts...IMO they are too long! I had to cut them down and make custom bolts. We performed the TT on two trucks in one day...so those pictures will go in James thread who's 97 XLT just got 1.5" lift from the TT and some warrior shackles....

Link coming


Join the Elite Explorers for $20 each year.
Elite Explorer members see no advertisements, no banner ads, no double underlined links,.
Add an avatar, upload photo attachments, and more!
.


- Because of the headers I ended up installing the new 2.5 degree camber bolts and shims backwards, so the nut is on the shock tower side. This caused a bit of confusion for the alignment guy who is used to putting his ratchet on the outer side, I showed him how I used a 21mm wrench and ratchet in oder to loosen/tighten them. My regular alignment guy was not available so I bit the bullet and went to Big O for $60.. they did a decent job

I did the same thing because of the ABS, tranny & fuel lines on the left side. Isn't so much fun snaking the old ones out:mad:


Back
Top