Freshmeat
Well-Known Member
- Joined
- July 26, 2008
- Messages
- 482
- Reaction score
- 1
- City, State
- Denham Springs, LA
- Year, Model & Trim Level
- 1994 Ranger STX SC
Okay, guys- I'm not a fan of lift shackles. I had them on my old Samurai and it was a nightmare. (Part of the nightmare may have been that all parties were drunk during the SOA conversion, but who's counting?) So I wanted to figure out a way to lift the rear to match the 2" Skyjacker 132S coils I had in the front without spending too much money. Sure, there was the option of the add-a-leafs (which you're welcome to do), but the short AALs put undue stress on the other springs.
So here's what I bought:
1.) New spring retainer clips ($10 for two packs - you can probably get away with one pack and put one clip on each leaf pack)
2.) New spring center bolts ($10 for two at Advance Auto [Motormite PN- 03761] but it's my understanding you could actually run 3/8" grade 8 bolts from Lowe's or Home Depot and save a few more bucks on this step)
3.) Leaf packs from a 1980s full size Chevrolet pick-up truck. Mine came out of a 1987 (or so) 1500. Find someone who lifted their full size truck and they'll probably give you the springs. I paid $10 for them at the junk yard.
First step is to strip down the rear spring pack. To do this you need to lift the Explorer and set jack stands under the frame rails, to keep the body suspended during the work. Otherwise you'll run into serious problems and pain as soon as you unbolt the U-bolts at the axle.
Once the body is on jackstands and the tires are off, remove the four bolts holding the U-bolts in place. The shocks mount to the spring plate so you may want to remove them; I chose to let the plates hang on the shocks while I worked.
Once you have the U-bolts removed, use the floor jack to lift up on the axle to free it from the center bolt- you may need to pry a bit, as they can some times rust together over time.
From here, clamp the springs together using a C-clamp or some other high strength clamp. Don't use anything fragile, as these springs have a lot of pressure on them and they'll take any chance they get to explode out of the pack.
Now that the springs are secured, grind off the bottom side of the spring pack center bolt. You can try to unscrew it, but you have new ones and these won't be long enough anyway, so cut that bish off. Next cut off (or pry off) the spring pack retaining clip toward the front of the axle. Again- you could try to reuse it, but it won't fit, which is why you have new ones... so cut away if you need.
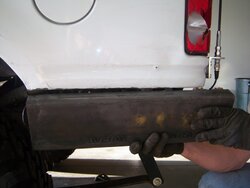
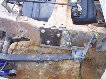
This is what you'll be looking at by this point:

Now take the springs to an open area where you can move things around. Here is what you'll have for the stock springs (something to note here- the center pin on the Explorer leaf springs is not actually centered- it's offset to the front by a couple inches. The longer section will need to go to the rear):

Here is how you'll assemble them with the new spring. I used the longest spring from the pack, not counting the main leaf. If you want even more lift you could probably run the shorter spring as well, but I wanted to err on the side of flexy, so I kept the extra spring out...

A trick I figured out yesterday while assembling the packs is to use a bunch of zip ties to hold them together, slightly compressed, so I can set them into place without them popping out all over the place. If you have someone else helping you this won't be an issue, but if you're doing this solo like I was, strong zip ties will help a lot for this step.

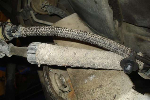
Here it is completely reassembled. Note the retaining clips on both ends of the spring packs. Stock only had one clip on the front side of each spring pack and none on the back, but I tend to beat the bejeezus out of my rig and wanted to be sure they didn't have a chance to slip around anywhere, so I put one on each end.

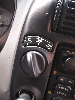
I ended up with about 1.5" lift in the rear, which came out almost perfectly level with the Skyjacker coils I have in the front. While doing all the work in the back I went ahead and removed the rear swaybar because I won't be driving this on the streets often and when I do I won't be doing 70 around any curves. During this process is the perfect time to pull that rear sway bar and get some better flex while you're under there.

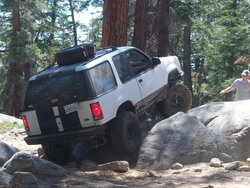
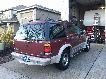
Here's a corner shot, to give a view of the whole truck with the Skyjacker coils, ******* packed rear, and 34x10.50x15s. I still need to trim the front fenders- please disregard the lack of clearance there.

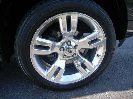
While I had the jack out I picked up the rear tire just to see whether I'd need to do any trimming in the back. I didn't max it out, but as you can see, it looks like I have plenty of room for the tire to bounce around without contact. This shot is relieving for me because I was concerned that the extra leaf would slaughter my uptravel, but it seems to tuck just fine for what I'll be doing.

I hope this helps someone in the future. Like I said- only running one spring retaining clip per side, using Lowe's bolts, and getting the springs for free (or cheap at the junk yard as I did), you can essentially lift the rear of your Ex by 1.5-2" for $10-20. Granted, you'll still need new shocks to see the full benefit of the lift, but you get the point.

So here's what I bought:
1.) New spring retainer clips ($10 for two packs - you can probably get away with one pack and put one clip on each leaf pack)
2.) New spring center bolts ($10 for two at Advance Auto [Motormite PN- 03761] but it's my understanding you could actually run 3/8" grade 8 bolts from Lowe's or Home Depot and save a few more bucks on this step)
3.) Leaf packs from a 1980s full size Chevrolet pick-up truck. Mine came out of a 1987 (or so) 1500. Find someone who lifted their full size truck and they'll probably give you the springs. I paid $10 for them at the junk yard.
First step is to strip down the rear spring pack. To do this you need to lift the Explorer and set jack stands under the frame rails, to keep the body suspended during the work. Otherwise you'll run into serious problems and pain as soon as you unbolt the U-bolts at the axle.
Once the body is on jackstands and the tires are off, remove the four bolts holding the U-bolts in place. The shocks mount to the spring plate so you may want to remove them; I chose to let the plates hang on the shocks while I worked.
Once you have the U-bolts removed, use the floor jack to lift up on the axle to free it from the center bolt- you may need to pry a bit, as they can some times rust together over time.
From here, clamp the springs together using a C-clamp or some other high strength clamp. Don't use anything fragile, as these springs have a lot of pressure on them and they'll take any chance they get to explode out of the pack.
Now that the springs are secured, grind off the bottom side of the spring pack center bolt. You can try to unscrew it, but you have new ones and these won't be long enough anyway, so cut that bish off. Next cut off (or pry off) the spring pack retaining clip toward the front of the axle. Again- you could try to reuse it, but it won't fit, which is why you have new ones... so cut away if you need.
This is what you'll be looking at by this point:
Now take the springs to an open area where you can move things around. Here is what you'll have for the stock springs (something to note here- the center pin on the Explorer leaf springs is not actually centered- it's offset to the front by a couple inches. The longer section will need to go to the rear):
Here is how you'll assemble them with the new spring. I used the longest spring from the pack, not counting the main leaf. If you want even more lift you could probably run the shorter spring as well, but I wanted to err on the side of flexy, so I kept the extra spring out...
A trick I figured out yesterday while assembling the packs is to use a bunch of zip ties to hold them together, slightly compressed, so I can set them into place without them popping out all over the place. If you have someone else helping you this won't be an issue, but if you're doing this solo like I was, strong zip ties will help a lot for this step.
Here it is completely reassembled. Note the retaining clips on both ends of the spring packs. Stock only had one clip on the front side of each spring pack and none on the back, but I tend to beat the bejeezus out of my rig and wanted to be sure they didn't have a chance to slip around anywhere, so I put one on each end.
I ended up with about 1.5" lift in the rear, which came out almost perfectly level with the Skyjacker coils I have in the front. While doing all the work in the back I went ahead and removed the rear swaybar because I won't be driving this on the streets often and when I do I won't be doing 70 around any curves. During this process is the perfect time to pull that rear sway bar and get some better flex while you're under there.
Here's a corner shot, to give a view of the whole truck with the Skyjacker coils, ******* packed rear, and 34x10.50x15s. I still need to trim the front fenders- please disregard the lack of clearance there.
While I had the jack out I picked up the rear tire just to see whether I'd need to do any trimming in the back. I didn't max it out, but as you can see, it looks like I have plenty of room for the tire to bounce around without contact. This shot is relieving for me because I was concerned that the extra leaf would slaughter my uptravel, but it seems to tuck just fine for what I'll be doing.
I hope this helps someone in the future. Like I said- only running one spring retaining clip per side, using Lowe's bolts, and getting the springs for free (or cheap at the junk yard as I did), you can essentially lift the rear of your Ex by 1.5-2" for $10-20. Granted, you'll still need new shocks to see the full benefit of the lift, but you get the point.