What can be done in a weekend | Ford Explorer Forums - Serious Explorations

  • Register Today It's free!

What can be done in a weekend

DVS1

Well-Known Member
Joined
April 3, 2001
Messages
209
Reaction score
1
City, State
Bolingbrook IL
Year, Model & Trim Level
98 EB
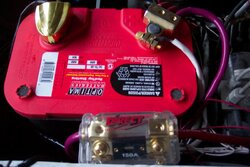
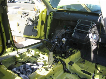
Hi guys.....just wanted to show a quick weekend install, comprised of components that were just laying around the garage (ok...so 1 or 2 new pieces!)...anyway FAR FAR from IASCA caliber (that was my last Ex, click on my sig).
But sounds very nice (imaging and staging are a bit skerewed, but height, and tonal accuracy are very good).
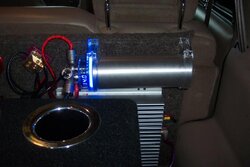
A little bit more work on the wire management, and its done...

Some components used:
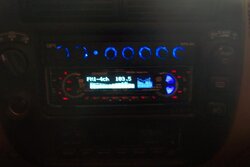
Kenwood X917 - Head unit
SPL SPQ 20 - Para Eq
6.5 inch Clarion pro audio 1685 component set - front stage
Pioneer x..? 6x8 - rear fill
2 Audiobahn AW1251T subs in bandpass box (no definition to these subs...not very musical, good for the boom though)
Kenwwod 8101D/subs
Kenwood PS200T/rear
Pioneer GM X524/ front

Again just to show what a determined weekend, and a need for a "cleaner garage" can yield!

D
 

Attachments

  • inside3.jpg
    inside3.jpg
    68.7 KB · Views: 282
  • inside4.jpg
    inside4.jpg
    78.9 KB · Views: 286
  • inside5.jpg
    inside5.jpg
    62.1 KB · Views: 293


Join the Elite Explorers for $20 each year.
Elite Explorer members see no advertisements, no banner ads, no double underlined links,.
Add an avatar, upload photo attachments, and more!
.


More

Some more
 

Attachments

  • batt1.jpg
    batt1.jpg
    59 KB · Views: 290
  • dvd1.jpg
    dvd1.jpg
    43.2 KB · Views: 293
  • tweet1.jpg
    tweet1.jpg
    41.7 KB · Views: 285


again
 

Attachments

  • lit cap2.jpg
    lit cap2.jpg
    51.1 KB · Views: 285
  • lit cap.jpg
    lit cap.jpg
    60.7 KB · Views: 286
  • inside dark.jpg
    inside dark.jpg
    50.2 KB · Views: 287


That looks great man, nice work! Looks like a high quality install. I also love the EQ above the HU. Very cool.


And again again
 

Attachments

  • radio dark.jpg
    radio dark.jpg
    27.2 KB · Views: 277
  • monitors1.jpg
    monitors1.jpg
    54.5 KB · Views: 289
  • rt monitor.jpg
    rt monitor.jpg
    51.5 KB · Views: 278


Ok, thats weird cuz Im installing a board just like that tonight and tomorrow. I have a few questions for you now that you have done basically what Im doing.

1. How did you mount the 6.5 in the front speaker location. Do you have a blueprint for a bracket that you used?

2. How is the sound with the tweeters mounted in that spot, Ive been looking for a place to mount mine.

3. How did you run the speaker wire through the door.

4. How is the piece of wood standing up, what are you using to brace it?

Any help would be great as Im doing the install tonight and tomorrow. Thanks


Texplorer:

1.I simply traced the outline of the speaker onto 1/2 inch plywood, and broke out the roto zip....to cut out the pattern, as well as the hole for the magnet assembly......Ta-da!...home made adapter. (other wise the the magnet came in contact with the window brace) PLEASE measure your 6.5's mounting depth!

2.The tweeters mounted in this position in my particular case, presented an EXTREMELY bright soundstage!("allegedly" these clarion tweets can reproduce 120khz!) ...if you choose this location lets hope that your crossovers allow you to attenuate those tweets by at least -3db (-6db could be optimal).

3.Through the rubber boot between the doors....a fishtape was DEFINITELY required for this!....dont be afraid to slice that boot to make it easier....electrical tape "wraps" it right back up.

4.First I mounted 3 lengths of 2x4 to that metal flap using screws....then I mounted the actual MDF board to that, again using screws....This allowed me space in which to run, and pull my power/ground/signal, and speaker wires through.

Hey man, good luck to you....and let me know if I can be of any further assistance.

D


So did you put the 1/2 plywood over the stock plastic spacer or did you take the spacer off? I know exactly what your talking about with the metal bar. I was gonna dremel out the stock spacer a little cause the 6.5 mounting points lined up with the 5x7 mounting points but the 6.5 rubbed a little. But if I would have dremeled out the part that rubbed the magnet would have hit the bar when I installed them.
I also noticed that the tweeter location worked fine on the passenger side but on the drivers side it was a little big cause of the mirror controls. Thanks for all the help.


yeah....I removed the stock spacer......and yes....you are right about the tweets...the passenger side mounts flawlessly....the drivers side is a little trickier....but it can "squeeze" into place.....


D


Ok, I really need your help once more as Im stuck right now. How in the hell did you run the speaker wire through the drivers side door??? I ran the passenger door easily but they drivers door is considerably different. There is no way to run in the boot cause inside the boot is a plug. Actually the big hard plastic thing is the plug but I dont see another way to do it. If anyone can answer please help me out!!!


Ok.......I know what you are talking about......my first instinct was to drill a small hole (enough to accomodate the speaker wire diameter)...but as I was shining a flash light thru there, I noticed there is a very tiny "gap" on that plate that is mounted on the door (where the boot and plug assembly for the stock wires enter)....I know it may be difficult to detect...but its there...and it is possible to snake 12 guage speaker wire thru it....and it doesn't appear to pinch it either......
Let me know what you find......

D


Well I ghetto wired the crap outa that side. That plastic canister lookin thing has two mounting screws, one on top and one on bottom. I removed the top screw and ran one 16 gauge speaker wire through the screw hole, then I kinda pushed the top of the canister in a little and ran the other 16 guage wire through the room I made by pushing it back. Prolly just the same way you did.

Thanks for all your help DVS, it really did make things easier.


No Prob man...anytime I can help!......
Be sure to post some pics of your install!

D


Back
Top