TexasArmadillo
Elite Explorer
- Joined
- June 1, 2010
- Messages
- 441
- Reaction score
- 17
- City, State
- Pearland, Texas
- Year, Model & Trim Level
- 2019 Explorer Limited
This past weekend I decided to replace my transmission filter. I have about 137K miles on my truck and it seemed like a good time to do it. This post will describe how I went about doing this.
I'll break down my setup. First, I'll give you the setting. I live in Arlington, however I can not fix my truck in the parking lot of my apartment complex. So, I have to travel to Houston to visit my parents to and fix my truck.
As far as materials go I provided a list below.
Mercon V Transmission fluid 10 quarts (side note I only used 4)
Transmission Filter (purchased from the local Ford dealership)
Transmission Pan Gasket (also from the dealership)
Kerosene
13mm and 10mm Sockets with 3/8" and 1/4" driver
Sea Foam Transmission cleaner
Shop Towels
Jack
Jack Stands
Gojo
Catch Pan
Card Board
Flat Head Screw Driver
3/8" drive extension.
To start off this endeavor I put the Sea Foam Transmission cleaner into my transmission dipstick receptacle. The directions say to run the vehicle for 5 or more miles switching through all the gears. I figured 247 miles should about do it. Now, I'm not sure if this actually did anything, but it claims to de-glaze your transmission system.
Here is a picture of most of my materials.

To start, jack up your vehicle and put two jack stands, one on each side of the vehicle. I normally leave the jack under there as well. I make sure it has a little bit of pressure on the lift point, but I still keep the main force on the jack stands. Next, place your catch pan under the vehicle. The bigger the pan the better chance you will keep the drive way clean. I use the card board as a poor mans creeper. I simply place it under the vehicle and slide on it to gave access to the under side of my Explorer.
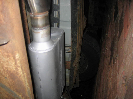
To remove the transmission pan, I crawled under the vehicle and inspected the pan. I did not see any signs of damage and I was pleased. The first thing to do is to pop the heat shield off of the pan. Refer to the photo to see the heat shield. Next, I used a 3/8" driver with a 13mm socket to remove the pan bolts. For some of the bolts I had to use an extension. I used a tried and true method to remove these bolts so that I would limit the amount of spillage. I broke all the bolts or relieve the pressure on the pan to transmission connection. I then took all of the side bolts out. By side bolts I mean the ones not on the corners. That means I left two bolts on each corner. I did not want to to damage the pan so I kept these eight bolts at the same pressure. I then slid the catch pan under the transmission pan to catch the fluid that is about to start flowing. I then loosened the rear bolts to force the fluid to the rear of the vehicle. At this point your arms will get a lovely coating of hopefully dark red fluid. After the majority of the fluid has stopped flowing I then removed the remaining bolts. When the last bolt is removed be ready to take the full force of the pan and remaining fluid. To remove the pan I actually had to use a flat head screw driver and gently pry the pan to break the seal the gasket had made.


To remove the filter all you have to do is use the 3/8" drive and the 10mm drive. There is a bolt in the middle of the filter. Simple remove this and gently pry off the filter with your hand. Ensure that the two black O-rings are on the filter.

I now started the clean up process. I removed the old gasket from the pan and then discarded it. I used Kerosene and the shop towels to remove all of the residue that was in the pan. This is after I dumped the remaining fluid out of course. I made sure to clean everything I could. This included the magnet in the pan and then the bottom of the transmission under the vehicle. I made sure to wipe up any remaining fluid and double checked to make sure all of the old gasket was gone.

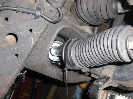
After all of that I had to prep the new filter and gasket. The gasket has a pretty cool feature. They have small metal inserts in the gasket that protects the gasket from over torquing. You might have seen these in other posts. Anyways, I put the gasket on the pan and put a bolt to keep the holes lines up. For the filter you will need to put two o-rings on. There is a large one that goes on the larger spout and a smaller o-ring that goes on the smaller spout. Look at the picture below and you will see what I mean.

To replace the filter crawl back under the vehicle. Then, gently push the filter back in place. If you did not remember the orientation when you removed it, just remember the big spout goes in the big hole and the small spout goes in the small hole. No brainier right. Then insert the bolt that should have came with the filter. Once again it is a 10mm socket and I used a 3/8" drive. I then took my pan/gasket/bolt under the vehicle to mount it up. It can be a little tricky, but simply get one bolt started then continue with the rest. Normally in a situation like this you should find the torque setting for the bolt and use a torque wrench to ensure you do not damage anything. Well, I didn't have that. By the way, I think the torque setting is 23 ft/lbs, not 100% on that. Anyways, I used a 1/4" drive with a 13mm socket. Why a 1/4" drive you ask. Well you should not be able to over torque the bolt with a 1/4" drive. If you do I recommend you go by a torque wrench and lay off the forearm excesses. After this simply clip the heat shield back on the transmission pan. Mine was hesitant so I used the flat head screw driver and worked it back on.
To finish this project up you will need to add the fluid you took out. As mentioned above I read my manual and bought 10 quarts of Mercon V. Well, apparently that is if you don't have any fluid at all. I only took out four quarts so that is what I added back in. First, remove your vehicle from the jack stands and jack. You then pull your transmission dip stick and put a funnel in. Open your Mercon V fluid bottle and pour in. To clean myself I used the Gojo, a little water, and a lot of shop towels. After this I ran Dillo till the transmission warmed up. After this I put the vehicle in park, while it was still running, and and checked the dip stick. Make sure the fluid level is in the normal operating range. If it is, your done. If not, add more fluid.
I have to say after doing this install my truck ran much better. The transmission seemed to engage the gears at a quicker rate. I immediately noticed an instant drop in lag time when shifting. Well that is it for this write up. In case you were curious I put a picture of the dirty filter below.

I'll break down my setup. First, I'll give you the setting. I live in Arlington, however I can not fix my truck in the parking lot of my apartment complex. So, I have to travel to Houston to visit my parents to and fix my truck.
As far as materials go I provided a list below.
Mercon V Transmission fluid 10 quarts (side note I only used 4)
Transmission Filter (purchased from the local Ford dealership)
Transmission Pan Gasket (also from the dealership)
Kerosene
13mm and 10mm Sockets with 3/8" and 1/4" driver
Sea Foam Transmission cleaner
Shop Towels
Jack
Jack Stands
Gojo
Catch Pan
Card Board
Flat Head Screw Driver
3/8" drive extension.
To start off this endeavor I put the Sea Foam Transmission cleaner into my transmission dipstick receptacle. The directions say to run the vehicle for 5 or more miles switching through all the gears. I figured 247 miles should about do it. Now, I'm not sure if this actually did anything, but it claims to de-glaze your transmission system.
Here is a picture of most of my materials.
To start, jack up your vehicle and put two jack stands, one on each side of the vehicle. I normally leave the jack under there as well. I make sure it has a little bit of pressure on the lift point, but I still keep the main force on the jack stands. Next, place your catch pan under the vehicle. The bigger the pan the better chance you will keep the drive way clean. I use the card board as a poor mans creeper. I simply place it under the vehicle and slide on it to gave access to the under side of my Explorer.
To remove the transmission pan, I crawled under the vehicle and inspected the pan. I did not see any signs of damage and I was pleased. The first thing to do is to pop the heat shield off of the pan. Refer to the photo to see the heat shield. Next, I used a 3/8" driver with a 13mm socket to remove the pan bolts. For some of the bolts I had to use an extension. I used a tried and true method to remove these bolts so that I would limit the amount of spillage. I broke all the bolts or relieve the pressure on the pan to transmission connection. I then took all of the side bolts out. By side bolts I mean the ones not on the corners. That means I left two bolts on each corner. I did not want to to damage the pan so I kept these eight bolts at the same pressure. I then slid the catch pan under the transmission pan to catch the fluid that is about to start flowing. I then loosened the rear bolts to force the fluid to the rear of the vehicle. At this point your arms will get a lovely coating of hopefully dark red fluid. After the majority of the fluid has stopped flowing I then removed the remaining bolts. When the last bolt is removed be ready to take the full force of the pan and remaining fluid. To remove the pan I actually had to use a flat head screw driver and gently pry the pan to break the seal the gasket had made.
To remove the filter all you have to do is use the 3/8" drive and the 10mm drive. There is a bolt in the middle of the filter. Simple remove this and gently pry off the filter with your hand. Ensure that the two black O-rings are on the filter.
I now started the clean up process. I removed the old gasket from the pan and then discarded it. I used Kerosene and the shop towels to remove all of the residue that was in the pan. This is after I dumped the remaining fluid out of course. I made sure to clean everything I could. This included the magnet in the pan and then the bottom of the transmission under the vehicle. I made sure to wipe up any remaining fluid and double checked to make sure all of the old gasket was gone.
After all of that I had to prep the new filter and gasket. The gasket has a pretty cool feature. They have small metal inserts in the gasket that protects the gasket from over torquing. You might have seen these in other posts. Anyways, I put the gasket on the pan and put a bolt to keep the holes lines up. For the filter you will need to put two o-rings on. There is a large one that goes on the larger spout and a smaller o-ring that goes on the smaller spout. Look at the picture below and you will see what I mean.
To replace the filter crawl back under the vehicle. Then, gently push the filter back in place. If you did not remember the orientation when you removed it, just remember the big spout goes in the big hole and the small spout goes in the small hole. No brainier right.
Then insert the bolt that should have came with the filter. Once again it is a 10mm socket and I used a 3/8" drive. I then took my pan/gasket/bolt under the vehicle to mount it up. It can be a little tricky, but simply get one bolt started then continue with the rest. Normally in a situation like this you should find the torque setting for the bolt and use a torque wrench to ensure you do not damage anything. Well, I didn't have that. By the way, I think the torque setting is 23 ft/lbs, not 100% on that. Anyways, I used a 1/4" drive with a 13mm socket. Why a 1/4" drive you ask. Well you should not be able to over torque the bolt with a 1/4" drive. If you do I recommend you go by a torque wrench and lay off the forearm excesses. After this simply clip the heat shield back on the transmission pan. Mine was hesitant so I used the flat head screw driver and worked it back on. To finish this project up you will need to add the fluid you took out. As mentioned above I read my manual and bought 10 quarts of Mercon V. Well, apparently that is if you don't have any fluid at all. I only took out four quarts so that is what I added back in. First, remove your vehicle from the jack stands and jack. You then pull your transmission dip stick and put a funnel in. Open your Mercon V fluid bottle and pour in. To clean myself I used the Gojo, a little water, and a lot of shop towels. After this I ran Dillo till the transmission warmed up. After this I put the vehicle in park, while it was still running, and and checked the dip stick. Make sure the fluid level is in the normal operating range. If it is, your done. If not, add more fluid.
I have to say after doing this install my truck ran much better. The transmission seemed to engage the gears at a quicker rate. I immediately noticed an instant drop in lag time when shifting. Well that is it for this write up. In case you were curious I put a picture of the dirty filter below.
 Do you plan on eventually adding a drain plug?