dvdswan
Well-Known Member
- Joined
- June 6, 2021
- Messages
- 349
- Reaction score
- 202
- City, State
- SEATTLE
- Year, Model & Trim Level
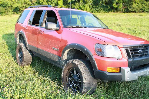
- 2002 ST 4WD Premium
Last couple of days I've been playing around and searching the net to things to do.
Ordered the timing chain tensioners and the thermostat housing yesterday. Also ordered body mounts, LED bulbs for the interior and instrument panel (installed the rear dome light/map lights. The front the T5 connectors were burned and the ribbon tape for the lights was broken, the lights did work before but now they are not. I image the ribbon tape is falling out of connection path). Ordered new T5 connectors with bulbs at the moment and will replace with LEDs when I'm sure the T5s are the right size. I had some T10s and they're too small, go figure, what you have on hand never is right.
I did order a new radio and tailgate handle with camera as well.
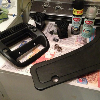
I took apart the center instrument bezel that I bought not long ago...


I used a small drill bit, 1/8" I think to remove the melted plastic stud cap that hold the 4x4 and rear wiper indicators in place. 4 studs on each one.


The rear wiper will be changed out with the back window that belongs there. When I'm ready to set them back into place I'll drop hot plastic back on top of the studs.
Played with 2 colors, unfortunately each time the sun disappeared and cooled the plastic too fast and I got cracks in paint. So, I will repaint it again. 1st color was aluminum... it was really shiny and I think it would be too bright against the dark gray interior.

and then stainless steel which I think looks better, but I'll know more when I install it when I'm done.

I also ordered some power mirrors with puddle lights and heated. This way I can hookup the defroster switch to them. The mirrors are from an 02 Explorer, so the base is different but I plan on playing with these to see if they can be mounted to the ST mirror bases.
Oil changes for both the expo and ST will be done this weekend, oh yeah. But maintenance has to be done. Should get trans services done too if time permits.

Ordered the timing chain tensioners and the thermostat housing yesterday. Also ordered body mounts, LED bulbs for the interior and instrument panel (installed the rear dome light/map lights. The front the T5 connectors were burned and the ribbon tape for the lights was broken, the lights did work before but now they are not. I image the ribbon tape is falling out of connection path). Ordered new T5 connectors with bulbs at the moment and will replace with LEDs when I'm sure the T5s are the right size. I had some T10s and they're too small, go figure, what you have on hand never is right.
I did order a new radio and tailgate handle with camera as well.
I took apart the center instrument bezel that I bought not long ago...
I used a small drill bit, 1/8" I think to remove the melted plastic stud cap that hold the 4x4 and rear wiper indicators in place. 4 studs on each one.
The rear wiper will be changed out with the back window that belongs there. When I'm ready to set them back into place I'll drop hot plastic back on top of the studs.
Played with 2 colors, unfortunately each time the sun disappeared and cooled the plastic too fast and I got cracks in paint.
So, I will repaint it again. 1st color was aluminum... it was really shiny and I think it would be too bright against the dark gray interior.and then stainless steel which I think looks better, but I'll know more when I install it when I'm done.
I also ordered some power mirrors with puddle lights and heated. This way I can hookup the defroster switch to them. The mirrors are from an 02 Explorer, so the base is different but I plan on playing with these to see if they can be mounted to the ST mirror bases.
Oil changes for both the expo and ST will be done this weekend, oh yeah. But maintenance has to be done. Should get trans services done too if time permits.
 My luck though I probably threw them out during last year's garage cleaning.