- Joined
- October 5, 2008
- Messages
- 3,201
- Reaction score
- 436
- Location
- Humid, Damp, and Hot
- City, State
- Houston, TX
- Year, Model & Trim Level
- '98 EB, '93 Limited
Everybody has referenced this "how-to" here for most of their overhead console answers on installation and wiring.
But even with that great writeup, I still come away without a complete idea on how to install it. Hopefully here, with pics, I can help those people with question marks above their heads on this issue.
First off you will need:
PLEASE READ THIS WIRING DIAGRAM - DOWNLOAD IT AND LOOK AT OVERHEAD CONSOLE.PDF - Thanks to CmdrPopNFresh!!
Overhead console - You can find these on ebay from $40-$100, the difference in prices is comparable to how much you will actually receive.
Wiring harness - Need as much as you can get.
Mounting bracket - Gotta have this. If it doesn't come with the console, Look around for one that does.
Temp sensor - Looks like a small black cigar that is right behind the radiator. If you get one with the "kit" than you can place it wherever you want.
Basic screwdrivers
SHARP box knife or other SHARP knife
A helper
Wire trimmers
Splicing tools and pieces
First off I started with the bracket

and traced its design on a piece of cardboard. I then cut the trace out out and trimmed the edges to make it slightly smaller than the bracket itself. I used this as a guide for making the cuts in the headliner.

The cut needs to be made right between the two sun shades and you need to cut deep. It's alright if you need to make two or three cuts on the same line to get all the way through. That headliner stuff is THICK!
Now here was my first mistake. I had no dimensions for EXACTLY where to cut the headliner other than knowing its general placement and the guide i had from the bracket, so I guessed.

Now my mistake is now the salvation for your headliner") Here are the proper dimensions for placement of the bracket.
Here are the proper dimensions for placement of the bracket.
Plastic Trim|<--19 3/4"-->|Console Bracket|<--19 3/4"-->|Plastic Trim
|Console Bracket|
/|\
2 1/2"
\|/
Front of Headliner
You will need to move that green wire out of the way in the above pic so the bracket will fit.

As you can see in the pic the cut is a little off.
Now, at first I just tried to put the bracket on and screw it in...WITHOUT sticking the rear part of the bracket UNDER the headliner. Believe me, the minute I did it I knew it was wrong.
The proper way is this:

Now here is how the console attaches.


Yep, that's right. You will have to screw through the headliner to hit the bracket.
Now this is a dry attach with NO wiring. However if you have followed this so far you should be ready to do that next.

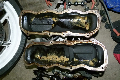
Ok, here is the wiring harness. I am going to identify all the plugs and where they go. Sorry for the crappy cell phone pics.
The full wiring harness. They sent me the whole deal here. I was pretty impressed.

Now the individual plugs. These two white colored connectors with green wires connect to the lights in the courtesy mirrors.

Next up is the Limited Auto Dim Rear View Mirror plug (The small thin one) and the Over head console plug (The large one).

This plug *I believe* goes to the cargo light in the rear of the truck. I plan on splicing it into the the existing wiring for the dome light and cargo light so I can still use the dome light.

And last, but not least, the main part of the wiring harness. So far I have determined that it could be spliced into the wiring behind the *Driver's side* A-pillar molding.

Also a bonus pic of that little gem - the temperature sensor.

Ok, I have finally determined the BASIC wires you need for the install. These are almost completely different from the wire colors stated in the original overhead console install write up. This is partly why it has taken so much time to update with wiring placement. I have no idea why *EXCEPT* maybe the console he pulled was from a 2nd Gen. Mine was from a '94 Limited.
1. Power is: Purple/Orange
2. Speed Sensor is: Grey/Black
3. Temperature Sensor wires are: Blue/Green and Light Blue/Orange
4. Dimmer wire is: Blue/Red
5. Front Dome Light and Vanity Mirror Lights are: Green/Yellow
6. Cargo Light is: Black/Blue
Pics anyone?
Alright to start the wiring you will need to remove these things:
-Negative Battery cable (Do I need to tell you why )
-Both Sunshades (4 Screws)
-Right AND Left A-piller plastics (careful with these, those plugs can be fragile and break)
-The black tabs underneath the A-piller plastics that hold in the head liner
Ok, under the left A-pillar plastic you should see a thick cable. This is the wiring harness to all the lights. If you will notice it has a plug down near the dash.
You are going to want to save this harness.
Pull the headliner down and start undoing all the white fasteners.
When you get to the the green/yellow wire and the black/blue one that lead to the back of the truck, cut them, but leave plenty of slack.

Ok you should have this out by now:

Next up you need to add about three feet of wire to each of these: (more if your harness was cut shorter than mine)
1. Power wire: Purple/Orange
2. Speed Sensor wire: Grey/Black
3. Temperature Sensor wires: Blue/Green and Light Blue/Orange
4. Dimmer wire: Blue/Red
5. Front Dome Light and Vanity Mirror wires: Green/Yellow
6. Cargo Light wire: Black/Blue
Make sure you identify them or you are going to be popping up and down from under the dash like gopher trying to figure out which wire is what.
Are you done? 'k, next up you got to get all those little wires down to the wiring harness under the dash. Follow the original cable after the plug down to the little slit next to the dash. You can either tie them in a lose overhand knot and slide them in or feed them in one at a time.
Now, I have identified each of the wires you need to splice into. Sorry for the blurry pics.
Power wire: splice it into the gray/yellow wire under the dash on the right side of the steering wheel.

The one with the bright yellow connector is the wire. (I took all these AFTER I spliced into the wires)
Ground and Dimmer: These are spliced into the plug on the back of the ash tray. Its only two screws to remove.

Speed Sensor: I spliced this into the grey/black wire coming out of a separate harness that came out through the firewall slightly to the left of the brake pedal.

Cargo and Dome Lights: I took a different approach with these. You should have two black/blue wires and one that is green/yellow. Take the old harness and cut off the plug with plenty of extra wire. Now splice the two wires identified above into the two wires coming out of that plug. Voila! You can plug these two directly into the already existing female plug without going under the dash.


Ok, time to reattach the negative battery cable and plug in the console. Turn the keys to the ON position and see if you are lighting up. If you are then proceed on. If not double check all your connections.
Now, its time to put the harness back in and hook up the dome and cargo lights. First tie up any remaining wires and shove them into the crack...nicely, with NO bare leads. Now your new harness should have the white plugs to hold it onto the frame. Start attaching them on the driver's side A-frame till you get to the first vanity mirror plug. Now cut off the black/blue wire leading to the cargo light and splice it into the existing wiring you cut earlier. After that take an extra piece of wire and splice the green/yellow dome light to the first vanity mirror wire.
Finally finish attaching the harness to the frame under the headliner till you get to the overhead console area. Screw in the overhead bracket and run the harness OVER the bracket. Run the last plug to the right vanity mirror.

Ok, what's left? The temp sensor, right? Well, it turns out mine was defective, but I left the temp sensor wiring zip tied under the dash so I could wire one in when I get it. For you you can wire it inside the truck (a better option in my opinion) or outside (more accurate). Doesn't matter.
Alright time to button everything up. Replace all your trim pieces and make sure the dome light and cargo light wiring is placed securely under the headliner.
Plug in your overhead console and screw it into place, Turn the truck on and press MODE until VAR appears on the screen. Check this diagram for your area and variance. In this mode keep hitting MODE till your number appears then let it sit for about a minute and it will return to normal.

Now, last but not least you need to calibrate your new console. Find an open parking lot and press mode on the console till CAL appears. put your X in drive and drive in a circle without applying the pedal. Keep doing this till the CAL symbol disappears.
Your done! Now go out and impress your friends with your wiring knowledge
But even with that great writeup, I still come away without a complete idea on how to install it. Hopefully here, with pics, I can help those people with question marks above their heads on this issue.
First off you will need:
PLEASE READ THIS WIRING DIAGRAM - DOWNLOAD IT AND LOOK AT OVERHEAD CONSOLE.PDF - Thanks to CmdrPopNFresh!!
Overhead console - You can find these on ebay from $40-$100, the difference in prices is comparable to how much you will actually receive.
Wiring harness - Need as much as you can get.
Mounting bracket - Gotta have this. If it doesn't come with the console, Look around for one that does.
Temp sensor - Looks like a small black cigar that is right behind the radiator. If you get one with the "kit" than you can place it wherever you want.
Basic screwdrivers
SHARP box knife or other SHARP knife
A helper
Wire trimmers
Splicing tools and pieces
First off I started with the bracket
and traced its design on a piece of cardboard. I then cut the trace out out and trimmed the edges to make it slightly smaller than the bracket itself. I used this as a guide for making the cuts in the headliner.
The cut needs to be made right between the two sun shades and you need to cut deep. It's alright if you need to make two or three cuts on the same line to get all the way through. That headliner stuff is THICK!
Now here was my first mistake. I had no dimensions for EXACTLY where to cut the headliner other than knowing its general placement and the guide i had from the bracket, so I guessed.
Now my mistake is now the salvation for your headliner
Here are the proper dimensions for placement of the bracket.Plastic Trim|<--19 3/4"-->|Console Bracket|<--19 3/4"-->|Plastic Trim
|Console Bracket|
/|\
2 1/2"
\|/
Front of Headliner
You will need to move that green wire out of the way in the above pic so the bracket will fit.
As you can see in the pic the cut is a little off.
Now, at first I just tried to put the bracket on and screw it in...WITHOUT sticking the rear part of the bracket UNDER the headliner. Believe me, the minute I did it I knew it was wrong.
The proper way is this:
Now here is how the console attaches.
Yep, that's right. You will have to screw through the headliner to hit the bracket.
Now this is a dry attach with NO wiring. However if you have followed this so far you should be ready to do that next.
Ok, here is the wiring harness. I am going to identify all the plugs and where they go. Sorry for the crappy cell phone pics.
The full wiring harness. They sent me the whole deal here. I was pretty impressed.
Now the individual plugs. These two white colored connectors with green wires connect to the lights in the courtesy mirrors.
Next up is the Limited Auto Dim Rear View Mirror plug (The small thin one) and the Over head console plug (The large one).
This plug *I believe* goes to the cargo light in the rear of the truck. I plan on splicing it into the the existing wiring for the dome light and cargo light so I can still use the dome light.
And last, but not least, the main part of the wiring harness. So far I have determined that it could be spliced into the wiring behind the *Driver's side* A-pillar molding.
Also a bonus pic of that little gem - the temperature sensor.
Ok, I have finally determined the BASIC wires you need for the install. These are almost completely different from the wire colors stated in the original overhead console install write up. This is partly why it has taken so much time to update with wiring placement. I have no idea why *EXCEPT* maybe the console he pulled was from a 2nd Gen. Mine was from a '94 Limited.
1. Power is: Purple/Orange
2. Speed Sensor is: Grey/Black
3. Temperature Sensor wires are: Blue/Green and Light Blue/Orange
4. Dimmer wire is: Blue/Red
5. Front Dome Light and Vanity Mirror Lights are: Green/Yellow
6. Cargo Light is: Black/Blue
Pics anyone?
Alright to start the wiring you will need to remove these things:
-Negative Battery cable (Do I need to tell you why
)-Both Sunshades (4 Screws)
-Right AND Left A-piller plastics (careful with these, those plugs can be fragile and break)
-The black tabs underneath the A-piller plastics that hold in the head liner
Ok, under the left A-pillar plastic you should see a thick cable. This is the wiring harness to all the lights. If you will notice it has a plug down near the dash.
You are going to want to save this harness.
Pull the headliner down and start undoing all the white fasteners.
When you get to the the green/yellow wire and the black/blue one that lead to the back of the truck, cut them, but leave plenty of slack.
Ok you should have this out by now:
Next up you need to add about three feet of wire to each of these: (more if your harness was cut shorter than mine)
1. Power wire: Purple/Orange
2. Speed Sensor wire: Grey/Black
3. Temperature Sensor wires: Blue/Green and Light Blue/Orange
4. Dimmer wire: Blue/Red
5. Front Dome Light and Vanity Mirror wires: Green/Yellow
6. Cargo Light wire: Black/Blue
Make sure you identify them or you are going to be popping up and down from under the dash like gopher trying to figure out which wire is what.
Are you done? 'k, next up you got to get all those little wires down to the wiring harness under the dash. Follow the original cable after the plug down to the little slit next to the dash. You can either tie them in a lose overhand knot and slide them in or feed them in one at a time.
Now, I have identified each of the wires you need to splice into. Sorry for the blurry pics.
Power wire: splice it into the gray/yellow wire under the dash on the right side of the steering wheel.
The one with the bright yellow connector is the wire. (I took all these AFTER I spliced into the wires)
Ground and Dimmer: These are spliced into the plug on the back of the ash tray. Its only two screws to remove.
Speed Sensor: I spliced this into the grey/black wire coming out of a separate harness that came out through the firewall slightly to the left of the brake pedal.
Cargo and Dome Lights: I took a different approach with these. You should have two black/blue wires and one that is green/yellow. Take the old harness and cut off the plug with plenty of extra wire. Now splice the two wires identified above into the two wires coming out of that plug. Voila! You can plug these two directly into the already existing female plug without going under the dash.
Ok, time to reattach the negative battery cable and plug in the console. Turn the keys to the ON position and see if you are lighting up. If you are then proceed on. If not double check all your connections.
Now, its time to put the harness back in and hook up the dome and cargo lights. First tie up any remaining wires and shove them into the crack...nicely, with NO bare leads. Now your new harness should have the white plugs to hold it onto the frame. Start attaching them on the driver's side A-frame till you get to the first vanity mirror plug. Now cut off the black/blue wire leading to the cargo light and splice it into the existing wiring you cut earlier. After that take an extra piece of wire and splice the green/yellow dome light to the first vanity mirror wire.
Finally finish attaching the harness to the frame under the headliner till you get to the overhead console area. Screw in the overhead bracket and run the harness OVER the bracket. Run the last plug to the right vanity mirror.
Ok, what's left? The temp sensor, right? Well, it turns out mine was defective, but I left the temp sensor wiring zip tied under the dash so I could wire one in when I get it. For you you can wire it inside the truck (a better option in my opinion) or outside (more accurate). Doesn't matter.
Alright time to button everything up. Replace all your trim pieces and make sure the dome light and cargo light wiring is placed securely under the headliner.
Plug in your overhead console and screw it into place, Turn the truck on and press MODE until VAR appears on the screen. Check this diagram for your area and variance. In this mode keep hitting MODE till your number appears then let it sit for about a minute and it will return to normal.
Now, last but not least you need to calibrate your new console. Find an open parking lot and press mode on the console till CAL appears. put your X in drive and drive in a circle without applying the pedal. Keep doing this till the CAL symbol disappears.
Your done! Now go out and impress your friends with your wiring knowledge