theluke19
Well-Known Member
- Joined
- January 14, 2004
- Messages
- 905
- Reaction score
- 5
- City, State
- Denver, Co
- Year, Model & Trim Level
- 2005 Sport Trac
Well, I had some extra time today, and decided to go ahead and tackle this project.
What this write-up covers is how to add a switch near the driver's seat to manually activate the reverse lights. The reverse lights will continue to function as normal (illuminated while in reverse), but will also become available by switch even when the truck is off/in park/not in the driver's seat.
Let's get to work.
Parts/Tools used by me - yours may vary:
5 pin Auxilary relay ($7)
In-line blade fuse terminal and 30 A blade fuse ($4)
12v Automotive switch ($3)
~15 ft of 14 gauge 'main' wire (red pref.)
~3 ft of 14 gauge 'ground' wire (black pref.)
small Zip-ties
Ratchet/driver with 8mm (power terminal) and 10mm (ground) sockets
Wire cutters
Exacto knife
Multimeter
Electrical Tape
Wire Crimper
~8 crimp-on female spade terminals
~3 crimp-on butt connectors
~2 crimp-on ring connectors

The first step was to find the reverse light wire. Problem was, I didn't know the best place to tie in.
The wire you're looking for is Black/Pink, and may be found in various areas of the truck. I found mine behind the driver's kick panel - which is also the most convenient place to hide a bulky relay.
Here's how to get to it:
First, Pull the kick panel, which I found easiest to do by starting with the rear-of-the-vehicle most part of the panel.

Then, you'll need to pull back the rubber cover, as shown, to expose the hidden wires.

A closer look will reveal a handy-dandy grounding point for your relay/switch:

Look through the bushel o' wires, until you find the two Black/pink wires. I'm unsure if there is two because of the two lights, or not - but I tested one, and it did what I wanted to, so I used it.

Make sure to test the wire with a multimeter / test light to see if it is the correct wire!
Here's what the proper one tested with a multimeter (Shave off a piece of the wire sheathing, and use that for a red (hot) test point, and connect the black test point to a grounding point on the vehicle.):
Off:

Brakes:

Reverse:

Once you've found the proper wire, the hard part is done, and the fun part begins!
Here's what you're looking at for wiring (it looks a little confusing at first, but take a few minutes to look at it and figure it out. If you have questions, just ask):

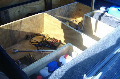
I started by running my power wire. You'll want to keep the fuse as close to the battery as possible. I found this Power terminal along the fusebox, and used a ring terminal connected to my in-line fuse to tie into it. I pulled the fuse out until the project was finished.

I ran this wire (ziptied to sturdy places) under the cab, and into a gromet-plugged hole which comes up under the front of the driver's seat.

The black wire in that picture is for my reverse camera, but to run the wires through the gromet, I had to modify it slightly (failure to modify this gromet to ensure that the hot wire is not cut may result in your fuse blowing as the wire gets cut by the metal!):

Back to the wiring

I hooked up as much as I could, while working on the tailgate, as possible. For instance, take time to crimp on connectors, set up the switch to the relay, cut the proper lengths of wire- prior to getting under the steering wheel in that cramped area.
Also, as you can tell by the diagram, I used the SAME ground/power for the switch and relay by using a butt connector to turn 1 wire into 2.
When I took the black/pink wire, and clipped it- I used butt connectors and a couple 4" pieces of wire to extent them to reach the relay.
Once it is all wired, plug in your fuse, and give it a shot!


Let there be light!
Now, for cable management. Wrap any exposed terminal with electrical tape. Then, start tucking the relay/wires into the available hole in the body.


Replace the rubber cover/and kick panel -
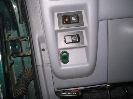
I pulled my switch up to the top of the kick panel. This is not where I plan to leave it. I have already ordered 5 new, matching switches for cheap - which have green LED's. I'll update this when I change out the switch.

Have fun! (I know I did!)
What this write-up covers is how to add a switch near the driver's seat to manually activate the reverse lights. The reverse lights will continue to function as normal (illuminated while in reverse), but will also become available by switch even when the truck is off/in park/not in the driver's seat.
Let's get to work.
Parts/Tools used by me - yours may vary:
5 pin Auxilary relay ($7)
In-line blade fuse terminal and 30 A blade fuse ($4)
12v Automotive switch ($3)
~15 ft of 14 gauge 'main' wire (red pref.)
~3 ft of 14 gauge 'ground' wire (black pref.)
small Zip-ties
Ratchet/driver with 8mm (power terminal) and 10mm (ground) sockets
Wire cutters
Exacto knife
Multimeter
Electrical Tape
Wire Crimper
~8 crimp-on female spade terminals
~3 crimp-on butt connectors
~2 crimp-on ring connectors
The first step was to find the reverse light wire. Problem was, I didn't know the best place to tie in.
The wire you're looking for is Black/Pink, and may be found in various areas of the truck. I found mine behind the driver's kick panel - which is also the most convenient place to hide a bulky relay.
Here's how to get to it:
First, Pull the kick panel, which I found easiest to do by starting with the rear-of-the-vehicle most part of the panel.
Then, you'll need to pull back the rubber cover, as shown, to expose the hidden wires.
A closer look will reveal a handy-dandy grounding point for your relay/switch:
Look through the bushel o' wires, until you find the two Black/pink wires. I'm unsure if there is two because of the two lights, or not - but I tested one, and it did what I wanted to, so I used it.
Make sure to test the wire with a multimeter / test light to see if it is the correct wire!
Here's what the proper one tested with a multimeter (Shave off a piece of the wire sheathing, and use that for a red (hot) test point, and connect the black test point to a grounding point on the vehicle.):
Off:
Brakes:
Reverse:
Once you've found the proper wire, the hard part is done, and the fun part begins!
Here's what you're looking at for wiring (it looks a little confusing at first, but take a few minutes to look at it and figure it out. If you have questions, just ask):
I started by running my power wire. You'll want to keep the fuse as close to the battery as possible. I found this Power terminal along the fusebox, and used a ring terminal connected to my in-line fuse to tie into it. I pulled the fuse out until the project was finished.
I ran this wire (ziptied to sturdy places) under the cab, and into a gromet-plugged hole which comes up under the front of the driver's seat.
The black wire in that picture is for my reverse camera, but to run the wires through the gromet, I had to modify it slightly (failure to modify this gromet to ensure that the hot wire is not cut may result in your fuse blowing as the wire gets cut by the metal!):
Back to the wiring
I hooked up as much as I could, while working on the tailgate, as possible. For instance, take time to crimp on connectors, set up the switch to the relay, cut the proper lengths of wire- prior to getting under the steering wheel in that cramped area.
Also, as you can tell by the diagram, I used the SAME ground/power for the switch and relay by using a butt connector to turn 1 wire into 2.
When I took the black/pink wire, and clipped it- I used butt connectors and a couple 4" pieces of wire to extent them to reach the relay.
Once it is all wired, plug in your fuse, and give it a shot!
Let there be light!
Now, for cable management. Wrap any exposed terminal with electrical tape. Then, start tucking the relay/wires into the available hole in the body.
Replace the rubber cover/and kick panel -
I pulled my switch up to the top of the kick panel. This is not where I plan to leave it. I have already ordered 5 new, matching switches for cheap - which have green LED's. I'll update this when I change out the switch.
Have fun! (I know I did!)