MillennialFalcon
New Member
- Joined
- January 9, 2022
- Messages
- 7
- Reaction score
- 12
- City, State
- San Luis Obispo CA
- Year, Model & Trim Level
- 1999 Ford Explorer EB
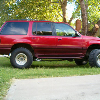
Thought I would share my ‘98 5.0 2wd explorer “budget” build.
It’s been about 3 years imagineering
2 years of collecting parts and actually building it
My dumbass thought it would be cheaper and cooler to do this build using OEM F150 parts. Was it cheaper? Maybe. Was it a lot of alcohol fueled fab? Yes. Lol
I can honestly say that I spent the most money on shocks and bumps of this whole build.
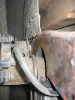
I started with the rear axle..
I chose an ‘04 F150 8.8 because big bearing, bigger brakes, wider, and still able to use the factory speed sensor from the explorer. -$250 @ local junkyard

cut off all the factory junk, added a backbone truss and geared it 4.56 with Spartan lunchbox locker


Then I bought the explorer lol

Once I got the exploder, I was able to take better measurements on the rear frame for leaf spring mounts, and commit to supension options. I decided to do a cantilevered link killer set up cuz I didn’t want to run the shocks into the cab, but wanted a lot of travel. I also decided I was gonna try to adapt F150 4wd spindle/knuckle to my home-brewed alcohol fueled long travel arms. At this point, I had several design issues, I wanted to run 5x135mm lug pattern because I wanted to use knuckles from an ‘02 F150 4WD because using CAD to model, the a-arm geometry of that year worked so well with the stock explorer a-arm pivot mounts vs using the later years F150 knuckles. (Also I had scored on stock FX4 17” wheels cheap using that lug pattern -$100 for x4 rims) Problem is my rear axle is 6x135mm pattern. I devised an absolutely redneck way to re-drill them. Welded all the lug holes shut except one that would work with 5x135mm and re-drilled the lug pattern using a mag drill and template to accurately mount mag-drill.


Worked out perfectly. Lol
Once I had the rear end all figured out, I went ahead and modeled a cantilever set up designed around King 10” stroke 3.0 4 tube bypass with a rising rate.
 Stay tuned for part 2!
It’s been about 3 years imagineering
2 years of collecting parts and actually building it
My dumbass thought it would be cheaper and cooler to do this build using OEM F150 parts. Was it cheaper? Maybe. Was it a lot of alcohol fueled fab? Yes. Lol
I can honestly say that I spent the most money on shocks and bumps of this whole build.
I started with the rear axle..
I chose an ‘04 F150 8.8 because big bearing, bigger brakes, wider, and still able to use the factory speed sensor from the explorer. -$250 @ local junkyard
cut off all the factory junk, added a backbone truss and geared it 4.56 with Spartan lunchbox locker
Then I bought the explorer lol
Once I got the exploder, I was able to take better measurements on the rear frame for leaf spring mounts, and commit to supension options. I decided to do a cantilevered link killer set up cuz I didn’t want to run the shocks into the cab, but wanted a lot of travel. I also decided I was gonna try to adapt F150 4wd spindle/knuckle to my home-brewed alcohol fueled long travel arms. At this point, I had several design issues, I wanted to run 5x135mm lug pattern because I wanted to use knuckles from an ‘02 F150 4WD because using CAD to model, the a-arm geometry of that year worked so well with the stock explorer a-arm pivot mounts vs using the later years F150 knuckles. (Also I had scored on stock FX4 17” wheels cheap using that lug pattern -$100 for x4 rims) Problem is my rear axle is 6x135mm pattern. I devised an absolutely redneck way to re-drill them. Welded all the lug holes shut except one that would work with 5x135mm and re-drilled the lug pattern using a mag drill and template to accurately mount mag-drill.
Worked out perfectly. Lol
Once I had the rear end all figured out, I went ahead and modeled a cantilever set up designed around King 10” stroke 3.0 4 tube bypass with a rising rate.