How to: - 1994 Head gasket replacement / engine pull | Page 3 | Ford Explorer Forums - Serious Explorations

  • Register Today It's free!

How to: 1994 Head gasket replacement / engine pull

Prefix for threads which are instructional.
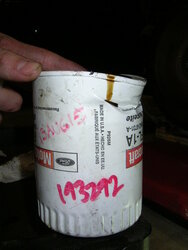
1-4. Motor is out. Have a plan for what you're going to do once the motor is out (unlike me). If you don't have an engine stand, have somewhere to set the motor down. Don't let it fall over and crush the oil filter making a mess, or crush a part of you.

I lifted the motor high enough to clear the truck, then rolled the truck out from under it to set it down. I will be building a stand out of wood to hold the engine.

Be aware that you will continue to lose coolant from the water pump holes.

Lacking a stand, I used a creeper with some blocks of wood to hold it temporarily. I added a little bit of tip protection with some bungees but it still doesn't need any sudden moves.
 

Attachments

  • PICT0123.JPG
    PICT0123.JPG
    122.7 KB · Views: 305
  • PICT0127.JPG
    PICT0127.JPG
    109.6 KB · Views: 307
  • PICT0124.JPG
    PICT0124.JPG
    114.6 KB · Views: 299
  • PICT0125.JPG
    PICT0125.JPG
    107.3 KB · Views: 306


Join the Elite Explorers for $20 each year.
Elite Explorer members see no advertisements, no banner ads, no double underlined links,.
Add an avatar, upload photo attachments, and more!
.


Bonus pictures.
 

Attachments

  • PICT0135.JPG
    PICT0135.JPG
    114.7 KB · Views: 300
  • PICT0134.JPG
    PICT0134.JPG
    121 KB · Views: 303
  • PICT0133.JPG
    PICT0133.JPG
    99.7 KB · Views: 298
  • PICT0130.JPG
    PICT0130.JPG
    84.4 KB · Views: 299
  • PICT0129.JPG
    PICT0129.JPG
    82.8 KB · Views: 303
  • PICT0128.JPG
    PICT0128.JPG
    89.5 KB · Views: 315
  • PICT0126.JPG
    PICT0126.JPG
    100 KB · Views: 288


Lessons learned:
  • Double check you've removed everything holding the engine back, before you lift it.
  • Take your time. Lift a little at a time.
  • Protect the truck from damage caused by the engine swinging around.
  • Protect yourself. Gloves and safety glasses. Steel toed boots if you have them. Don't stand under the engine when it is suspended.
  • Count all the bolts when you're removing them from the bellhousing. On a different trans job for a friend, we forgot one and broke an ear off the bellhousing.
  • Have a lot of paper towels handy for this job, and a couple tupperware containers to catch fluids.
  • If something is resisting you, don't force it. Analyze the issue and look at it from all sides. Take a break and come back to it. Rushing the job will result in damage to you or the vehicle.


Great write up Arco777 ! - I have always wanted to see a step by step breakdown of pulling the engine. I did my head gasket in summer of 2014. I wish I had replaced/cleaned lifters and replaced rocker arm assembly. If you can, now is the time to stop and ask what else could I look at while this motor is out ... even things in the engine bay are now accessible. Of course it depends upon your time and finances.

Thank you again for taking the time out to share your experience here.


Thank you, Watchman. It's not over yet. :)


What is that on the right cylinder head rear freeze plug?


That is a warranty tab glued on by a junkyard.

Close. It's a warranty tag from the cylinder head manufacturer. They are Pioneer heads, installed in 2008 just after I bought the truck and joined the forum.

I will try to continue the teardown tonight. Last night I was just too tired.
 

Attachments

  • PICT0005.JPG
    PICT0005.JPG
    87.2 KB · Views: 275
  • PICT0003.JPG
    PICT0003.JPG
    107.5 KB · Views: 278


It's a device that will melt (inside of plug?) if the engine is over heated. That way they know if the head failed itself or if it was operator error. Remand engine have these as well.


It's a device that will melt (inside of plug?) if the engine is over heated. That way they know if the head failed itself or if it was operator error. Remand engine have these as well.

Today I learned something :) thanks!


Ah hah. Very clever of Pioneer.

So, your heads cracked did they? NOT! you see this here melty bit..... ..


I got the motor on a proper stand tonight, pulled off the flexplate and the cover plate. No pictures yet.

Ordered a pair of performance servos for the A4LD and a Sonnax crank spacer, from Performance Automotive Transmission Center in Texas. Trans is also getting a PML deep aluminum pan, thanks to forum member DUDER 1. I briefly considered rebuilding the trans, but after learning how many tools I'd have to buy, I think I'll hold off for a little while. It shifts strong and gives no indications of any impending trouble.

A set of upgraded head bolts (10.9, re-usable, non torque-to-yield) arrived from Tom Morana Racing in Canada. New head gaskets are Fel-Pro Perma-Torque Severe Duty. The other new gaskets are a mix of Victor Reinz and Fel-Pro.

I think after this I'm going to end up with some leftover spare parts because I ordered too many. A few new misc gaskets, a new set of Fel-Pro Perma-Dry valve cover gaskets, a new set of Victor Reinz head bolts, etc. Have to figure out if someone else can make use of them. :)


1-2. Removed the flywheel and rear cover plate. 6 bolts. They have very fine threads. I used an electric impact wrench to remove them, otherwise the motor would have turned over (I don't have a helper to hold the crank).

The cover is a little tight around the locating dowel pins, so it took some prying. I took it slow and used a putty knife instead of a screwdriver to avoid damage/bending.
 

Attachments

  • PICT0007.JPG
    PICT0007.JPG
    127.8 KB · Views: 227
  • PICT0006.JPG
    PICT0006.JPG
    110.7 KB · Views: 229


1. Removed coil pack bracket. 3 bolts, two of which go into upper intake and one into the head above the exhaust manifold. Unplug the connector first.

2. Unplug some connectors. We're going to get the wiring harness off this thing in preparation for removing the upper intake (and I'm washing the motor first so I want all wires outta here). Unplug the TPS, IAC, and DPFE. Don't force any of the connectors, there's a way each one unlocks. I already have to use a ziptie to hold my IAC connector on...:roll:

3. Undo the DPFE exhaust sampling hoses - just pull them off the fitting.

4. Unplug the IAT and EGR vac solenoid.

5. Undo the vac line that goes to the EGR valve, and the vac line pair that goes to the EGR vac solenoid.

6. On the other side of the motor, find where the vac line runs to the fuel pressure regulator and pull it off.

7. Now with some finagling, you can get the whole vac line setup out.
 

Attachments

  • PICT0014.JPG
    PICT0014.JPG
    142.2 KB · Views: 230
  • PICT0013.JPG
    PICT0013.JPG
    138.4 KB · Views: 229
  • PICT0012.JPG
    PICT0012.JPG
    116.8 KB · Views: 232
  • PICT0011.JPG
    PICT0011.JPG
    112.8 KB · Views: 222
  • PICT0010.JPG
    PICT0010.JPG
    151.9 KB · Views: 253
  • PICT0009.JPG
    PICT0009.JPG
    143.3 KB · Views: 229
  • PICT0008.JPG
    PICT0008.JPG
    161.6 KB · Views: 235


1. Unplug coolant temp sensor. Or is it the sender? I get them mixed up.

2. Unplug the fuel injectors. They just take some wiggling. You can unplug the CPS, aka CMP (at the rear of the motor) now too.

3. The wiring harness is held to a tab, mounted to one of the upper intake manifold studs and held down by a nut. You can remove the nut to release the bracket, or try to pull the wire harness fastener out of the bracket. You can tell which I chose.

4. Undo the crank position sensor (CKP?) and the wire clips that hold its harness to the block.
 

Attachments

  • PICT0018.JPG
    PICT0018.JPG
    139.9 KB · Views: 235
  • PICT0017.JPG
    PICT0017.JPG
    100.7 KB · Views: 229
  • PICT0016.JPG
    PICT0016.JPG
    96.2 KB · Views: 234
  • PICT0015.JPG
    PICT0015.JPG
    109.9 KB · Views: 225


Extract the evap purge solenoid with its hoses. It should come out without much of a struggle, just be gentle with it so you don't break the solenoid's fittings.
 

Attachments

  • PICT0019.JPG
    PICT0019.JPG
    144.6 KB · Views: 217
  • PICT0020.JPG
    PICT0020.JPG
    117.6 KB · Views: 234


Since I want to remove the wiring harness before taking the upper intake off (keeping a good seal for washing the motor off)...

1. Unplug the other three injector connectors. The first one is easy, the second two will come off easiest with a real long needlenose pliers. I just went between the runners of the manifold.

2. Unplug the temperature sender/sensor. One of these controls the gauge, the other signals the PCM. I don't remember which at the moment.

3. The water neck is in the way. Unbolt it. Apparently the original bolts can be soft by now so if that's the case, go easy on them. Expect some coolant to dribble out. I used my shop vac to suck it away as I removed the bolts. I've got grade 8 hardware replacing the factory bolts. Good time to check for any corrosion on the water neck and clean it up if so.

4. Remove the thermostat. Grab and twist it a little if it's stuck. Good time to swap in a Motorcraft replacement.

5. I don't remember my gasket mating surfaces being this ugly, but at least the coolant passages look good so far!

6. Fuel line is still in the way. Use two wrenches to undo it. There shouldn't be any pressure or dribble.

7. Work the wiring harness out! For S&G I labeled all the connections for you...
 

Attachments

  • PICT0028.JPG
    PICT0028.JPG
    148.3 KB · Views: 228
  • PICT0027.JPG
    PICT0027.JPG
    82.6 KB · Views: 234
  • PICT0026.JPG
    PICT0026.JPG
    109.9 KB · Views: 222
  • PICT0024.JPG
    PICT0024.JPG
    110.9 KB · Views: 213
  • PICT0023.JPG
    PICT0023.JPG
    92.1 KB · Views: 206
  • PICT0022.JPG
    PICT0022.JPG
    139.7 KB · Views: 232
  • PICT0021.JPG
    PICT0021.JPG
    103.6 KB · Views: 225


Join the Elite Explorers for $20 each year.
Elite Explorer members see no advertisements, no banner ads, no double underlined links,.
Add an avatar, upload photo attachments, and more!
.


1. Undo the bolt holding the bracket for the DPFE. 13mm socket.

2. Undo the bracket holding the EGR vac solenoid. One bolt, one nut. I'm not sure what they are stock, probably 10mm socket for one and 5/16 or 8mm for the other.

3. Undo the EGR pipe fitting. If you haven't done it recently, you may want to use some penetrating oil first. Make sure you're turning the right direction before reefing on it.
 

Attachments

  • PICT0029.JPG
    PICT0029.JPG
    111.4 KB · Views: 235
  • PICT0030.JPG
    PICT0030.JPG
    131.7 KB · Views: 218
  • PICT0031.JPG
    PICT0031.JPG
    115 KB · Views: 228


Back
Top