Clutch5sp
Active Member
- Joined
- September 21, 2019
- Messages
- 64
- Reaction score
- 123
- City, State
- TX
- Year, Model & Trim Level
- 2000 Explorer XLT
Hello all...This truck has been very dependable since purchased new in 2000 Explorer 4dr 4x4 XLT 101k miles. Last few years has been quite the journey and learning experience with this & that's going wrong. You know...all the typical shtuff like vac leaks, fuel trim issues, rough running, and every other problem listed in these forums. I have a good understanding of PCM data for troubleshooting and my newest toy Forscan software to work with all my Ford vehicles. I've been chasing high LTFT (lean) for a long time now with no vac leaks or misfires. Compression test finally led to a better diagnosis finding low comp 1-cylinder each bank butt it still ran ok. Wife decided to keep driving it knowing something could go wrong at anytime. She brought it home Christmas eve with white smoke gushing from the tailpipe. Here's where I am right now....engine has been pulled and on engine stand torn down for inspection of all parts.
First intake gasket replacement job found a lot of thick oil sludge under valve covers, on heads, valve train & in the valley. This could have been caused by vac leak being regular with oil changes etc.. Intake ports had a layer of gunk and guess this comes from the EGR letting dirty exhaust back through. Cleaned it all up good as possible with an oil change afterwards.
Second intake gasket job was done due to the china rails (intake manifold to block front & rear) were not sealed good with Felpro kit and tube of pooky. Extra pooky got that sealed, butt still have a vac leak per scan data. Smoke test found IAC & EGR leaking and were replaced. Everything is tight as a tic while scan data still shows very high LTFT (lean) 18% to 25% bank 1&2 setting the infamous P0171 & P0174 codes with CEL of course. STFT behaved almost normal swinging above & below zero and O2's were doing their thing as normal. Nothing would change LTFT at idle or driving snap throttle EXCEPT adding propane at the air cleaner tube before the MAF. Fuel filter, pump, injectors were all working properly.
Compression test found cylinder #3 120psi bank 1 and cylinder #5 130psi bank 2 to be lower than the rest being 160psi. All increased 10psi with a squirt of oil in the plug holes. I concluded the low compression each bank was false flag for a vac leak diagnosis tricked to being a whole engine affected not bank specific. This was causing the O2's to adjust for the improper combustion. The engine seemed to run OK, but these issues were concerning me knowing a huge repair was in the near future.
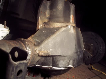
We have a blown head gasket as white smoke gushes from the tailpipe. I have everything tools hoist stand etc...except cam bearing puller on order. Cracked heads between the valve seats #3 & #4 along with blown gaskets. I'm seeing signs of light wear in rod & crank bearings most likely due to the sludge & crusty carap all in everything everywhere. Cylinder bores & pistons look pretty good no signs of wear. Rockers were pitted and worn at valve contact. Lifters look good, and will be taken apart & cleaned. Every moving part will get new bearings and/or replaced due to the crud going on in the oil for quite a long time. Surprised the damage isn't worse while count my blessings. Almost 2-gallons drained from the oil pan as 25% of that was water. No real milkshake happened.
New rings bearings push rods rockers gaskets seals HEADS and a high volume oil pump will hopefully get this truck back on the road for another 23-years. $1,450 for parts is only 2-payments back in the day when financed. Now trying to to get everything cleaned as parts trickle in for the next week or so. I have pics...need to find pic host site to share em with you all.
First intake gasket replacement job found a lot of thick oil sludge under valve covers, on heads, valve train & in the valley. This could have been caused by vac leak being regular with oil changes etc.. Intake ports had a layer of gunk and guess this comes from the EGR letting dirty exhaust back through. Cleaned it all up good as possible with an oil change afterwards.
Second intake gasket job was done due to the china rails (intake manifold to block front & rear) were not sealed good with Felpro kit and tube of pooky. Extra pooky got that sealed, butt still have a vac leak per scan data. Smoke test found IAC & EGR leaking and were replaced. Everything is tight as a tic while scan data still shows very high LTFT (lean) 18% to 25% bank 1&2 setting the infamous P0171 & P0174 codes with CEL of course. STFT behaved almost normal swinging above & below zero and O2's were doing their thing as normal. Nothing would change LTFT at idle or driving snap throttle EXCEPT adding propane at the air cleaner tube before the MAF. Fuel filter, pump, injectors were all working properly.
Compression test found cylinder #3 120psi bank 1 and cylinder #5 130psi bank 2 to be lower than the rest being 160psi. All increased 10psi with a squirt of oil in the plug holes. I concluded the low compression each bank was false flag for a vac leak diagnosis tricked to being a whole engine affected not bank specific. This was causing the O2's to adjust for the improper combustion. The engine seemed to run OK, but these issues were concerning me knowing a huge repair was in the near future.
We have a blown head gasket as white smoke gushes from the tailpipe. I have everything tools hoist stand etc...except cam bearing puller on order. Cracked heads between the valve seats #3 & #4 along with blown gaskets. I'm seeing signs of light wear in rod & crank bearings most likely due to the sludge & crusty carap all in everything everywhere. Cylinder bores & pistons look pretty good no signs of wear. Rockers were pitted and worn at valve contact. Lifters look good, and will be taken apart & cleaned. Every moving part will get new bearings and/or replaced due to the crud going on in the oil for quite a long time. Surprised the damage isn't worse while count my blessings. Almost 2-gallons drained from the oil pan as 25% of that was water. No real milkshake happened.
New rings bearings push rods rockers gaskets seals HEADS and a high volume oil pump will hopefully get this truck back on the road for another 23-years. $1,450 for parts is only 2-payments back in the day when financed. Now trying to to get everything cleaned as parts trickle in for the next week or so. I have pics...need to find pic host site to share em with you all.