2006 Ford Explorer Xact Communications XTR1 ( w/ car kit) plug and play Sirius satellite radio installation
By J. Clarke
NJStangFan@yahoo.com V.P., Central Jersey Mustangs & Fords
www.teamcjmf.com
This is my experience with the installation of an Xact Communications XTR1 plug and play Sirius satellite radio in a 2006 Ford Explorer. (Note: This Explorer contains the Audiophile stereo system.)
The Sirius unit with car kit (
http://shop.sirius.com/edealinv/ser...r=2640&siId=564300&catParentID=7875&scId=7875 )and the mounting bracket (Panavise model #75107-206,
http://www.cellularmount.com/order/itemdetail.asp?ID=3113 ):
Sirius unit:
Panavise mounting bracket box for 2006 Ford Explorer:
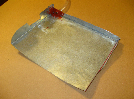
Contents of the mounting bracket box:
Contents of the Sirius box:
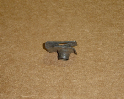
The Sirius car kit mounting bracket:
Step 1:
To prepare the Sirius mounting bracket for installation on the Panavise mount, remove the (center) screw that holds the main portion of the bracket to the section containing the double sided tape. It will look like this afterwards:
Step 2:
Using the shorter bolts (with the corresponding washers and nuts) supplied with the Panavise mount, attach the Sirius bracket to the mounting plate of the Panavise (the part with the pre-mounted bolts). It will then look like this:
Step 3:
Working from the passenger side of the vehicle, remove the shifter trim ring, being careful not to break it. (It’s plastic and will snap out if removed carefully.):
Step 4:
Open the center console and use a nut driver to remove the two bolts holding the tunnel cover (the piece with the cup holders in it).:
Step 5:
Contrary to the Panavise instructions, the power point in the tunnel cover does not need to be unclipped and removed. You can slip the tunnel cover over the shifter and set it on the driver’s seat.
Step 6:
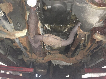
Working from the bottom, CAREFULLY remove the center console bezel. You don’t necessarily need to fully remove the entire thing. It can be extracted far enough to accomplish the installation without full removal.
Step 7:
Remove the two bolts holding the passenger side of the radio.
Step 8:
Install the mounting bracket using the two bolts from Step 7:
Step 9:
Run the power cord from the Sirius car kit along the passenger side on the interior of the bezel and reinstall the bezel. Run the power cord from the bottom of the bezel and through the interior of the tunnel and into the center console storage bin. Reinstall the tunnel cover using the two bolts that we removed in Step 4.
Step 10:
Take the Sirius bracket that was mounted to the front Panavise bracket in Step 4 and using the acorn nuts from the Panavise kit, mount it to the Panavise piece that was just mounted to the dashboard.
Step 11:
Take the bracket from the Sirius kit and install it onto the bottom of the mount:
Step 12:
Mount the Sirius unit on the Sirius bracket and run the power and antenna cord to the wiring harness. Plug in the harness and power cord into the power point and you’re now ready to enter the world of Sirius satellite radio.
Notes.
• I didn’t install the antenna cord in this installation because I’m not ready to active the unit… And for the fact that it was 30 degrees in the garage last night. I intend to run the antenna either to the dashboard or along the passenger side to the rear hatch and mount it on the roof (similar to Step 9).
• I intend to hard wire the Sirius unit audio output to the factory head unit to avoid the use of the FM modulator. (This allows use of the “AUX” button on the radio.) This will require a wiring harness and some more though.
• I intend to hardwire the power source. I’ll be using a “Y” adaptor similar to this:
http://www.radioshack.com/product/index.jsp?productId=2062266&cp=&kw=dc+outlet&parentPage=search in the meantime.
• This can be downloaded in .PDF format from:
http://www.lbisunsets.com/Jamie/Explorer/SiriusInstall/2006FordExplorerXactCommunicationsXTR1.pdf I should have my bracket this evening for my wife's 2006 Exploder and I'd like to know if anyone has hard wired the satellite output to the factory input yet. Any tips or tricks? How hard is it to take the center console apart to get the radio out?
 I'll post my write up when I get it done.