aldive
Elite In Memoriam
- Joined
- January 17, 2001
- Messages
- 24,667
- Reaction score
- 28
- Year, Model & Trim Level
- 1999 XLT
I have had my Flex A Lite Black Magic Extreme 180 fan installed for 10 months now ( http://www.explorerforum.com/forums/showthread.php?t=140251&highlight=electric+fan ).
This fan has provided me excellent service with one exception, the control unit ( http://www.explorerforum.com/forums/showthread.php?t=140251&page=5&pp=20&highlight=electric+fan post #84 ). The control unit went “all screwy” with the fan turn on function. I contacted Flex A Lite ( they are not real good returning E Mail, but the phone worked well ) and they provided me a new control unit at no cost ( Warranty ). It has functioned suitably but I wanted something better; something with variable speed control, no high amp draw on start up, would automatically stay running after shutting off the truck and had manual control capability.
I investigated several other controllers before deciding on the VSC from Flex A Lite; all the others lacked one or more features I desired. I actually liked the controller from Delta Controls (http://www.dccontrol.com/index.htm ) better, but ruled it out since it did not offer manual control of the fan.
I obtained the new VSC ( Variable Speed Controller # 31165 - http://www.flex-a-lite.com/auto/html/vsc.html ) from Jeg’s. The cost was $89.98 to my door.
This unit varies the fan speed from 60 to 100% depending on the cooling requirements. The controller operates the fan at 60% with the AC on ( unless the coolant temperature demands 100% speed ). Another constructive feature is that the VSC has a built in 5 second delay on start up to reduce charging system demands. The VSC also operated the fan for 30 seconds after turning off the truck’s ignition switch if the coolant temperature is higher than the turn off point.
First impression of the VSC is that it is a much better constructed unit than the stock 180 controller. The 180 controller can be opened and the circuit board is loose ( sloppy construction )whereas when opened the VSC’s “guts” are sealed in potting material.
Installation was straightforward and took about 1 hour; the majority of the time was in wire preparation.
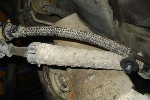
My biggest dilemma was where to mount the VSC. I did not want to mount it to the fan shroud since access to the wires is difficult in that location ( been there done that with the stock controller ). I decided to tie wrap the VSC to the antilock brake system tubing. This position allows easy access to the wires and the unit is out of the way.
Terminals on the VSC:
#1 Battery Negative
#2 Negative to Fan
#3 Positive to Fan
#4 Positive Input from Battery
#5 Negative Override Signal OFF
#6 Negative Override Signal ON
#7 AC Compressor Negative signal
#8 AC Compressor Positive Signal
#9 Ignition Positive Signal
#10 Temp Sensor Positive
#11 Temp Sensor Negative
The positive and negative wires from the fan are attached to the VSC ( terminals 3 and 2 ) with spade terminals ( after crimping on the terminal, heat shrink tubing was used to seal the connection ). Now the positive ( the fuse was removed from the holder ) and negative wires from the battery were attached to the VSC ( terminals 4 and 1 ). I attached the 12v positive ignition switched wire to the VSC ( terminal 9 - I used the wire that I previously used with the stock 180 controller ). The 12 v positive wire from the AC ( red wire ) was spliced to a green wire to the VSC ( terminal 8 – terminal 7 was not needed ). The existing manual turn on switch wire was then attached to the VSC ( terminal 6 ). The VSC also has a provision to manually switch off the fan ( terminal 5 ); I set up this feature with a switch mounted under the hood so that I can turn off the fan when working under the hood.
The temperature probe was attached as close as possible to the upper radiator hose by pushing it through the radiator fins. With about ¾” of the probe protruding from the radiator, the cap was reinstalled on the probe ( this serves two purposes: (1) to keep probe in place and (2) to insulate the probe from the cooler air for a more accurate temperature reading ). The two wires from the probe had to be spliced onto new wire to be able to reach the VSC ( terminals 10 and 11 - polarity was not important in this case ).
To set the VSC’s thermostat, the adjusting screw was turned clockwise to set the turn on temperature at a higher temperature ( counterclockwise for lower ). To achieve maximum accuracy ( +/- 1 F ), coolant temperature was determined by my OBD II scanner ( http://www.autoxray.com/products.aspx?sub=scanners&id=2 ). I set the thermostat to turn on at 185 F. This allows the fan to come on at 60% speed and as the temperature rises to 195 F, the fan reaches 100% speed.
There are LED indicators on the VSC to indicate the status of the various conditions.
L1 Fan Signal
L2 AC Operation
L3 Ignition Signal
When the truck is started, after 5 seconds, L3 will illuminate. With the motor running and AC on, L1, L2 and L3 will be illuminated. With the motor running and just the fan running, L1 and L3 will be illuminated.
After mounting the VSC, all the wires were enclosed in loom material to yield a safe and neat look.
A road test was performed including both highway and in town ( traffic ) driving. This controller performed flawlessly as advertised; a vastly superior product when compared to the stock 180 controller.
I really like the fact that there is no high amp draw from the fan at the truck’s start up as well as the fact that the fan automatically runs for 30 seconds after turning off the truck
I recommend the VSC to anyone with an electric cooling fan.
This fan has provided me excellent service with one exception, the control unit ( http://www.explorerforum.com/forums/showthread.php?t=140251&page=5&pp=20&highlight=electric+fan post #84 ). The control unit went “all screwy” with the fan turn on function. I contacted Flex A Lite ( they are not real good returning E Mail, but the phone worked well ) and they provided me a new control unit at no cost ( Warranty ). It has functioned suitably but I wanted something better; something with variable speed control, no high amp draw on start up, would automatically stay running after shutting off the truck and had manual control capability.
I investigated several other controllers before deciding on the VSC from Flex A Lite; all the others lacked one or more features I desired. I actually liked the controller from Delta Controls (http://www.dccontrol.com/index.htm ) better, but ruled it out since it did not offer manual control of the fan.
I obtained the new VSC ( Variable Speed Controller # 31165 - http://www.flex-a-lite.com/auto/html/vsc.html ) from Jeg’s. The cost was $89.98 to my door.
This unit varies the fan speed from 60 to 100% depending on the cooling requirements. The controller operates the fan at 60% with the AC on ( unless the coolant temperature demands 100% speed ). Another constructive feature is that the VSC has a built in 5 second delay on start up to reduce charging system demands. The VSC also operated the fan for 30 seconds after turning off the truck’s ignition switch if the coolant temperature is higher than the turn off point.
First impression of the VSC is that it is a much better constructed unit than the stock 180 controller. The 180 controller can be opened and the circuit board is loose ( sloppy construction )whereas when opened the VSC’s “guts” are sealed in potting material.
Installation was straightforward and took about 1 hour; the majority of the time was in wire preparation.
My biggest dilemma was where to mount the VSC. I did not want to mount it to the fan shroud since access to the wires is difficult in that location ( been there done that with the stock controller ). I decided to tie wrap the VSC to the antilock brake system tubing. This position allows easy access to the wires and the unit is out of the way.
Terminals on the VSC:
#1 Battery Negative
#2 Negative to Fan
#3 Positive to Fan
#4 Positive Input from Battery
#5 Negative Override Signal OFF
#6 Negative Override Signal ON
#7 AC Compressor Negative signal
#8 AC Compressor Positive Signal
#9 Ignition Positive Signal
#10 Temp Sensor Positive
#11 Temp Sensor Negative
The positive and negative wires from the fan are attached to the VSC ( terminals 3 and 2 ) with spade terminals ( after crimping on the terminal, heat shrink tubing was used to seal the connection ). Now the positive ( the fuse was removed from the holder ) and negative wires from the battery were attached to the VSC ( terminals 4 and 1 ). I attached the 12v positive ignition switched wire to the VSC ( terminal 9 - I used the wire that I previously used with the stock 180 controller ). The 12 v positive wire from the AC ( red wire ) was spliced to a green wire to the VSC ( terminal 8 – terminal 7 was not needed ). The existing manual turn on switch wire was then attached to the VSC ( terminal 6 ). The VSC also has a provision to manually switch off the fan ( terminal 5 ); I set up this feature with a switch mounted under the hood so that I can turn off the fan when working under the hood.
The temperature probe was attached as close as possible to the upper radiator hose by pushing it through the radiator fins. With about ¾” of the probe protruding from the radiator, the cap was reinstalled on the probe ( this serves two purposes: (1) to keep probe in place and (2) to insulate the probe from the cooler air for a more accurate temperature reading ). The two wires from the probe had to be spliced onto new wire to be able to reach the VSC ( terminals 10 and 11 - polarity was not important in this case ).
To set the VSC’s thermostat, the adjusting screw was turned clockwise to set the turn on temperature at a higher temperature ( counterclockwise for lower ). To achieve maximum accuracy ( +/- 1 F ), coolant temperature was determined by my OBD II scanner ( http://www.autoxray.com/products.aspx?sub=scanners&id=2 ). I set the thermostat to turn on at 185 F. This allows the fan to come on at 60% speed and as the temperature rises to 195 F, the fan reaches 100% speed.
There are LED indicators on the VSC to indicate the status of the various conditions.
L1 Fan Signal
L2 AC Operation
L3 Ignition Signal
When the truck is started, after 5 seconds, L3 will illuminate. With the motor running and AC on, L1, L2 and L3 will be illuminated. With the motor running and just the fan running, L1 and L3 will be illuminated.
After mounting the VSC, all the wires were enclosed in loom material to yield a safe and neat look.
A road test was performed including both highway and in town ( traffic ) driving. This controller performed flawlessly as advertised; a vastly superior product when compared to the stock 180 controller.
I really like the fact that there is no high amp draw from the fan at the truck’s start up as well as the fact that the fan automatically runs for 30 seconds after turning off the truck
I recommend the VSC to anyone with an electric cooling fan.