mjones97
Well-Known Member
- Joined
- April 16, 2007
- Messages
- 403
- Reaction score
- 2
- City, State
- Salem, IN
Written by:
Maurice Jones Jr. (mjones)
*Please direct all questions and comments to the author.
DISCLAIMER:
Explorer Forum, the site owner, its administration and the author are not liable for anything that may occur as a result of someone who reads or follows any steps in this How-To. Proceed at your own peril. The reader assumes all responsibility for consequences that may occur by performing this modification.
Difficulty:
8/10
Time:
~5 hours
Tools/Equipment Needed:
- 1/2” and 3/8” Metric & Standard Socket Set
- 1-1/4”
- 1-1/8”
- 13/16
- 7/8”
- 3/4”
- 1/2"
- 18mm
- 15mm
- 12mm (12 point)
- Metric & Standard wrench set
- 1-1/8”
- 3/4"
- 12mm (12 point)
-18mm
- 2x 3/8” 4” extension
- 3/8” swivel adaptor
- Jack Stands
- Floor Jack
- Impact Wrench
- Air Compressor
- Hammer
- 2# sledge hammer
- Medium flat screw driver
- Large flat screw driver
- Tire Rod Seperator
- Angle Grinder w/ Metal grinding wheel
- Drill w/ 1/2” drill bit
- Red Thread Locker
- Zip Ties
Parts Needed:
- Dana 28 or Dana 35 Twin Traction Beam (TTB) Ranger Based Vehicle (RBV) front axle
- 4wd RBV TTB radius arms
- BW1350 or BW1354 MANUAL transfer case w/ shift linkage and mounting bolts
- Front drive shaft according to which transfer case you use
- 4x 1/2"x1” Grade 8 bolts
- 4x 1/2" Grade 8 nuts
- 8x 7/16” washers
- 2 quarts of Mercron transmission fluid
- 2 to 3 quarts of 75w90 gear oil (depending on which front axle you use)
- Transfer case output shaft seal
- Transfer case to transmission gasket
Special Precaution:
Please be careful when doing this modification. If you set the jack stands improperly, the truck can fall on you. It is up to you the installer to set the jack stands up where you feel comfortable with them.
BEFORE: 2wd Bronco II:


Steps:
1. Start by jacking up the front of the Bronco II and support it on a pair of jack stands; I used one (1) jack stand under each front frame rail in front of the front suspension.
2. Remove the tires from the driver and passenger side of the front.


3. Knock the slide pins out of the brake calipers using a flat screw driver and a hammer. Using wire ties, tie the brake caliper up to the frame. Be careful not to allow the brake caliper to hang by the brake hose.


4. Remove the lower shock mount from the radius arm using a 1/2" drive ratchet and a 3/4" socket on one side and a 3/4" wrench on the other. Allow the shock to hang free for re-installation, or remove if replacing shock. If you are removing the shock, the upper stud has a 9/16” nut that is needed to be removed.

5. Remove the swap bar end link from the sway bar using a 1/2" drive ratchet and an 18mm socket on one side and a 18mm wrench on the other side of the bolt. Allow the sway bar to hang in the frame brackets if you plan on leaving the sway bar attached. If not, remove the sway bar to frame mounts using a 1/2" drive ratchet and a 15mm socket.

6. Remove the cotter pin in the tire rod end (TRE). Now remove the nut on the TRE using a 1/2" drive ratchet with a 7/8” socket. Using the TRE separator, drive the TRE out of the steering knuckle. Place the TRE nut back on the TRE and lower it to the ground.

7. Remove the nut holding the lower portion of the spring onto the beam using a 1-1/8” wrench. Once the nut is off and the washer is removed, rotate the spring out of the coil bucket and lay it off to the side.

8. Remove the beam to bracket bolt using a 1/2" drive ratchet with an 18mm socket on one side and a 18mm wrench on the other.


9. Drive the radius arm mounting bolt out of the beam with a hammer.

10. Now remove the beam from the radius arm and the beam bracket.
11. Remove the radius arm to frame bracket nut using a 1-1/8” socket on an impact gun. This will allow you to remove the 2wd radius arm and replace it with a 4wd radius arm. Be sure to save the bushings, washers, nuts, and the heat shields for re-installation on the 4wd radius arms.

When finished repeating steps #2-11 on the passenger side, you should have the front suspension completely out of the truck. Not it is time to start putting the 4wd components in. Compare the 2wd to 4wd beam pictures and then continue to step #12.


12. Using the angle grinder and cut off wheel, grind the rivet heads holding the passenger side beam bracket down flush with them bracket. Then use a big hammer to knock the bracket off the engine cross member. Once the bracket is off, use the same hammer to punch out the rivets exposing the holes.


13. Now you need to clearance the holes circled in the picture below to 1/2” using a 1/2” dill bit. Those will be the holes you use to mount the 4wd bracket.

14. Mount the 4wd passenger side beam bracket using the 1/2”x1” bolts and hardware. Be sure to use a washer on each side of the bolt. The bracket goes on the rear side of the engine cross member. Remember to use the red thread locker on the nuts so they do not back off.


15. Install the 4wd radius arms. Be sure to get the proper one on the proper side so you will not have alignment issues. Make sure to put the bushings back on in the same way they came off and then tighten down the nut using the 1-1/8” socket.


16. Now re-install the 4wd beam into the truck. Slide the bracket side into the beam bracket and install the bolt and nut using the 18mm socket and 18mm wrench.
17. Slide the beam into the radius arm and install the upper and lower bolts using the 1-1/8” socket.
18. Re-install the coil spring onto the upper coil bucket and on the beam. Remember, the beam nut takes the 1-1/8” wrench. Make sure you spin the coil spring until it seats into the coil bucket properly.
19. If you removed the rotors from the 4wd beams, see your repair manual on how to re-install those now.
20. Re-install the brake caliper onto the steering knuckle by driving in the slide pins
21. Now either re-install the original shock, or install the new shock.


22. If you are leaving the sway bar installed, now is the time to re-install it on the beam.
23. Re-install the TRE onto the steering knuckle. Tighten the TRE nut down using the 7/8” socket until you can get the cotter pin into the TRE. You may need to adjust the toe on the steering knuckle so you can drive it to an alignment shop. To do this, use a 15mm socket to loosen the TRE sleeve. With the sleeve lose; adjust the TRE to desired setting (I had to cut about 1-1/4” off the passenger side TRE to get it close. If you do this properly, you will not mess up the threads).
24. Using the 12mm 12 point socket, break the bolts on the drive shaft to transfer case flange lose. Then using a 12mm 12 point wrench, remove them the rest of the way and allow the drive shaft to hang from the rear end.

25. Now it is time to remove the dummy transfer case. Using a 3/8” drive ratchet, a 1/2” socket, 2 4” extensions, and a swivel adaptor, remove the 5 bolts holding the transfer case to the transmission. The lower mounting bolt behind the transmission mount will have to be taken out with a 1/2" wrench (this bolt will remain in the transmission until you install the new transfer case)
26. Slide the dummy transfer case off the transmission.
27. Once the dummy transfer case is out, remove the rear flange using the 1-1/4” socket.
28. Remove the rear seal on the dummy transfer case by prying with a screw driver.
29. Remove the speedometer worm gear.
(You can now discard the dummy transfer case once it is off as it will NOT be used for anything and doubtfully anyone would want it.)
30. Remove the rear output flange, using the 1-1/4” socket, from the transfer case you are going to be using.

31. Remove the rear seal on the transfer case by prying with a screw driver.

32. Remove the speedometer worm gear.


33. Install the speedometer worm gear out of the dummy transfer case.
34. Hammer in the new rear seal being careful not to damage the seal.
35. Install the output flange on the transfer case using the 1-1/4” socket.
36. Slide the transfer case into place on the output shaft of the transmission. Be sure to install the gasket between the transfer case and transmission. Bolt the transfer case back to the transmission using a 1/2” socket.
37. Reconnect the rear drive shaft to the transfer case output shaft using the 12mm, 12 point socket.
38. Install the front drive shaft. Depending on which transfer case you used (BW1350 or BW1354) depends on how you install the drive shaft to the transfer case. If you have a BW1350, the drive shaft will slip into the slip yoke in the transfer case. If you have a BW1354, you will bolt the double cardon joint to the fixed yoke on the transfer case. The picture below is the mounting of a BW1354.
39. Using a Phillips screw driver, remove the shift boot or shifter cover from your floor shifter.
40. Pull the carpet back to expose the floor plate.


41. Remove the floor plate using a 8mm socket.
42. Now cut out a small section to allow the transfer case shifter to come into the cab and have full range of operation.
43. Install the transfer case shifter using a 1-1/8” wrench and a 1/2” wrench to bolt the shifter bolts to the transmission tail housing.


44. Re-install the floor plate and replace the carpet in its position.
45. Install the new shift boot console that has the provision for the transfer case shifter.

46. Fill the transfer case with roughly 1.5 quarts of Mercron ATF fluid.
47. Fill the front differential with 75w90 gear oil. Depending if you install a Dana 28 or Dana 35 will determine how much differential fluid you will need.
48. Re-install the tires/wheels and then drop the truck off the jack stands.
AFTER: 4wd Bronco II:


Maurice Jones Jr. (mjones)
*Please direct all questions and comments to the author.
DISCLAIMER:
Explorer Forum, the site owner, its administration and the author are not liable for anything that may occur as a result of someone who reads or follows any steps in this How-To. Proceed at your own peril. The reader assumes all responsibility for consequences that may occur by performing this modification.
Difficulty:
8/10
Time:
~5 hours
Tools/Equipment Needed:
- 1/2” and 3/8” Metric & Standard Socket Set
- 1-1/4”
- 1-1/8”
- 13/16
- 7/8”
- 3/4”
- 1/2"
- 18mm
- 15mm
- 12mm (12 point)
- Metric & Standard wrench set
- 1-1/8”
- 3/4"
- 12mm (12 point)
-18mm
- 2x 3/8” 4” extension
- 3/8” swivel adaptor
- Jack Stands
- Floor Jack
- Impact Wrench
- Air Compressor
- Hammer
- 2# sledge hammer
- Medium flat screw driver
- Large flat screw driver
- Tire Rod Seperator
- Angle Grinder w/ Metal grinding wheel
- Drill w/ 1/2” drill bit
- Red Thread Locker
- Zip Ties
Parts Needed:
- Dana 28 or Dana 35 Twin Traction Beam (TTB) Ranger Based Vehicle (RBV) front axle
- 4wd RBV TTB radius arms
- BW1350 or BW1354 MANUAL transfer case w/ shift linkage and mounting bolts
- Front drive shaft according to which transfer case you use
- 4x 1/2"x1” Grade 8 bolts
- 4x 1/2" Grade 8 nuts
- 8x 7/16” washers
- 2 quarts of Mercron transmission fluid
- 2 to 3 quarts of 75w90 gear oil (depending on which front axle you use)
- Transfer case output shaft seal
- Transfer case to transmission gasket
Special Precaution:
Please be careful when doing this modification. If you set the jack stands improperly, the truck can fall on you. It is up to you the installer to set the jack stands up where you feel comfortable with them.
BEFORE: 2wd Bronco II:
Steps:
1. Start by jacking up the front of the Bronco II and support it on a pair of jack stands; I used one (1) jack stand under each front frame rail in front of the front suspension.
2. Remove the tires from the driver and passenger side of the front.
LET’S START ON THE DRIVER SIDE OF THE BRONCO II.
3. Knock the slide pins out of the brake calipers using a flat screw driver and a hammer. Using wire ties, tie the brake caliper up to the frame. Be careful not to allow the brake caliper to hang by the brake hose.
4. Remove the lower shock mount from the radius arm using a 1/2" drive ratchet and a 3/4" socket on one side and a 3/4" wrench on the other. Allow the shock to hang free for re-installation, or remove if replacing shock. If you are removing the shock, the upper stud has a 9/16” nut that is needed to be removed.
5. Remove the swap bar end link from the sway bar using a 1/2" drive ratchet and an 18mm socket on one side and a 18mm wrench on the other side of the bolt. Allow the sway bar to hang in the frame brackets if you plan on leaving the sway bar attached. If not, remove the sway bar to frame mounts using a 1/2" drive ratchet and a 15mm socket.
6. Remove the cotter pin in the tire rod end (TRE). Now remove the nut on the TRE using a 1/2" drive ratchet with a 7/8” socket. Using the TRE separator, drive the TRE out of the steering knuckle. Place the TRE nut back on the TRE and lower it to the ground.
7. Remove the nut holding the lower portion of the spring onto the beam using a 1-1/8” wrench. Once the nut is off and the washer is removed, rotate the spring out of the coil bucket and lay it off to the side.
8. Remove the beam to bracket bolt using a 1/2" drive ratchet with an 18mm socket on one side and a 18mm wrench on the other.
9. Drive the radius arm mounting bolt out of the beam with a hammer.
10. Now remove the beam from the radius arm and the beam bracket.
11. Remove the radius arm to frame bracket nut using a 1-1/8” socket on an impact gun. This will allow you to remove the 2wd radius arm and replace it with a 4wd radius arm. Be sure to save the bushings, washers, nuts, and the heat shields for re-installation on the 4wd radius arms.
**REPEAT STEPS #2-11 FOR THE PASSENGER SIDE 2WD BEAM**
When finished repeating steps #2-11 on the passenger side, you should have the front suspension completely out of the truck. Not it is time to start putting the 4wd components in. Compare the 2wd to 4wd beam pictures and then continue to step #12.
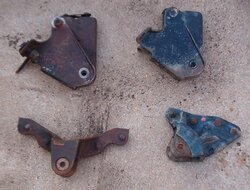
12. Using the angle grinder and cut off wheel, grind the rivet heads holding the passenger side beam bracket down flush with them bracket. Then use a big hammer to knock the bracket off the engine cross member. Once the bracket is off, use the same hammer to punch out the rivets exposing the holes.
Notice the difference in the passenger side beam brackets. The 4wd bracket is on the left and the 2wd bracket is on the right.
13. Now you need to clearance the holes circled in the picture below to 1/2” using a 1/2” dill bit. Those will be the holes you use to mount the 4wd bracket.
14. Mount the 4wd passenger side beam bracket using the 1/2”x1” bolts and hardware. Be sure to use a washer on each side of the bolt. The bracket goes on the rear side of the engine cross member. Remember to use the red thread locker on the nuts so they do not back off.
15. Install the 4wd radius arms. Be sure to get the proper one on the proper side so you will not have alignment issues. Make sure to put the bushings back on in the same way they came off and then tighten down the nut using the 1-1/8” socket.
The top radius arm is the 2wd radius arm. Since the 2wd beam is only about 5” thick and the 4wd beam is closer to 6-1/2” thick, you have to use 4wd radius arms
LET’S START RE-INSTALLATION ON THE DRIVER SIDE OF THE BRONCO II.
16. Now re-install the 4wd beam into the truck. Slide the bracket side into the beam bracket and install the bolt and nut using the 18mm socket and 18mm wrench.
17. Slide the beam into the radius arm and install the upper and lower bolts using the 1-1/8” socket.
18. Re-install the coil spring onto the upper coil bucket and on the beam. Remember, the beam nut takes the 1-1/8” wrench. Make sure you spin the coil spring until it seats into the coil bucket properly.
19. If you removed the rotors from the 4wd beams, see your repair manual on how to re-install those now.
20. Re-install the brake caliper onto the steering knuckle by driving in the slide pins
21. Now either re-install the original shock, or install the new shock.
22. If you are leaving the sway bar installed, now is the time to re-install it on the beam.
23. Re-install the TRE onto the steering knuckle. Tighten the TRE nut down using the 7/8” socket until you can get the cotter pin into the TRE. You may need to adjust the toe on the steering knuckle so you can drive it to an alignment shop. To do this, use a 15mm socket to loosen the TRE sleeve. With the sleeve lose; adjust the TRE to desired setting (I had to cut about 1-1/4” off the passenger side TRE to get it close. If you do this properly, you will not mess up the threads).
**REPEAT STEPS #16-23 FOR THE PASSENGER SIDE 4WD BEAM**
When finished repeating steps #16-23 on the passenger side, you should have the front 4wd suspension installed in the truck. You can now re-install the tires and wheels and take the truck off the jack stands. Once the truck is resting on its own weight, proceed to step #24.
24. Using the 12mm 12 point socket, break the bolts on the drive shaft to transfer case flange lose. Then using a 12mm 12 point wrench, remove them the rest of the way and allow the drive shaft to hang from the rear end.
25. Now it is time to remove the dummy transfer case. Using a 3/8” drive ratchet, a 1/2” socket, 2 4” extensions, and a swivel adaptor, remove the 5 bolts holding the transfer case to the transmission. The lower mounting bolt behind the transmission mount will have to be taken out with a 1/2" wrench (this bolt will remain in the transmission until you install the new transfer case)
26. Slide the dummy transfer case off the transmission.
27. Once the dummy transfer case is out, remove the rear flange using the 1-1/4” socket.
28. Remove the rear seal on the dummy transfer case by prying with a screw driver.
29. Remove the speedometer worm gear.
(You can now discard the dummy transfer case once it is off as it will NOT be used for anything and doubtfully anyone would want it.)
Look into the speedometer cable hole in the transfer case you are going to be using. If the worm gear you just removed is the same color (either red or yellow) as the one in the transfer case, then skip to step #36. If not the same color, then continue to step #30.
30. Remove the rear output flange, using the 1-1/4” socket, from the transfer case you are going to be using.
31. Remove the rear seal on the transfer case by prying with a screw driver.
32. Remove the speedometer worm gear.
33. Install the speedometer worm gear out of the dummy transfer case.
34. Hammer in the new rear seal being careful not to damage the seal.
35. Install the output flange on the transfer case using the 1-1/4” socket.
36. Slide the transfer case into place on the output shaft of the transmission. Be sure to install the gasket between the transfer case and transmission. Bolt the transfer case back to the transmission using a 1/2” socket.
37. Reconnect the rear drive shaft to the transfer case output shaft using the 12mm, 12 point socket.
38. Install the front drive shaft. Depending on which transfer case you used (BW1350 or BW1354) depends on how you install the drive shaft to the transfer case. If you have a BW1350, the drive shaft will slip into the slip yoke in the transfer case. If you have a BW1354, you will bolt the double cardon joint to the fixed yoke on the transfer case. The picture below is the mounting of a BW1354.
Let’s go inside the cab to get the floor plate ready for the transfer case shifter to come through the floor.
**If you have a column shift automatic transmission, skip to step #40**
**If you have a column shift automatic transmission, skip to step #40**
39. Using a Phillips screw driver, remove the shift boot or shifter cover from your floor shifter.
40. Pull the carpet back to expose the floor plate.
41. Remove the floor plate using a 8mm socket.
42. Now cut out a small section to allow the transfer case shifter to come into the cab and have full range of operation.
43. Install the transfer case shifter using a 1-1/8” wrench and a 1/2” wrench to bolt the shifter bolts to the transmission tail housing.
44. Re-install the floor plate and replace the carpet in its position.
45. Install the new shift boot console that has the provision for the transfer case shifter.
**Do NOT forget to fill the transfer case and differential with fluid**
46. Fill the transfer case with roughly 1.5 quarts of Mercron ATF fluid.
47. Fill the front differential with 75w90 gear oil. Depending if you install a Dana 28 or Dana 35 will determine how much differential fluid you will need.
48. Re-install the tires/wheels and then drop the truck off the jack stands.
AFTER: 4wd Bronco II:
Make sure after about 500 miles you recheck all your bolts to ensure they keep their torque.