Andy96XLT
Well-Known Member
- Joined
- October 5, 2007
- Messages
- 574
- Reaction score
- 3
- City, State
- Branchburg NJ, Bethlehem PA
- Year, Model & Trim Level
- 96 XLT
Well after searching through the site and asking a lot of questions I finally decided to tackle putting my aux trans cooler on my 1996 XLT. I bought the cooler because in the summer I tow a small boat and in the winter I plow my driveway and some neighbors. Since nobody else seems to have a step by step "how to" on installing one, I thought I would give back to the site and post how I did it. Also this helps for people who do not have factory transmission coolers like me
Items you will need:
Transmission cooler
Rags
Tubing cutter
Transmission hose (high psi and high temp)
Hose clamps
Transmission fluid
Zip ties
Plastic Cup or anything to catch leaking tranny fluid
Ratchet and various sockets for bumper
To start I got my explorer in the garage and got all my tools ready. I used a hayden transmission cooler good for vehicles up to 25000 lbs


To start the task I tool off my bumper to get better access to the trans lines and to figure out where I was going to mount the transmission cooler, I realized after you probably do not need to take the bumper off, but its much easier and its just 4 bolts.

Once the bumper was off I started on the actual cooler install. The first thing I needed to do was locate the return fluid line that goes back to the transmission. I found that lower line on the clip is the return line

I seperated the two lines since they were clipped together and mocked up where I was going to place the cooler and where to cut the actual transmission line.
Before I cut the trans line I mounted the cooler where I wanted (I needed to mount it in an odd place because I have an HHO generator but It actually turned out very well) with the high pressure hoses already attached to the cooler.

I than used a tubing cutter and cut after the first visable bend after coming out of the radiator. This is right where the enter and return line meet.

I placed a cup underneith to catch the little bit of leaking transmission fluid and to try to avoid making a mess.
I than cut the tube after the 2nd bend (where the return and enter line seperate)

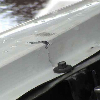
Here is a picture of the lines attached. I know its not a great picture but you can see where the bottom line coming out of the cooler attaches back to the factory line

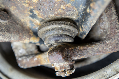
And here is again a not so good picture of the line coming from the original line into the transmission cooler

I found I lost about 4 oz of fluid during this task so I refilled it with some fresh ATF and now its set.
After everything check to make sure you have no leaks and reattach the bumper.
I am going to check the ATF levels every day for the next few days just to make sure that i have no leaks and everything is holding well.
Hope this helps!!
Items you will need:
Transmission cooler
Rags
Tubing cutter
Transmission hose (high psi and high temp)
Hose clamps
Transmission fluid
Zip ties
Plastic Cup or anything to catch leaking tranny fluid
Ratchet and various sockets for bumper
To start I got my explorer in the garage and got all my tools ready. I used a hayden transmission cooler good for vehicles up to 25000 lbs
To start the task I tool off my bumper to get better access to the trans lines and to figure out where I was going to mount the transmission cooler, I realized after you probably do not need to take the bumper off, but its much easier and its just 4 bolts.
Once the bumper was off I started on the actual cooler install. The first thing I needed to do was locate the return fluid line that goes back to the transmission. I found that lower line on the clip is the return line
I seperated the two lines since they were clipped together and mocked up where I was going to place the cooler and where to cut the actual transmission line.
Before I cut the trans line I mounted the cooler where I wanted (I needed to mount it in an odd place because I have an HHO generator but It actually turned out very well) with the high pressure hoses already attached to the cooler.
I than used a tubing cutter and cut after the first visable bend after coming out of the radiator. This is right where the enter and return line meet.
I placed a cup underneith to catch the little bit of leaking transmission fluid and to try to avoid making a mess.
I than cut the tube after the 2nd bend (where the return and enter line seperate)
Here is a picture of the lines attached. I know its not a great picture but you can see where the bottom line coming out of the cooler attaches back to the factory line
And here is again a not so good picture of the line coming from the original line into the transmission cooler
I found I lost about 4 oz of fluid during this task so I refilled it with some fresh ATF and now its set.
After everything check to make sure you have no leaks and reattach the bumper.
I am going to check the ATF levels every day for the next few days just to make sure that i have no leaks and everything is holding well.
Hope this helps!!