ok, my first how to... Everyone said it couldn't be done, but I thought I would give it a shot.
Try this at your own risk.
Start off by removing the driver door pannel.
1. Remove 2 Phillips screws above door release handle
2. Pry out door release trim
3. Using a panel tool (or a flat screwdriver) pry around the bottom and sides of the door panel
4. Slide panel upward to remove.
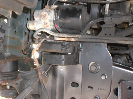
Once the pannel is removed you will see this...
the back of keypad. It still attached to the driver door. There is a clip on the right side. Remove the clip

the speaker needs to be removed to gain access to the other end of the keypad. You need to disconnect the green plug.

the keypad, and the attached wires. The first piece of wire loom (closest to the keypad) must be removed.

back of the switch. The white stuff is silicone, and needs to be removed. Notice the 3 pins underneath the silicone. Those also have to be removed

in this picture the silicone is removed as well as the pins. Once the pins are removed the outer case can be slid off.

once the outer case is removed you are left with more silicone. I CAREFULLY peeled the silicone in one piece as the numbers are attached to all the silicone

once the silicone is lossened the numbers will slide off the casing. In this picture you see the number cover, and the green film over the fiber optic pannel DO NOT BEND OR CUT THE FIBER OPTICS it will damage it.

a view behind the green fiber optic pannel. The wires are fed through the case, to gain access to the circuit board you need to push the wires throught the case. This will push the board out

CAREFULLY peel the green film from the fiber optic pannel. This will allow the fiber optics to be what ever colour bulb you decide to use. Do not bend or cut the fiber optics. It will damage it, and not allow light to go through the pannel.

this is the back of the circuit board. The light bulb is soldered in the middle. The rest of the bulb is inside a housing which houses the fiber optics ends. Desolder the light bulb, and remove it and the housing from the circuit board.

once the light bulb is removed from the board it can be seperated from the housing. If you look close there are two clips on either side of the housing, sperate the two parts

solder on the LED bulb to the board. I used a blue 5mm wide angle bulb. The negative lead of the LED bulb gose to the yellow/black wire

I added a resitor for the LED on the yellow and black wire. The resistor must be put on the back side of the casing to allow the circuit board to be slide back into the casing

the fiber optics and light bulb housing are slid over the LED bulb and held into place with some hot glue (not pretty, but it does the trick)

reassembly begins. Don't forget to put the white frame behind the fiber optic pannel, I also added silicone to all the places silicone was removed and even to the top, bottoms and sides of the number covers (not on the actual number part it will block the light)


Drum roll please.... The Finished Product!! FYI... the lights only worked when it is plugged into the car. I tried testing it by putting 12 volts to the blue and yellow/black wire but it doesn't work.

Now thats sexy!!
Try this at your own risk.
Start off by removing the driver door pannel.
1. Remove 2 Phillips screws above door release handle
2. Pry out door release trim
3. Using a panel tool (or a flat screwdriver) pry around the bottom and sides of the door panel
4. Slide panel upward to remove.
Once the pannel is removed you will see this...
the back of keypad. It still attached to the driver door. There is a clip on the right side. Remove the clip
the speaker needs to be removed to gain access to the other end of the keypad. You need to disconnect the green plug.
the keypad, and the attached wires. The first piece of wire loom (closest to the keypad) must be removed.
back of the switch. The white stuff is silicone, and needs to be removed. Notice the 3 pins underneath the silicone. Those also have to be removed
in this picture the silicone is removed as well as the pins. Once the pins are removed the outer case can be slid off.
once the outer case is removed you are left with more silicone. I CAREFULLY peeled the silicone in one piece as the numbers are attached to all the silicone
once the silicone is lossened the numbers will slide off the casing. In this picture you see the number cover, and the green film over the fiber optic pannel DO NOT BEND OR CUT THE FIBER OPTICS it will damage it.
a view behind the green fiber optic pannel. The wires are fed through the case, to gain access to the circuit board you need to push the wires throught the case. This will push the board out
CAREFULLY peel the green film from the fiber optic pannel. This will allow the fiber optics to be what ever colour bulb you decide to use. Do not bend or cut the fiber optics. It will damage it, and not allow light to go through the pannel.
this is the back of the circuit board. The light bulb is soldered in the middle. The rest of the bulb is inside a housing which houses the fiber optics ends. Desolder the light bulb, and remove it and the housing from the circuit board.
once the light bulb is removed from the board it can be seperated from the housing. If you look close there are two clips on either side of the housing, sperate the two parts
solder on the LED bulb to the board. I used a blue 5mm wide angle bulb. The negative lead of the LED bulb gose to the yellow/black wire
I added a resitor for the LED on the yellow and black wire. The resistor must be put on the back side of the casing to allow the circuit board to be slide back into the casing
the fiber optics and light bulb housing are slid over the LED bulb and held into place with some hot glue (not pretty, but it does the trick)
reassembly begins. Don't forget to put the white frame behind the fiber optic pannel, I also added silicone to all the places silicone was removed and even to the top, bottoms and sides of the number covers (not on the actual number part it will block the light)
Drum roll please.... The Finished Product!! FYI... the lights only worked when it is plugged into the car. I tried testing it by putting 12 volts to the blue and yellow/black wire but it doesn't work.
Now thats sexy!!