Suicide77
Elite Explorer
- Joined
- April 1, 2012
- Messages
- 386
- Reaction score
- 42
- City, State
- Salt Lake City, Utah
- Year, Model & Trim Level
- 1993 Explorer
Hey Guys,
I'm going to attempt to fix up my Explorer. The 'Bug' has bitten me and now all I want to do is work on it and drive off road! The major obstacles however are the fact that I've never worked on my truck before and its off road capabilities are limited to its stock abilities.
So far I have found that pick n pull or any junk yard is a great way to learn without messing up your own truck first. Secondly, I stumbled onto this awesome forum and am slowly building up enough know how to making an attempt at lifting my Explorer either 2",4", or 6" inches (I'm still at the beginning stages on that line of knowledge).
So... without further ado... I will introduce my Explorer

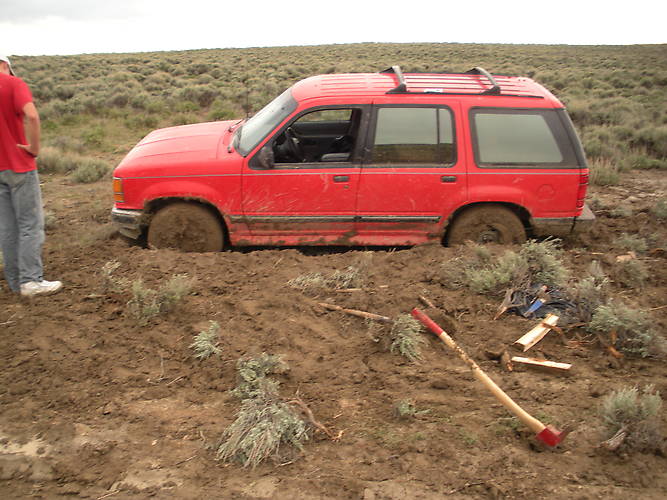
I've gone through thick and thin, high and low, and most memorably, Mud... while in my Explorer.
I've had it for 4 years and it has 216,000 Miles on it. The head has never been taken off of the engine, so I would like to slowly work my way in that direction to avoid a break down. I love taking it all over Utah and would like to get it road worthy enough to tackle Elephant Hill and Shafer Trail in Canyon Lands. (Shafer Trail Pictured)

I got the 'Bug' at the beginning of April when I finally gave into wanting a shiny truck to cruise the dirt roads in. My father is a pro at acting like he knows what he is doing without knowing what he is really doing. Case in point, 'teaching' me how to polish and shortly after taking all the paint off my old '84 Civic. I decided to educate myself (to Youtube!) and figure out a good and effective way to polish without acting like I knew what I was doing. I finally stumbled onto a training video issued by Meguiar's to some auto detailing company. After an hour of wax on... wax off... I hit the point of having an 'idea' of what to do. I ended up getting a Shurhold DA Orbital Polisher and off to work I went. Here is the tape and set up I did to prep and protect the trim.

Taping, ironically, takes almost as long as the first once over with the Fine Cut #5 compound provided by Meguiar's. As you progress up to the Show Car Glaze #1 you find that each lighter duty compound ends up taking less and less time to apply. Here is a shot of the hood and front quarter panel after going through the process that was drilled in my head. wax on.. wax off...

At this point I was feeling pretty happy with myself! I was ready to cruise down a dirt road in my shiny Explorer! Unfortunately though, I have had a blown speaker for about 3 years. I decided if I was going to fly down a dirt road with House of the Rising Sun blaring out of the radio I had better get a new sub so that the old crackling one didn't ruin the moment. So off to pick n pull!
After tinkering, breaking a zillion push clips, and finding out how useless it was to replace just the speaker, I set out and got a new amp, wiring kit, and Kenwood speaker. After a little drilling, searching for a wiring route through the fire wall, and carefully removing the push clips I ended up with this plausible setup!

I figured maybe I could get lucky and conceal this new rig behind the interior panel to first, allow a nice clean look: second, to give me plenty of room for camping supplies, a cooler, and tannerite: third, so the urge of a passer by to bust a window and steal what is in plain sight might be diverted. After some himming and hawing and Dremel tooling I ended up getting the interior panel back on with a reasonable outcome.

I am one to experiment, however, on other peoples stuff and not mine. So off to pick n pull and one speaker cover later I have started pondering some possible ways to finish the installation. What I have now is simply a "That'll do..." but in the future I am envisioning a nice black wire mesh covering and maybe even painting the speaker panel with the gloss or flat black rustoleum. Because this isn't the original and just a practice one I plan on tweaking and testing until it suddenly looks "Ahh! Just right!". Till then though, "That'll do..."

Now, since I had the dash board off, I had noticed something very interesting. Could it be that the Check Engine Light has been off for an abnormally long time because it was Broken! Yes, it was entirely the case.

So, P-N-P once again. After my learning experience, I realized that I would have to mess with the speedometer cable rod thingy that came out of the engine. This proved to be quite the challenge for me especially because I need to know how fast I am going on the freeway so I don't exceed 65 mph (another long story for some other time) and screwing up the speedometer would just plain old suck to do. Once again after himming and hawing and dropping the new bulb (@#$%!!) I managed to get everything in and put back in place.

Whew, now as long as it doesn't turn on and stay on when I start the Explorer!
Here is the burned out thing that was once a light bulb.

With all the interior starting to look once again like it should and the out of place thump thump of a decent speaker, I decided to do something about the grill. I notice the front of my Explorer, now matter how much I scrub and clean, looks like it has peeling faded something staring back at you. So to fix this I used some blue painters tape, a can of Rustoleum rubberized undercoating, and a top layer of classic Rustoleum black. The end product finally tied the front end together to make a little more uniform look. (I know, a noobie move, but I like it).

Since the front looked a little better, naturally it would seem the back end could use some work. I have had a very rusted old hitch and instead of just spray and pray I thought I would take the whole hitch assembly off and do it the right way (nose to the grind stone... er.. uh.. grinder to the metal I mean).
Shouldn't be bad right? Just 6 bolts, 3 on each side! Cake walk! Well after day 1 I found my new super power was sheering bolts. So I gave it another shot on day 2. Another sheered bolt in the same position!!! Well it can't get much worse right? Day 3. Stripped nut. I think it would have been easier to just skip the breaker bar and have gone straight for the grinder.
Here is a picture of the grinded out carriage bolt with the striped nut (left) and one of the two sheered bolts (right) lurking under the frame.

Day 4 (today). I manned up. Got under that truck. Ground out the stripped nut. PB blastered, hammered, breaker barred, and worked out the remaining 3 bolts without sheering them off. And finally, with a little incentive from the grinder, PB Blaster, and a few good sledge hammer whacks, I was able to free the rusty hunk of junk.

As you can see a fair amount of rust has piled up on both sides near where the bolts connected.
Here is a pic of the remains of the grinded off carriage bolt.

This is a shot of the other bolt that ended up getting sheered off. The metal plate is absolutely rusted to the frame and bolt.

I'll just leave that up to future me to deal with because now my focus will soon be on restoring this rusted out hunk of metal that I pulled off of my back bumper.

The question then remains... do I fix it and put it back on or just leave it off? Which do you think?
Well, thank you for taking the time to read and gawk at what this new noobie is doing to his truck. Hopefully one day I will have a respectable truck with some good off road capabilities! Till then, back into the rust bucket and into the forum so that I may one day know what I'm talking about instead of just acting like it. Any comments are welcome, I'll keep updating this as I get my truck farther along with the repairs.
Thanks!
I'm going to attempt to fix up my Explorer. The 'Bug' has bitten me and now all I want to do is work on it and drive off road! The major obstacles however are the fact that I've never worked on my truck before and its off road capabilities are limited to its stock abilities.
So far I have found that pick n pull or any junk yard is a great way to learn without messing up your own truck first. Secondly, I stumbled onto this awesome forum and am slowly building up enough know how to making an attempt at lifting my Explorer either 2",4", or 6" inches (I'm still at the beginning stages on that line of knowledge).
So... without further ado... I will introduce my Explorer
I've gone through thick and thin, high and low, and most memorably, Mud... while in my Explorer.
I've had it for 4 years and it has 216,000 Miles on it. The head has never been taken off of the engine, so I would like to slowly work my way in that direction to avoid a break down. I love taking it all over Utah and would like to get it road worthy enough to tackle Elephant Hill and Shafer Trail in Canyon Lands. (Shafer Trail Pictured)
I got the 'Bug' at the beginning of April when I finally gave into wanting a shiny truck to cruise the dirt roads in. My father is a pro at acting like he knows what he is doing without knowing what he is really doing. Case in point, 'teaching' me how to polish and shortly after taking all the paint off my old '84 Civic. I decided to educate myself (to Youtube!) and figure out a good and effective way to polish without acting like I knew what I was doing. I finally stumbled onto a training video issued by Meguiar's to some auto detailing company. After an hour of wax on... wax off... I hit the point of having an 'idea' of what to do. I ended up getting a Shurhold DA Orbital Polisher and off to work I went. Here is the tape and set up I did to prep and protect the trim.
Taping, ironically, takes almost as long as the first once over with the Fine Cut #5 compound provided by Meguiar's. As you progress up to the Show Car Glaze #1 you find that each lighter duty compound ends up taking less and less time to apply. Here is a shot of the hood and front quarter panel after going through the process that was drilled in my head. wax on.. wax off...
At this point I was feeling pretty happy with myself! I was ready to cruise down a dirt road in my shiny Explorer! Unfortunately though, I have had a blown speaker for about 3 years. I decided if I was going to fly down a dirt road with House of the Rising Sun blaring out of the radio I had better get a new sub so that the old crackling one didn't ruin the moment. So off to pick n pull!
After tinkering, breaking a zillion push clips, and finding out how useless it was to replace just the speaker, I set out and got a new amp, wiring kit, and Kenwood speaker. After a little drilling, searching for a wiring route through the fire wall, and carefully removing the push clips I ended up with this plausible setup!
I figured maybe I could get lucky and conceal this new rig behind the interior panel to first, allow a nice clean look: second, to give me plenty of room for camping supplies, a cooler, and tannerite: third, so the urge of a passer by to bust a window and steal what is in plain sight might be diverted. After some himming and hawing and Dremel tooling I ended up getting the interior panel back on with a reasonable outcome.
I am one to experiment, however, on other peoples stuff and not mine. So off to pick n pull and one speaker cover later I have started pondering some possible ways to finish the installation. What I have now is simply a "That'll do..." but in the future I am envisioning a nice black wire mesh covering and maybe even painting the speaker panel with the gloss or flat black rustoleum. Because this isn't the original and just a practice one I plan on tweaking and testing until it suddenly looks "Ahh! Just right!". Till then though, "That'll do..."
Now, since I had the dash board off, I had noticed something very interesting. Could it be that the Check Engine Light has been off for an abnormally long time because it was Broken! Yes, it was entirely the case.
So, P-N-P once again. After my learning experience, I realized that I would have to mess with the speedometer cable rod thingy that came out of the engine. This proved to be quite the challenge for me especially because I need to know how fast I am going on the freeway so I don't exceed 65 mph (another long story for some other time) and screwing up the speedometer would just plain old suck to do. Once again after himming and hawing and dropping the new bulb (@#$%!!) I managed to get everything in and put back in place.
Whew, now as long as it doesn't turn on and stay on when I start the Explorer!
Here is the burned out thing that was once a light bulb.
With all the interior starting to look once again like it should and the out of place thump thump of a decent speaker, I decided to do something about the grill. I notice the front of my Explorer, now matter how much I scrub and clean, looks like it has peeling faded something staring back at you. So to fix this I used some blue painters tape, a can of Rustoleum rubberized undercoating, and a top layer of classic Rustoleum black. The end product finally tied the front end together to make a little more uniform look. (I know, a noobie move, but I like it).
Since the front looked a little better, naturally it would seem the back end could use some work. I have had a very rusted old hitch and instead of just spray and pray I thought I would take the whole hitch assembly off and do it the right way (nose to the grind stone... er.. uh.. grinder to the metal I mean).
Shouldn't be bad right? Just 6 bolts, 3 on each side! Cake walk! Well after day 1 I found my new super power was sheering bolts. So I gave it another shot on day 2. Another sheered bolt in the same position!!! Well it can't get much worse right? Day 3. Stripped nut. I think it would have been easier to just skip the breaker bar and have gone straight for the grinder.
Here is a picture of the grinded out carriage bolt with the striped nut (left) and one of the two sheered bolts (right) lurking under the frame.
Day 4 (today). I manned up. Got under that truck. Ground out the stripped nut. PB blastered, hammered, breaker barred, and worked out the remaining 3 bolts without sheering them off. And finally, with a little incentive from the grinder, PB Blaster, and a few good sledge hammer whacks, I was able to free the rusty hunk of junk.
As you can see a fair amount of rust has piled up on both sides near where the bolts connected.
Here is a pic of the remains of the grinded off carriage bolt.
This is a shot of the other bolt that ended up getting sheered off. The metal plate is absolutely rusted to the frame and bolt.
I'll just leave that up to future me to deal with because now my focus will soon be on restoring this rusted out hunk of metal that I pulled off of my back bumper.
The question then remains... do I fix it and put it back on or just leave it off? Which do you think?
Well, thank you for taking the time to read and gawk at what this new noobie is doing to his truck. Hopefully one day I will have a respectable truck with some good off road capabilities! Till then, back into the rust bucket and into the forum so that I may one day know what I'm talking about instead of just acting like it. Any comments are welcome, I'll keep updating this as I get my truck farther along with the repairs.
Thanks!


