my C5 swap | Ford Explorer Forums - Serious Explorations

  • Register Today It's free!

my C5 swap

Hotweels

Well-Known Member
Joined
May 7, 2001
Messages
703
Reaction score
0
City, State
Calgary,AB
Year, Model & Trim Level
'92 EB
well my 2yr SFA and C5 project is comin to an end :thumbsup:
(visa LOVES me)

finnaly got my C5 from the wreckers last week and after a brief inspection i decided it look's pretty decent in it's current state so out with the blow A4LD and in goes the C5..... or so i thought.... nothing is simple.... easy yes!... simple?....NO

problem #1
when i removed the A4LD i compaired the 2 flex plates and the C5 flex plate has the starter teeth about 1/8" farther away from the starter

SO i am gunna see if the A4LD starter will catch the whole tooth on the C5 flex plate

problem #2
the explorer kick down cable fit's very nice on the C5 but the bracket to hold the cable is WRONG in so many way's

SO i get to build a custom bracket for the cable

problem #3
the factory colum shifter wont work and dont even get me started with the factory C5 floor shifter...... 4 linkages and it bolts to the block and frame... no... just no

SO i get a shiney B&M megashifter :D and this puppy bolt's up perfectly

problem #4
stock explorer tranny lines are 3/8" and stock C5 lines are 5/16"

SO i get to hunt down an adapter to join my 5/16" to the 3/8"

problem #5
the spot in the tranny hump where the new B&M goes is made out of tin and one good hard shift and i will rip out the mounting bolt's

SO i get to put a 3/16" aluminum plate under it to stiffen it up

problem #6
the drivers side exhaust Y-pipe wont clear the bump in the bellhousing for the starter

SO you either need to hammer the Y-pipe to clear the bellhousing or put the torque converter on the front of the tranny and try to line it up with the flex plate


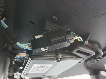
this is just what i ran into today in no order at all.... will post some pic's when i get er all done


Join the Elite Explorers for $20 each year.
Elite Explorer members see no advertisements, no banner ads, no double underlined links,.
Add an avatar, upload photo attachments, and more!
.


I've been through all this and its pretty easy.

1. Use the C5 flex plate and the spacer it came with. The starter number is the same for both transmissions. Do no try to use the A4LD flexplate, you will regret it.

2. Flip the kickdown bar over (facing up) and drill the end of the cable to fit over it. Then use an E-clip to hold it.

3. The C5 floor shift works great. 2 holes to drill in the frame. Up to you do do what you want there. Was your megashifter for the C5 valve body? If not it won't work. You will have to find a "case fill" C4 and swap it to get the shifter to work.

4. Rubber trans line 3/8" and some small radiator clamps. Has been on mine for a year and no leaks.

5. No answer here. The C5 shifter has a plate rivited to it.

6. You have to put the t-converter in first and spin it as it slides back (keep spinning and sliding). The nose should sit about 1/2" inside the bell housing. I never removed or messed with my "Y" pipe at all.


thats all easy.

Now you get to move the crossmember and get the driveshaft work done.


hahahaha thanks for the tip's

i dont have any of the C5 linkage stuff and i think thats what u mean about flipping the bar over?

no worries i am lookin at a art carr reverse manual valvebody
but just so you and everyone else know's the megashifter say's rite in the install instructions C4-C5-C6

the C4 and C5 have the same shifter throw


Oh ok...didnt' know about the shifter working. Thats cool to know for later.

I am not talking about the linkage for the shifter. There is a little arm (bar) on the side of the trans facing down that the kickdown rod hooked to originally. The bar then went up to the carburator. You remove a nut, flip the bar over (facing up and toward the front) and use it again. Nothing to it. Just use your existing kickdown cable like is posted above. :D


bought some 5/16" to 3/8" adapters today and bent some new 5/16" line from the tranny to the back of the engine block.... look's real purdy and only cost me $20 in supply's.... i thought about rubber line but figured hey i am this far into it why not use hard stuff and be done with it... was kinda fun hehehe

question for ya brian.....
the A4LD has that 5 wire NSS/Backup light thing on it... i found the 2 pin's for P/N start and the 2 pin's for the reverse light's but there is one wire that just seem's to be a ground? i measure it with my meter between the pin and transmission case and it's always a closed circuit no matter what gear is selected? is this wire just a cap it and forget it item?

the NSS and reverse lights are now controlled thru 2 micro switches in my shifter but damn i hate dead ended wires....


Hmmm....honestly, I really don't remember. I wired mine so long ago. My brother has it now. He took all my ranger, BII, A4LD, and C5 books with him too. I have nothing to look up the wiring in. I had it all figured out from the books, before I started the swap.

I do know that the OD and TC lockup wires were just capped off, since they didn't go to anything anymore. Sorry I am not any more help with that part.


that sorta makes sense with what i have here....

there are 2 plug's in the trans harness one is the 5 wire NSS and the other is just the 2 wire OD silonoid (sp?)... the single wire thats closed might be the TC lockup? oh well i gunna just use the 4 wires i kin identify and if she dont run rite i will look into it further.

rite now werk is so damn crazy i get to play with my junk fer aout 2-4hr's a day so this might take me a while... fun fun...


IF it doesn't work, I can try to get my brother to crawl under his and see whats wired to what. Mine was an 89 ranger though, so I don't know if the color codes would be the same. The problem there is getting ahold of him. :( Shutting up now. LOL


Subscribing. Good info.


i got the kickdown cable to work nicely with the factory A4LD bracket

just drilled a new hole in the cable mounting bracket and used one of the servo cover's bolts to hold the bracket in place all i need to do is put a few zip ties on the cable end where it goes thru the gas pedal to take up some of the slack...

the cheesy factory tunnel cover is made of 24ga tin so i cut up a nice piece of 3/16" aluminum plate to replace it and mount my megashifter with 1/4"x1.250" bolts and nylocks.... she's rock solid and not going to rip outta the floor any time soon... the throw of the shifter just clears a regular beer can in the cup holder but no more king can's are going in there hehehe (just kiddin i NEVER drink an drive).

tommorow's the wireing maybe and then the crossmember... think i kin move the crossmember foreward on the F150 radius arm mounts about 2" then run a piece of 1/4" plate straight out to bolt to the tranny.... she's gunna be close i bet.


My truck had all the stock suspension, so room was not a problem for me. I cut the factory rivits and moved the brackets forward. Then simply bolted the A4LD crossmemeber back just like it was factory.

My first try was to leave the crossmember alone and weld a plate on the front to bolt to. That didn't work. The weight of the trans/t-case twisted the crossmember up higher and it hit my t-case just sitting. I know it would have damaged or destroyed it when I torqued the engine.

Oh, I had to cut the rivits on the E-brake bracket too. It was in the way of the new crossmember brackets location. I just bolted it back in the same hole where the crossmember bracket was bolted to.


thats an issue for me with the SFA.... i dont have enuff room to re-use the stock crossmember so i cut mine down figureing i would be ok then a C5 fell into my lap so i need to change it all again.... might build a new one from scratch but thats alot of work...


another problem solved

http://www.minnis.ca/gallery/album06?page=2

all i have to werk with is a 4.5" grinder, cordless drill an a lincoln mig-pak 15 hehehe

i think it turned out pretty decent but i could have WAY more fun with a bender ;)


I do now know if the frames are that similar from the BII to your X, but the B II transmission crossmember bolts between the frame rails. I forgot about it since I did not use it (my stock cats are in the way). I have two of them laying behind the house from pulling two C5s. LOL

Anyway, your new crossmember looks cool.


i thought about useing the BII crossmember BUT i dont like drilling any extra holes in my frame.... i have been told it work's but hell this was cheaper cuz i allready had all the mtl.

this crossmember was also built the way it is considering the next time i have $5000 burnin a hole in my pocket theres gunna be a ford GT40 long block sittin on my door step.... 2.5" HSS with a 3/16" wall and that top piece is 6" channel notched around the HSS.... BEEFY

got my wires sorted today... all i used was the NSS and reverse light's the rest is taped up water tight and out of the way, i filled the tranny up with 7 liters of quaker type H/mercon and spun it thru the gears a few times (no d-shafts at the moment).... the shifter cable was a PITA to adjust by myself but still only a 15min job.

still waiting on my adjustable trac bar but now i can atleast order my d-shaft's.... $$$ouch


Hmm...I don't have a clue what works with the X, but I used the front D-shaft from the BII (just bolts in-got an extra one of those too) and had my ranger rear one lengthened.

I knew a guy, who knew a guy, who could do it for me at a machine shop for cheap. I found (salvage yard) a longer shaft with the correct OD and took both to him. He removed my ends, added the longer pipe part, and welded my ends back on. I don't know how he balanced it, but it is. At 85 miles an hour :eek: there is a tiny vibration, but it may not be the shaft itself. I don't think I should be driving that fast in an old junk ranger.

Anyway costs involved for me. Junk shaft $20 (I think) and the lengthening $45.


Back
Top