Ricks Bronco: 1and 1/2 | Page 160 | Ford Explorer Forums - Serious Explorations

  • Register Today It's free!

Ricks Bronco: 1and 1/2

th_M2U00704.jpg


Since the turn signal switch broke and I added independent dash mounted R&L turn signals on dash I had to change the way the rear turn signals came on.
Was going to add another rear light just for the turn signals.
But then I thought why not use the back-up light that is located in the stock B2 rear light housing. I already have back-up lights mounted on the swing out tire carrier which are ford fogs. Just inserted an amber bulb and hooked up to the same wire that goes to the same side front light.
Click on the pick. A little different look.


Join the Elite Explorers for $20 each year.
Elite Explorer members see no advertisements, no banner ads, no double underlined links,.
Add an avatar, upload photo attachments, and more!
.


Tuscarora-20111204-00788.jpg


Tuscarora-20111204-00780.jpg


Well I got the other spring perch off and spindle.

Tuscarora-20111204-00786.jpg


The next modification for the axle tube will be slicing off the ends to length, but before that happens there's plenty to do for those spindles.
I'll be going into uncharted waters here. Could just get those aftermarket ones that get machined to size and pressed into tubes.
But they're pricey to say the least and with so many mods to come $$$ is not something I can just blow away.
My idea is to machine a few thousands off the large end of the spindles to make clean and then machine this piece of huge Piece of DOM tubing that will become a sleeve to be pressed over top of the machined end and weld up. Now the inside of the sleeve will be machined out for a press fit.
Planning on pressing the large sleeve tube to where the spindle makes a step down.
Maybe about 5 or so inches hanging off the other side where that will be pressed onto axle tube and welded. May even drill some holes and do some plug welds there also to the existing tube.
Talk about strong, the welds would go around the full circumference of the 3.5" tube and up into the 4.5" sleeve tube at both ends.
Where you see the brake backing plate bracket, that part of the axle will be but off also once the final cut is made.
Plus all I'd have to do is to cut one weld and then press off in needed to change spindle ends. Not mentioning I would have the same Dana spindles that came with this rear. That alone makes it worth it. Oh ya, coming up with something different...priceless. And if it don't work...instant boat anchor.


IMG-20111204-00781.jpg


Tuscarora-20111204-00782.jpg


Taking off the pinion nut with a 1 5/16 thin wall socket.
To hold the yoke all i did was to put a pipe wrench on the flats of the yoke.
Slipped on my Torque multiplication handles on. One should always have a couple stashed in the corners somewhere ha ha.
The trick is to position the one on the nut so it's hitting the floor and then position the other around the 9:00 position. AM or PM really don't matter, me I'm a morning person. By 9 PM I'm tired.
Then let Gravity do it's thing on the nut that has over 200 lbs applied torque on it and over 25 years of accumulated rust and crap on it.
Next I step slowly step up on the 9:00 am handle with one of my Chuck Taylors while grasping the front bumper of Samson.
And at 190 lbs of of me and using 4' of extension one could easily see by doing the math that it comes right off.
And no more exertion then climbing one step. Don't work hard...work smart.
And my air compressor just don't have enough ump to do it. And even if it did my impact sockets are too thick to reach around the nut.

Question for you guys, any one know about how much an 8 lug front conversion increases the width if any?


Tuscarora-20111205-00804.jpg


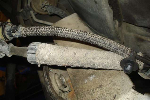
This particular Dana 70 model is the U series also known as the smoothie.
Reason is the cast housing is flush with the bottom of the diff cover.
The other models have the casting hanging below the cover.
I really don't see any difference between the bottom of the cast 8.8 and this one as hanging any further down.
But it seems that the 70 is higher above axle CL then the 8.8 and wider.
The pic is on bottom side of the centerline of axle.
But like broncobra said, with the gas tank removed there's plenty of room for this beast.
Funny how things work out for this larger axle ;)

Tuscarora-20111205-00800.jpg


I really need to clean the garage floor of all this crap from the axle. So might as well finish cutting the axle tubes before any cleaning takes place.
Went ahead and lopped off the pass. side of the axle.

Tuscarora-20111205-00802.jpg


When I'm done installing this spindle, it should be the strongest part of the tube when finished. Should be able to drive a Sherman tank over it and the tube will bend before the welds let go.
As with any suspension mods, a whole lot of measuring including taking tires off both front and rear of Samson and laying on my back thinking this out.

Tuscarora-20111205-00803.jpg


Now that's a whole lot better looking then that really long axle tube with the huge brake drum.
Plus it ought to look "Boss Awesome" when viewed from the rear with no gas tank blocking the view plus more importantly to let this thing articulate.
Now also have to remember that besides being able to drive home with a broken axles shaft the other benefit of a FF is that the axle shaft carries no weight of the truck, it's sole purpose in life is to transmit torque to the wheels.


ADS or old-timers??

Making great progress and yes shortened, minus drum looks great! Did I miss a post that indicated the disc brake setup your going to run?


Making great progress and yes shortened, minus drum looks great! Did I miss a post that indicated the disc brake setup your going to run?

Leaning toward the chevy K20 calipers, rotors with weld on brackets. This should let me run 15" rims if I want to or larger rims if need be.

Need to cut other side once I get new 14" cut wheel for the Makita "Chop- O- Matic". Then to the machine shop with the sleeves and spindles.


Tuscarora-20111206-00806.jpg


Put on the new cut-off blade and off comes the other end.
There is going to be some epic cleaning of this housing.

Tuscarora-20111206-00807.jpg


It's just a mere shadow of itself. Now for the long process of collecting parts.
May have to go back to my friends back yard aka "Axle City" and see what I can get that might help along the way. A lot easier now then under a foot or two of snow.

Just for grins and chuckles here are a few GAWR #.

Axle GAWR (Max) Manufacturer
Dana 30 2,770 lbs Dana Corp.
Dana 35 2,770 lbs Dana Corp.
Dana 44 3,500 lbs Dana Corp.
Ford 9-inch axle 3,600 lbs Ford Motor
Ford 8.8 axle 3,800 lbs Visteon

Dana 50 5,000 lbs Dana Corp.
Dana 60 6,500 lbs Dana Corp.
10.5" Corporate 14 Bolt Differential 8,600 lbs American Axle
Sterling 10.5 axle 9,750 lbs Visteon
Dana 70 10,000 lbs Dana Corp.


Tuscarora-20111207-00810.jpg


No this is not looking down the bore of my 54 cal muzzle loader after about 50 rounds.

I thought those tubes were dirty before i cut off the ends. Now add all those metal particles after the chop saw episode and I got a real mess.

Tuscarora-20111207-00812.jpg


So now i know the reason I saved the jack handle extension that has a U shaped end. It's for wrapping around shop rags laced with 000 steel wool.

Tuscarora-20111207-00813.jpg


Then place the non hooked end into 1/2" drill and spin away. Repeated process with solvent.

Tuscarora-20111207-00814.jpg


Clean enough. But could you only imagine not cleaning those tubes and setting up the new gears.


Artillery

Can't wait till you get wheels under that "cannon" like a good field piece requires. COG will definitely improve along with massive strength that will live up to full Sampson specs (unless you just want to keep the "little" title in place) cause with the V8, Atlas, solid front and now the Dana70 rear...your running out of Charley Atlas drive train strengthening exercises and it will be hard to kick much sand in Sampson's face once you get your current work completed and mount those 40 inchers. Now I really think you have a shot at the Ultimate Adventure trail ride...sittin a mighty fine horse!


thats gonna be a thoroughbred for sure. I was on 4x4groupbuy.com the other day and saw that 42" pitbull rockers are 38$ more per tire than 39.5s. maybe you should look at a d60 front and go 42's. just a thought


On Board Air

Tuscarora-20111208-00817.jpg


As if I need another project to complete. Seems a certain friend of mine had this air pump laying around in his garage and was going to use it for an emergency air supply for his utility truck.
It came off a full size car that had a suspension system that raised the car up. He said it worked great even with five people in it and asked if I wanted it. "Are you kidding, I'll take it". I'll ask again what it came off of.
All I know is that after I figured out what wires were what and removed the 1/8" hard plastic hose that clipped right off. I then temporally wired to my out side power supply, bingo, works.
Then slipped one of my extra air hose that had an end cut off over the fitting and secured with a standard hose clamp. The hose is in the upper left of pic. It worked great in the little testing time i did.
I let the air down from 20 to 15 pounds on one of the front tires, I know it's not that low.
The tire is a 35 x12.5.
Next was to time it. In 2 minutes it was back to 20. Works for me.

Here's a short video of the first test. It about jumped off the chair.
Click Here

Just need to find a good spot for it on the truck and then get one of those small diameter self coiling air hoses.
I think I have a cool spot for storing and pulling the air hose out.

I know that several thousand posts back I mentioned using a York AC comp. But this was free, no concern about having all that weight of the York mounted high up on engine. I'll sacrifice speed of airing up for keeping the COG low. I'll have this light weight comp. mounted low in the rear where it should be. The only words I found on the pump was Delco. I'll get the info for what it came off of just in case I need parts. If there is any parts for it available.


Well thought it was about time to stop manicuring this axle and get something going.
Took both spindles to my machine shop and explained how I wanted them machined.
He said give him a call around noon this Monday. Not bad turn around.
This is the same guy that machined my knuckles and a few items for my slip yoke eliminator on my BW1350 that worked so well.
Then I asked him about getting the cut axle housing in one of his large presses.
I think the axle housing may fit. If not I have a few back up plans.
After the spindles are done I'll order the large DOM sleeve. Which will have two different ID diminsions after machine work. Then the 8 lug rotors Hey, if it don't work then do not try this idea ha ha.

Plus I'll be doing the OBA thing also. I'll try to use those push on lines that are so easy to do plus I'll order a tank. Could use those BBQ tanks but I want one designed for air that has the inside painted. Do not need an On Board rust pit.


Tuscarora-20111211-00823-1.jpg


One thing i did not like was that I found no external air filter for this pump, not a good thing. So I removed the top cover of the pump which exposed the inside.
Just as I suspected an internal filter system that was dirty and to the point where the filter was falling apart. Like it was dry rotting.
The arrows show the 2 filters. They were just two pieces of foam placed vertically.
My plan now is to add an external filter system.

Tuscarora-20111211-00825.jpg


I also was concerned about the cylinder walls, which seemed ok. Then again who knows how much this suspension lift pump was even used.

Tuscarora-20111211-00829.jpg


So this is how I went about installing the outside replaceable filter.
I noticed that there was an existing barbed port on the side directly in front of the air chamber were the old filter was. It was casted into the housing but did not penetrate into the pump. This must have been if the pump was used for some other make or model car.
Where it did get the air was from a small oval hole directly below the rectangle filter slot.
So enter one 1/8" bit that fit perfectly, then I drilled out the wall and into chamber.
Once this was done I junked the two filters.

Tuscarora-20111211-00831.jpg


RTVed the bottom and it's done. Compliments of an in line gas filter.
My concern was that a lot of dust would be sucked up into the original opening when doing trails. Even if it was not on, the dust would have managed to get into that opening.

Next is to find low mounting location.


thats really funny bk I have 2 of those exact same compressors in my garage, my brother got 3 from a jy I think out of cadillacs, he kept one and gave me the other 2. So does slipping the hose over the black plastic tank thing hold enough pressure to fill a tank? id mount mine in there and run it to a reserve tank. Guess I need to put one in my BII. apparently I need to put in a filter as well.


thats really funny bk I have 2 of those exact same compressors in my garage, my brother got 3 from a jy I think out of cadillacs, he kept one and gave me the other 2. So does slipping the hose over the black plastic tank thing hold enough pressure to fill a tank? id mount mine in there and run it to a reserve tank. Guess I need to put one in my BII. apparently I need to put in a filter as well.

All I know is that when I let air out of the tire from 20 to 15, it pumped it up with no problem with no tank. Now I can't say yet about a tank but I would think it would run until the tank is ful, unless there is some duty cycle thing to worry about.
Guess I should go out to garage and let that tire go near flat and see what happens. I do know this, that black thingy acts like a check valve, it won't let air back into the compressor.

Tuscarora-20111211-00832.jpg


Having second thoughts about not using a propane tank. I check prices on an after market OBA tank and their price for even a 10 were high where as this one is 20 and it's free.

Just toying with it now. Thought Id cut off the protective valve guard. Just too propane looking for me. Someone might think I'm a tree hugger and converted my V8 to propane...I'd rather have a sister in the ***** house then do that :p:

My first concern about using one of these tanks was that they may rust up with the untreated insides. But thinking of treating with the same sealer that I used on my fuel cell? Would wait to seal it after weld-in bungs were in.


My dad gave me a tank that he said was used for holding freon, im not sure what the spec is on it but I figure it should hold enough pressure to fill my tires etc, I wonder if I could run both of the 2 compressors i have to put out more cfm. that would be pretty neat.


My dad gave me a tank that he said was used for holding freon, im not sure what the spec is on it but I figure it should hold enough pressure to fill my tires etc, I wonder if I could run both of the 2 compressors i have to put out more cfm. that would be pretty neat.

That would be cool.


Tuscarora-20111212-00838.jpg


Just kicking some ideas around. Thinking of making up a manifold out of this extra tubing I have. Just add some weld on pipe thread bungs. I'm thinking 1/8 and or 3/8" female pipe thread. The one in the pic is not a bung. It's a bushing so I can just get some ideas on what it may look like.
May make the manifold so it will screw into the tank.
I'll be going to a hydraulic shop who carries all kinds of fittings including those push on ones. Then I'll know what size weld on bungs to order.
I'll also make plans for a possible ARB supply line also.
I saw one guy who had this cool looking joy stick control for his air locker. It had means to release the pressure also to disengage the locker.
If it sounds like I haven't a clue about what I need for an air locker...your right ha ha. Never had one.

One other thing, I'm no way suggesting anyone try this. A propane tank still has gas in it even if the tanks been opened for years. You will need to release the remaining gas. Some tanks you just push in on a release valve.
This one is farily new and like all propane tanks, it's heavy duty.


Join the Elite Explorers for $20 each year.
Elite Explorer members see no advertisements, no banner ads, no double underlined links,.
Add an avatar, upload photo attachments, and more!
.


My dad gave me a tank that he said was used for holding freon, im not sure what the spec is on it but I figure it should hold enough pressure to fill my tires etc, I wonder if I could run both of the 2 compressors i have to put out more cfm. that would be pretty neat.

I'm not saying I've never seen them used before... but fyi, using freon tanks for air can get you in trouble.


Back
Top