Ricks Bronco: 1and 1/2 | Page 161 | Ford Explorer Forums - Serious Explorations

  • Register Today It's free!

Ricks Bronco: 1and 1/2

yeah heads up now that ive talked to Kert and checked online it appears that it is not legal or advisable to use a freon tank to store compressed air, might have to copy Rookie now dangit!


Join the Elite Explorers for $20 each year.
Elite Explorer members see no advertisements, no banner ads, no double underlined links,.
Add an avatar, upload photo attachments, and more!
.


yeah heads up now that ive talked to Kert and checked online it appears that it is not legal or advisable to use a freon tank to store compressed air, might have to copy Rookie now dangit!

Now that scares me, really really scares me ha ha.

Love the looks of these Shocks. May just have to start collecting all four. Love the 1.25 shaft.

On another suspension note. My modified D70 spindles were done yesterday evening. Like I'm going to miss the evening Black Powder hunt to pick up a hunk of steel. Just ain't goin to happen. There's a huge 10 pt out there but he's given me the slip so far.
May go pick them up around lunch time, I'll be freezing by that time anyway.
I'll also try to pick up some hardware for my OBA manifold so I'll be able to use those fancy dancy push in air lines.

Strange about this build, the more I check off of the list causes the remaining "Yet to do list" to grow exponentially :dunno:


don't worry Rick ill still have 2 compressors so mine will be cooler anyway, btw you buy some air shocks I know of a good home for your current coilovers... just saying


don't worry Rick ill still have 2 compressors so mine will be cooler anyway, btw you buy some air shocks I know of a good home for your current coilovers... just saying

You do know that you will have to synchronize the compression stroke so when one is TDC the other is BDC or you'll set up a vibration frequency that will cause another Death Wobble...just saying ;)

Tuscarora-20111214-00839.jpg


May go with this set up. The small silver fitting is one of those push fittings.
I'm going to forget the welded manifold idea. This will let me add, delete, or change angles of those ports.
None of those fittings are made up yet.
Really need to get rid of that Methyl Mercaptan stench. Going to rinse the inside with alcohol or acetone and then pour some paint in and swirl it around to seal tank.


IMG-20111201-00771.jpg


From this...

Tuscarora-20111215-00846.jpg


To these lovely goodies.
Their's just some primordial fear thing about doing all this and not even sure if it's going to work.

Tuscarora-20111215-00845.jpg


Tuscarora-20111215-00848.jpg


Here's where I'll design a step down sleeve due to the different outside dia.
I know I could just V notch both ends of axle and spindle and do a 3 pass weld using pucks and aligning bar and it would just never break. But by sleeving it will actually make it even stronger but my main concern is that by machining the spindle and sleeve it will center the spindle, dead drop straight when pressed on.
But by adding the sleeve I'll have to come up with a custom disc brake bracket cause of the large wall thickness. Imagine that.

Tuscarora-20111215-00849.jpg


This is the exact length of the short side of the axle.
Just trying to do as much in house (garage) as possible. Plus it's just so friggin fun ha ha. There were times when it was not so much fun when it was more or less in stock trim and getting to most of the areas were such a PITA.

And the cost of machine work...1/2 hour at $40/hr = a whooping $20.


"Iron sharpens iron"

Brackets shouldn't be a big problem & I'm certain you measured more than twice & you had already visualized what you have now in hand. It surely cuts the cost of machining when you furnish all the specs so the operator just has to cut steel. I judge him as an honest man, going by his price and so he is also probably very competent. I'm having fun just watching.


I'm certain you measured more than twice & you had already visualized what you have now in hand.

You read me like a book.

And yes the machine shop has has great prices and is in Hagerstown Md. It takes up two city blocks and must date back to the 1800s including the looks of some of the machines.
I'll ask if I can take some pics if they let me complete with the old old oak floors.
They also carry the very best in tools associated with machine work.


Tuscarora-20111216-00850.jpg


Going to get rid of the rotten egg smell that is added to the propane for safety reasons.
Just slosh around some acetone and that's the end of that.

Tuscarora-20111216-00859.jpg


Then after the acetone has had time to dry it was time to slosh some paint around the inside. Happened to have some white which I don't think color matters. Believe me, there are a lot of air tanks on the market that are not sealed on the inside.
Here the tank is turned upside down to let the paint run out.

Tuscarora-20111216-00860.jpg


Checking to see if it's holding pressure.

Ah, the sweet sound of success. Click Here

Next will be to hook-up the pump.
I added a shrader valve also to make the tank portable if I have to take it somewhere.
Probably will have to add some more ports but that's no biggie.


Tuscarora-20111216-00863.jpg


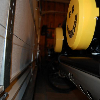
I jury rigged the electric pump to the tank which is laying on it's side and an air chuck clamped to the shrader valve. Turned on pump and when it got to 100# shut it off.

I wanted first to see how the pump would do, good marks so far.
Next to see just how much the 20 gallon tank would air back up tires with out being hook-up to the pump.
The 12.50 x 35 tires were aired down to 10# then air back up to 20 with what air was in the tank.
It was able to air two tires back up to 20#s in 4 min. There was about 20#s left in the tank.
But once I have it all plumed up and wired with controls the pump would have came on long before it got that low.
Plus I'll try to go to 120#s in tank once I have a shut off control hooked-up to the pump.
Of course I'll utilize a relay with two heavy gauge wires going directly to + and - batt.

I'm now even thinking of running an extra battery, running out of connection points. Along with all controls to keep both batt. charged up.
Could use it for aux lights and this pump maybe.


Don't forget a safety pop-off valve. That way you don't explode the tank if the shut-off fails.

~Mark


Don't forget a safety pop-off valve. That way you don't explode the tank if the shut-off fails.

~Mark

Good point and like the old saying goes..."It's not a matter of If but When".
This is becoming a little more involved then what I thought. But hey, the price was right.


Potomac-20111217-00867.jpg


Now after eliminating the high beam switch off the broken multi crap switch to the floor, there's only one item left to hook-up and that's the horn which in my opinion was the worst possible place to have it. You had to push the turn signal switch in lol. Not mentioning hitting it with knee when getting in, now if your vertical challanged, it may be a moot subject.
Think I'll mount a regular push type horn switch on the A pillar cage bar.
The best part will be cutting off that limp multi lever thing sticking out.
Then every thing it used to control will have it's own switch, a totally new concept ha ha. Or is it.


My hero

Retro floor mount dimmer...the way all vehicles should be equipped...yeah now I'm a hater of the evil stalk!


Ballisticfab-1.png


Just in time for Christmas, Ballistic has a 15% off on all stuff, so those Dana 70 disc brake brackets for a chevy k20 will be ordered Mon.
No that is not my axle but it does show the Ballistic bracket. My axle has been narrowed behind the brake backing plate bracket where the arrow is so it's a smooth tube.
What does have me concerned is the opening in the bracket that is a couple inches from the arrow, may be too close to the 4.5" dia that I need to cut into it. I'll talk to Ballistic and if there is some concern then maybe they can make a set with no hole. Probably want more $$ ha ha. Or might have to just weld a plate across bracket before using a 4.5 hole saw.

Only thing is no matter what, I'll have to enlarge the 3.5" dia to a 4.5" dia.
Here is the link to the sale
http://www.ballisticfabrication.com/

Description
Weld-on caliper mounts for the Dana 70 axles with 3.5" axle tubes at the ends- Made from 3/8" Steel in a strong yet light weight design. Drilled and taped to 7/16". For use with 73-87 Chevy 3/4" ton K-20 front calipers and rotors. CENTER HOLE ON ROTORS MAY NEED TO BE MACHINED LARGER FOR SOME VARIATIONS OF DANA 70s. Includes 2 pieces. Part # BRK-1016


Believe me, I've had my times with them also, taking too loooong to get what I ordered and then no confirmation on what I bought. Oh i will say something about it when I order them.
It's been said on other sites as well.
And just for that reason I've ordered long before I'll need it.

Guys at ruffstuff are great, in fact they're going to be part of this dana 70 mod. I spoke with them last week.


Join the Elite Explorers for $20 each year.
Elite Explorer members see no advertisements, no banner ads, no double underlined links,.
Add an avatar, upload photo attachments, and more!
.


Tuscarora-20111219-00870.jpg


So long you euro piece of crap switch.

Tuscarora-20111219-00869.jpg


Just need to add a horn switch.

Potomac-20111219-00871.jpg


Must admit, I got great satisfaction when I took the cut-off wheel to handle.
And the horn button is in a much better location. It's more of an instinctive location when you need to have the horn blaring away.
Not mentioning no more knee hitting that thing.
Good riddins to bad rubbish. Now everything it once controlled has it's own switch. And I like the way it cleaned it up.


Back
Top