Ricks Bronco: 1and 1/2 | Page 89 | Ford Explorer Forums - Serious Explorations

  • Register Today It's free!

Ricks Bronco: 1and 1/2

Weren't most full width HP D-44s 5 on 5.5? I don't recall seeing one that wasn't, excepting the 8 lug versions.

Well there was the d44 from the 150, but it was setup for radius arms and had 5 on 5.5, but the 250 was setup for leafs and had 8 lug setup(dont know the pattern). 350 was the same way, but it used a d60.

So i should clarify and say that it is weird seeing a d44 high pinion from 78 or 79 setup for leafs with 5 on 5.5. :roll:

this is a d44 low pinion from a 76 250. in 78 they went high pinion, but for the most part were unchanged other than that. (talking about the axles, not the entire truck)
IMG_08871.jpg


Join the Elite Explorers for $20 each year.
Elite Explorer members see no advertisements, no banner ads, no double underlined links,.
Add an avatar, upload photo attachments, and more!
.


IMG_0059.jpg


Got the pass side spindle off, what a major pain. Used a combination of those two chisels. As you can see it had some crude around that sleeve.
\
Pass. side axle is out and I measured the axle tube. It's .500 wall.


IMG_0061.jpg


I'm going to try something a little different then what I read on cutting off axle. They said use some dowls in the TRE holes and measure angle so the caster will be the same after installing knuckle back on. But what ever you do, don't rotate pinion any time aftewards. Well I want to rotate the tube so I can cut off the tube while setting in my comfy chair.
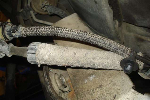
So just got my Laser light and struck a beam along the axle and up onto knuckle. The Laser tool was flush up against the cast iron diff. The light was adjusted to to shine along tube where it intersected with the center edge of the TRE. Then It was just matter of finding a drill bit the same diameter as the light beam. Next I drilled a series of holes just deep enough to mark the tube it's full length. Next I removed the Laser beam and reatached with the light hitting the three widly spaced holes along the tube. Each and every time it ligned up with the center of the TRE hole.

IMG_0063.jpg


Next was the tedious job of grinding the weld off the tube knuckle connection.
This took about 50 min. I got a few minutes into this job when I found a comfortabe way to support my arms on my knees and then it was not so bad.
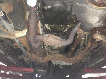
What you want to do is grind down far enough where you can see a faint line/crack. The is where the knuckle meets the tube and there is no more weld. If you look close near the top you can see the crack.
Then get a big 20 pound sledge hammer and knock off...Right like that will happen. And it did not come off.

IMG_0067.jpg


At this point the knuckle is supposed to be off. But I'm cutting the tube anyways. I hit long on hard and it did not budge.

IMG_0069.jpg


Yep, 1/2" wall, that is just so cool.

IMG_0071.jpg


I took the knuckle and put a cutting wheel on the grinder and cut off the tube and the hair line crack in back. Next I took the saw-zall and cut two cuts lenth wise in the tube that was still in that damn knucle. Here it is part way out when I took the pic. Hard to see the one cut it close shut when it took it first hit.

IMG_0072.jpg


Just use a large socket and a 20 pound sludge and out it came. Ho ra.

IMG_0074.jpg


And here is the fruit of all this labor. My shortened D44 axle tube. Now to get an early Bronco axle. No it's not welded yet...just too tired.


IMG_0079.jpg


This steering arm was fun getting off...The 20# sludge with the sharpened brick chisel is really coming in handy.
I need to get an arm made that fits that bolt pattern for my high steer upgrade. The steering arm that Was on it won't work with my coilovers.


IMG_0078.jpg


Here is the pass side that needs to be milled and tapped on top for the other side steering bracket to relocate the steering arm higher up.

I talked to a guy in Winchest Va. that mills the tops and uses water jet to make the steering arms. May have to make a trip down there.


Anybody have any pics of a HS D44 in a RBV with coil suspension or coilovers?

Just did a little research and fount out that the EB Bronco axle has smaller U-joints. Can't have this, at least need the same as the Dana 44. Looking locally to see if there is a machine shop that can re-spline the Dana or might just have to ship.


Well I did not take the knuckle to Winchester Va. but to Hagerstown Md. which is only a few miles from my house. There is a huge Machine shop there that actually is one city block long and 3 stories high. Talk about an Old School place, it must have been built in the early 1900s and still has dozens and dozens of lathes and such. Some of the equipment must have been there the same time. Tons of fasteners and every kind of machining tools you would ever want. Plus they sell steel products and drop pieces.
OK, bottom line, when I walked in there I took the knuckle and explained what I want. He's never done one and I told him that companies that do this get around $50 for one.
He said how about $25...I handed him over the knuckle. It will be done tomorrow afternoon. If I'm back from my Doctor visit I'll pick it up.


do you just want stock shafts or stronger?


do you just want stock shafts or stronger?

Well I need shafts that are 6" shorter but would like the u-joints to be as strong like the ones that are in there now, which i think are the 297 ones.
The shorter early Bronco shafts that are 6" shorter have weaker smaller u-joints. That's what I read anyway. So shorter shafts with stock type 79 F150 u-joints would be fine.


Rookie im setting up the same exact axle now. Mine was from a 77 F150. There pretty common actually.


Hey, thanks for the link. Might have to call them up and see if I can get just the right side.


Rookie im setting up the same exact axle now. Mine was from a 77 F150. There pretty common actually.

Is yours an 8 lug or 5? I'm trying to figure out if the 79 F150 Super Cab was the only one that had the 5 on 5.5 bolt pattern between 77-79. I also just learned that not all axle tubes in 79 were 3" x 1/2" wall. Some were 2.75 x 1/4"wall.
Just trying to be an educated consumer LOL.


Rookie im setting up the same exact axle now. Mine was from a 77 F150. There pretty common actually.


Also I'm trying to determine if the amount of webbing on center section translates to a heavy duty case, and if so this might mean that the tubes are in fact the .500" tubes.
This would be good info when scouring thru the salvage yards in quest of a HD axle.

Here is a pic of mine with the webbing. It has three on one side and a single one on other.
Any info from anyone would be appreciated.
IMG_0086.jpg


Is yours an 8 lug or 5? I'm trying to figure out if the 79 F150 Super Cab was the only one that had the 5 on 5.5 bolt pattern between 77-79. I also just learned that not all axle tubes in 79 were 3" x 1/2" wall. Some were 2.75 x 1/4"wall.
Just trying to be an educated consumer LOL.

Hmmm, I'll look when I get home, I have a full width coil spring d-44 HP empty housing out of a 78 Bronco that I can measure. Will also look at the webbing. I find quite a few coil versions in the yards around here, but very few leaf sprung in either pattern.


Thanks for doing that EB.

IMG_0088.jpg


Just got back the pass. side knuckle from the machine shop. Now instead of the TRE going in the extended arm with the hole, it will mount high up on a fabricated arm bolted to the top of the milled area.

$29.00 and some change to mill and re-tap those threads. No bad at all.

I had it milled the same angle to the ball joint hole as the driver side. Of course the driver side was done from factory.

I'm already thinking about a built 4 link DOM tubing suspension. If not then a built pinned twisted arm type.

To say this is getting interesting is an understatement.


did he drill the holes or are you planing on that?


did he drill the holes or are you planing on that?

The holes are not drilled. This is a whole new learning process for me. I'm thinking of getting the arms with the holes. And then getting the right hardware needed. This might be those cone shaped bushings also. Then if it's somthing I can do, I will get the right tap and have at it. My research says that those holes have to be Dead Drop perpendicular to the milled area. If I think I can not do it then off to the the machine shop.
I don't have he arms yet and that's another reason there are no holes. Seems to be a lot of suppliers out there to chose from. And prices all over the board.


IMG_0089.jpg


Going to weld on this part of the knuckle to the shortened axle. This was a major pain trying to get the tube and inner knuckle aligned up. Even after putting part in oven I still had to beat on it untill the cows came home. Then after it was on tube far enough it was just a frog hair off on the Laser beam. But I finally got it lined up. About a 1/4" from the left end of the light beam, you can see a faint dimple that is centered in the beam. This was one of my holding points.

IMG_0090.jpg


Then the fun part of welding the steel tube to the cast iron knuckle. Used plenty of heat from an acetylene torch. And then even post heated it.

IMG_0092.jpg


There was plenty of bare metal after cleaning the axle, so I thought some paint may be in order. I like the looks of the shaved axle minus those shock mounts.


Join the Elite Explorers for $20 each year.
Elite Explorer members see no advertisements, no banner ads, no double underlined links,.
Add an avatar, upload photo attachments, and more!
.


IMG_0015.jpg


Here is the stock axle length compared to the cut axle tube.

IMG_0016.jpg


And here is the splined end just far enough back not to extend past the spider gear.

So now to get the axle cut. I'm just going to send it to Currie and let them do it. Lord knows they have done enough of them.
When I talked to them they quoted $70 for cutting and machine work and around $20+ for shipping from CA to WV.

Need to start designing radius arms or 4 point as far as DOM tubing and joints go. Have and idea for a twisted RA suspension. Really want a 4 point, but not too much room under there. But we'll see.


Back
Top