Rockwells | Page 3 | Ford Explorer Forums - Serious Explorations

  • Register Today It's free!

Rockwells

Hello all,
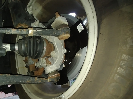
Long time user and fan, but been a long time since ive been on. O did my SAS about 6-7 years ago and posted on this site. Ive been running it with no problems besides the normal breakage. Lately i have been itchin for a upgrade and came across some up grades. I havent been on for ever so forgive me if im in the wrong thread, but back in the day it was easy to navigate this site. But anyways i have started my rock well conversion. I have rebuilt both axles flipped the rear hubs, shaved the breaks, added pinion breaks, grizzly locked the front welded the rear. Bought hummer h1 double beadlocks with rockwell welded in inserts. Plan on running 47 ltbs. Im running the BTF single reverse triangulated converions with coils. So far here is what i got, i have alot of pics put on my phone so i have to send them on over.
 

Attachments

  • 4 link rock.jpg
    4 link rock.jpg
    183.1 KB · Views: 2,380
  • front rockwell.jpg
    front rockwell.jpg
    199.1 KB · Views: 2,707
  • front on rocks.jpg
    front on rocks.jpg
    272.3 KB · Views: 3,056


Join the Elite Explorers for $20 each year.
Elite Explorer members see no advertisements, no banner ads, no double underlined links,.
Add an avatar, upload photo attachments, and more!
.


Can't Wait To See This thing In Action As well , Great Job on all The Work into this thing Two Thumbs Up !!


Join the Elite Explorers for $20 each year.
Elite Explorer members see no advertisements, no banner ads, no double underlined links,.
Add an avatar, upload photo attachments, and more!
.


Thanks,
I get my argon on monday so i will post some flex shots and actual ride height. Starting to see the light at the end of the tunnel. :thumbsup:


I want Rockwells just because of the pics :) Looks great.


Thanks!
Here is my only flex shot the body rolled a bit, because of bracing and the coil is over extended. Cant wait to try it for real! Come on damn argon, get here now!
 

Attachments

  • over extended.jpg
    over extended.jpg
    64.4 KB · Views: 966


one more:D
 

Attachments

  • angle shot.jpg
    angle shot.jpg
    42.5 KB · Views: 1,901


Awesome !!! , how much would you charge me to do that to my rig lol , thats most Evil looking first gen i have ever seen so Far , Great Job !


Thanks!
Bruce i have over 6 grand into it. And got the axles for free. This was no easy job, and i bascially did it all by myself except for a couple times. Its not easy moving 800 lb axles around on your own. Cherry picker and losts of jacks lol.


I have followed your build , i can just imagine how much effort it was , if i had the tools and spare money i would build a few just to sell lol


I welded up the shaft. Made shims for the slip joint. It started snowing so it will have to wait until another day and I need to get 3 gallons of gear oil to fill these pigs


Can't Wait To See A Video Of This Thing , Keep Up The Hard Work !!


Couple pics of the shaft. I cut the transfer case side off, cut the stock tube off. Measured it found the center then slowly ground down each side equally to fit inside the 1.5 inch inner diameter tube. The rockwell side was easy it had a lip 4 inches up the joint half that fit perfect into the square tube, i then got some .20 shims tacked the in and greased the shaft for a tight fit. Sorry for the bad pics, i need a real camera. The best part is that i still have 3 more rock well shafts so i can make spares:D
 

Attachments

  • new shaft.jpg
    new shaft.jpg
    58.4 KB · Views: 854
  • newshaft1.jpg
    newshaft1.jpg
    60.8 KB · Views: 789
  • newshaft2.jpg
    newshaft2.jpg
    33.7 KB · Views: 798


steering update

Well i went back to the drawing board On the steering at full lock right the steering link was right under the rotor for the brake and i was not happy with it. I thought and tried to come up with better ways but they all ended in not working. I cant move the brakes to the rear of the center chunk because it will decrease my up travel even more and i cant flip the knuckles because of the 4 link. So i seen a idea and went with it, i cant take the kudos for this because a guy on pirate has done it, except i used 1/4 wall square instead of round like he did. The wall of the stock tube is about 1/8 and i needed to move my link out more incase i hit something i dont want it to bend and hit my rotor. So by doing this i increased my distance by 1.5 inches and double the thickness. heres some pics of how close it was and how i made it plus the new distance from the rotor. :salute:
 

Attachments

  • steer4.jpg
    steer4.jpg
    35.2 KB · Views: 783
  • steer3.jpg
    steer3.jpg
    95.7 KB · Views: 793
  • steer2.jpg
    steer2.jpg
    86.7 KB · Views: 744
  • Steer1.jpg
    Steer1.jpg
    70.3 KB · Views: 817


A few more pics, when i welded it ran a bead as tight as i could in the crevis and the ran two fat beads on top.
 

Attachments

  • steer5.jpg
    steer5.jpg
    39.1 KB · Views: 767
  • steer6.jpg
    steer6.jpg
    61.5 KB · Views: 779
  • steer8.jpg
    steer8.jpg
    80.5 KB · Views: 788
  • steer9.jpg
    steer9.jpg
    57.6 KB · Views: 791


Quick update

I have realized that i need a E Brake, that is too much weight pushing on the parking paw. So i have done some research and found nothing, so i am back to the drawing board and have a few ideas. Wilwood makes a hydro/mechanical caliper, but im not sure if i have room or a way to set it up and i dont want to spend 140 dollars just to send it back if it dont work. They also have a smaller floating mechanical brake that is looking pretty promising. I have also found another one that is really nice that is used on older corvettes when they convert over to rear disc. And i am switching over to manual hubs due to the loud clatter that the square driveline makes (yes i know that teflon shims and welding and grinding works, but i have also heard that it doesnt last that long).I will post pics when i start the work. :salute:


I forsee some major tierod issues down the road. That thing is dangerous.


It has plates on the top and bottom. (not in the pic) Its tried and true, please do tell.


Drove it around for a bit, my buddy came out and we made a drive shaft with a toyota flange for his dana 60. My steering is a little tough locked in. Im going to have to upgrade my PS pump to meet the demand of the orbital valve and ram. Here is a pic of his 38s next to my 42s.
 

Attachments

  • 42s vs 38s.jpg
    42s vs 38s.jpg
    79.2 KB · Views: 789


crazy looking first gen. great job.


Join the Elite Explorers for $20 each year.
Elite Explorer members see no advertisements, no banner ads, no double underlined links,.
Add an avatar, upload photo attachments, and more!
.


Back
Top