Well, it's been a while since my last post, and I feel like I've gotten quite a bit done. Looking at it and realizing it's 4 weeks work of work, kinda makes ya think it's a really slow process, but with being on call every other day it seems, I haven't been able to get a ton done. It'd maybe help if I could fit it in my garage, and I'm half tempted to go to Harbor Freight and get one of those tent garages for $189, but it is what it is and I'd be to tempted to take as many breaks as I want if it was at home lol.
I have been basically working on only one door at a time and one side at a time...things went a little easier so far moving from the front door to the rear, so by theory, the last 2 doors should be an absolute breeze. First Item of business was to get the handles relocated. I ran into some headache here in the form of fab and body work that could have been avoided by more pre-planning on my part and not cutting through the insets for the door handles. A few had to be repaired where the rest had to be completely put back together. Need a little cleaning up, but they hold handles. After that, it was finding a spot, cutting into the door, and spot welding them in.

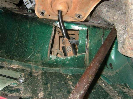
Next was getting the interior ready for a handle, adding some support to the inner panel that was welded in, and getting everything linked to the latch (not done in that order, but was in the rear door and will be on the other side.) Support was provided by some angle iron (think it's right around 1/2"x1/2", was what I was given it when I asked them for the smallest angle iron they had),
Linkage for the exterior handle was easy. Link rod was cut in half and a 2" piece of 3/16" steel rod was added to reach from handle to latch. Linkage for the interior handle was even easier. Link rod was bent in the middle and a 4"ish piece of rod was added as a gusset. Front door latch linkage done.
Next was working on capping the void. For this, I went to the welding shop and got 4 strips of 18g sheet metal, 4'x8", one for each door...to bend, I took a scrap piece of 1/4" steel and welded two 6" pieces of pipe to the ends, 1/4" pipe and 3/8" pipe. The plate was held in a vise and with the help of a dead-blow hammer, I was able to get the curves in the cap, larger diameter curve in the outside of the cap, small to the interior...
Cap was placed on the door and corners were made later. I also ended up filling in the area where the mirrors went. I am planning on using a set of manual Ranger paddle mirrors, as they'll be out of the way of the canvas tops. Mirrors were supposed to arrive yesterday, but tracking indicates it was brought to my town and then ended up back in Toledo....don't know what that's all about...
Holes were cut for 2 reasons. Round hole is for the 6.5" Pioneer speakers purchased for the tunes, and the rectangular hole next to it is for access to the latch. Hopefully my arms never get any bigger than they are, as it's a little tight reaching to the latch, but it all works! Have a few spots to cap yet, but the next thing in order for the front door is Bondo and paint!
Next was working on linking in the rear door from the handles to the latch. This proved to be a little more involved than the front door and took more gusseting than the front, but it all works. Linkage for the interior handle still flexes in the middle a little more than desired, so I need to address that before capping the back, although everything was made in a sense that all linkage and latches can be removed from the door like stock and replaced if needed.
Interior panel for the rear door was replaced before adding in the interior handle.this was pretty simple and no extra metal was purchased. The panel used was actually made from the exterior door skin panel that was cut out, and once again a piece of small angle iron was used to give the door a little more support and straighten the panel.
Next work will include finish cap on the front door, cap on the rear and then moving on to the drivers side. Slow and cheap...metal for capping the doors is the thing needed the most for the project (everything else will be frills) only cost about $30. We won't get into what I spent on the speakers and canvas materials (so far) for the upper door covers.
So updates on this thread have not been just updates on the truck, but include things going on in my life. Little less than a year ago I shared that my wife and I lost our first and that the doctors had high hopes for when we might be ready to start a family again. Well, we're halfway there! we are once again expecting a little bundle of joy. coming right after Thanksgiving, so we're pretty excited about that. Work on the Explorer will once again take a bit of a back burner to getting ready for the little one, but also to home improvements as we are also in the process of buying the house we are currently renting...life is hitting fast lol.