UCA bolt nightmare | Ford Explorer Forums - Serious Explorations

  • Register Today It's free!

UCA bolt nightmare

EB4X

Explorer Addict
Joined
December 28, 2016
Messages
1,370
Reaction score
916
City, State
Orange county, Ca
Year, Model & Trim Level
95 Explorer 4X 4.0 ohv
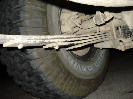
Wow...so replacing my upper control arms / ball joints .... so on drivers side- one piece - Ford in there great wisdom put's a ground connection right where the rear bolt has to slide back and out...along with brake / fuel lines .....and that's not the worst part!....I removed ground....pivoted camber washer so it goes 'behind' lines but with arching metal frame right behind bolts I can't get this side to slide out! ....I read some other post a while back and other guy was freaking too contemplating using a sawzall to cut bolt..... so next obvious thing is how are replacement adjusting bolt kits going to work in....
Ford really designed this poorly.....can't believe this.

Passenger side / two piece I just worked the old bolts back in since I don't "have to" replace those...all though wanted new more adjustable bolt kit in there.....


Join the Elite Explorers for $20 each year.
Elite Explorer members see no advertisements, no banner ads, no double underlined links,.
Add an avatar, upload photo attachments, and more!
.


Yeah, they are a pain.

If you can't get it past the lines, you can move the lines out of the way, and wiggle the bolt past them, enough to remove / install the arm.


The driver side is pain. I spent good 4 hours getting that one bolt out, until i got the angle grinder out. I have no idea how to remove the bolt properly.

I installed the right side bolt "backwards" just so i don't have to deal with it anymore. Probably affects a lot of things in all the wrong ways.

Edit: i actually cut the UCA not the bolt.


I also discovered that you can push inward on the control arm once the bolt is partially out and it moves just enough to allow the bolt to be removed.


I also discovered that you can push inward on the control arm once the bolt is partially out and it moves just enough to allow the bolt to be removed.

That's because the Bolt hole is slotted. Great tip to share!


I found my old post from last Summer when I did the UCA replace. Down at the bottom of the page I explained what I did when I put the front bolt back in. I remember at some point I got the front bolt in the right position to get it out but it may have required carefully tweaking the lines to get enough clearance. With the bolt turned around makes the next time easier.
1997 Upper Control Arms with Ball Joint Replacement & more (Pics added)(Parts arrived)


Like said earlier, remove the front bolt first then twist the arm around till you can get that rear one out on the driver's side.

The reason they go that way is so they can be tightened at ride height with the tire on. They also need to be torqed to over 80 ft/lbs and that can't be done with the nuts on the inside.

Aftermarket camber adjusters have the plates that slide on the bolt making install way easier. I always recommend adding them even at stock height.


Boomin has it. Once you figure it out the drivers side takes only a few extra minutes to do. I like to remove the lines from the white plastic clip that holds the vent lines out of the way so you can re locate the lines enough to work around them. With the rear bolt/adjuster removed and the control arm pointed the correct way (all the way out in the back, all the way in in the front) you can remove the front bolt while turning the bolt at the same time. Right away (while still fresh in your muscle memory) install the new UCA and install the new front bolt in the exact same way. Once you have done this 5-75 times you will have it sorted out. The first couple of times it will leave you wondering WTH was Ford thinking!!! Well now I know, they were thinking if you know the procedure you can do it all the time and people will think you are magic, With the Gen II IFS, there are some simple tricks to know before you are an expert
Also you should MARK the location of the UCA and where it sits inside the upper brackets BEFORE you remove anything, also lay the bolts out on the floor inthe exact position you removed them in so you can easily know how they go back in.

Did you know that UCA bushings need to be torqued properly with the weight of the vehicle on them? Otherwise you will tear the bushings and they will SQUEEK and come loose forever!
You hand tighten the UCA bolts, finish your job, put the truck back down on the tires, then at ride height is when you torque them, otherwise you will ruin all your hard work and new parts.


The first time I replaced Gen II left UCA's I struggled with it a little, but I figured that there must be a trick to it. I took the UCA out of the spindle, removed the nuts from the front and rear UCA bolts, wiggled, twisted, pushed and pulled the UCA to its various adjustment limits, I popped the fuel and brake lines out of their plastic bracket and pushed them out of my way, I also took the A/C line bracket bolt out to get a bit more room on the front UCA bolt. Once everything was loose I rotated the bolts and adjusters as required and when you hit the sweet spot the bolt comes right out.

I've now done this job at least 6 times and I've never had to take the saws-all to my UCA bolts. Ford could certainly have made this job easier, but it is what it is.


IIRC it kind of looked like the numerous lines were attached to the rolling chassis during assembly, meaning the UCA was put on before the lines....


IIRC it kind of looked like the numerous lines were attached to the rolling chassis during assembly, meaning the UCA was put on before the lines....

You're probably correct about the order of assembly at the factory. They're going to do things in the fastest/most economical way for themselves. It's like the 5.0L radiator/AC condenser. No doubt installing both as a unit on the assembly line makes sense for them, but it makes changing the V8 radiator afterwards a PITA.

All-in-all, with the exception of the 4.0L SOHC engine's timing chains, I find Ford's Gen II Explorers more easy to work on than most post 90's vehicles. When I encounter something that seems impossible, or impossibly difficult, it's because I'm doing it wrong.


"They also need to be torqed to over 80 ft/lbs and that can't be done with the nuts on the inside."

Good point....I was contemplating that on the passengers side...but decided against it.... so now with stock bolts still on there (passenger side) I guess alignment wont be able to get 'dialed in' perfectly....had to move on to drivers side before my knees gave out or I threw hammer through windshield....(I was able to get one bolt out but not the other on pass. side)

"That's because the Bolt hole is slotted. Great tip to share"
I noticed this as well and utilized it on removing / reinstalling passenger side bolt... I was using this 'slotted play' on drivers side as well but not enough on own...as stated I'm going to loosen up lines and go with that.....but:
"Aftermarket camber adjusters have the plates that slide on the bolt making install way easier."

My Dorman kit the bolt head plate is fixed just like stock....AND it's completely rounded instead of having that stock semi-pyramid shape as to angle around for "easier" removal / installation so I'm guessing / dreading that I might have to put stockers back in on this side as well ..we'll see....ugh...

Thanks everybody for your input....helpful and helpful for the emotional recovery as well :)


NIGHTMARE FINISHED...
I angled and tapped difficult "rear" bolt out....INTO the trans coolant line- no way around it other than headache of removing that line......after disconnecting one of it's clips giving it a hair more play-gauging it had a just enough flexibility / tolerance before it would kink / affecting end fitment.
Getting it back in without damaging it or the threads on bolt was even more of headache....barely pulled it off....total MacGyver.... tapped flat side- no thread section and manipulated with screwdrivers etc.
As stated all these lines were clearly installed after the UCA on the assembly line...
Be hitting some trails before long now.....


the trans cooler lines are on the pass side, those aluminum lines on the drivers side are EVAP system for the fuel tank just FYI

Well done!!
Now you are more prepared for the next time :)


the trans cooler lines are on the pass side, those aluminum lines on the drivers side are EVAP system for the fuel tank just FYI

Well done!!
Now you are more prepared for the next time :)

4 more times he'll be an expert.


The first time I replaced Gen II left UCA's I struggled with it a little, but I figured that there must be a trick to it. I took the UCA out of the spindle, removed the nuts from the front and rear UCA bolts, wiggled, twisted, pushed and pulled the UCA to its various adjustment limits, I popped the fuel and brake lines out of their plastic bracket and pushed them out of my way, I also took the A/C line bracket bolt out to get a bit more room on the front UCA bolt. Once everything was loose I rotated the bolts and adjusters as required and when you hit the sweet spot the bolt comes right out.

I've now done this job at least 6 times and I've never had to take the saws-all to my UCA bolts. Ford could certainly have made this job easier, but it is what it is.
This is exactly how I did mine everyone has problems I just pushed uca in and turned the bolt and pulled it out

I wonder if the 2wd is different from the 4x4 in that area


This is exactly how I did mine everyone has problems I just pushed uca in and turned the bolt and pulled it out

I wonder if the 2wd is different from the 4x4 in that area

No they're identical. The AWD/4WD's just have the CV axle in the way. I prefer to just remove the steering knuckle on the AWD/4WD's to have more room to work.


"4 more times he'll be an expert" - lol

"This is exactly how I did mine everyone has problems I just pushed uca in and turned the bolt and pulled it out.
I wonder if the 2wd is different from the 4x4 in that area"
"No they're identical."

Yeah but his is the SOHC and mines the OHV engine.... so I'm guessing there's some deviation in the lines/ hose routings to a degree...that fuel EVAP line was only about 2 1/2" behind bolt...(and it's large welded on camber plate)...so when angling bolt away from shock housing the bolt collided right with evap line in it's last 1/2" of travel out...
Next replacing front two u-joints.....


Last year when a mechanic friend helped me rebuild my rear end, install shocks on all four corners, end links, and upper control arms, I wanna say he spent less than an hour on each side of the front end. And that was with shocks and end links up front. I even spent the extra money on the aftermarket camber kit and he blew through the job without using them. (So if anybody needs them, I owe many a "pay it forward" and they're yours!).

He made it all look easy. That being said; before he was a fleet tech for our county, he was a tech at a Ford dealership. There is no telling how many Explorer upper control arms he has done between the two employers!


Join the Elite Explorers for $20 each year.
Elite Explorer members see no advertisements, no banner ads, no double underlined links,.
Add an avatar, upload photo attachments, and more!
.


He made it all look easy. That being said; before he was a fleet tech for our county, he was a tech at a Ford dealership. There is no telling how many Explorer upper control arms he has done between the two employers!

Is yours the OHV or SOHC? And having on a lift makes ALL the difference in the world....if that was the case as well.....and then air ratchets etc...


Back
Top