-
Performance Upgrades - Maintenance - Modifications - Problem Solving - Off-Road - Street Trucks.
Covering the Explorer, ST, Sport, Lincoln Aviator, Sport Trac,
Mercury Mountaineer, Mazda Navajo, Ford Ranger, Mazda Pickups, and the Aerostar.
Featuring H.I. - Human Intelligence.
Register Today It's free!
You are using an out of date browser. It may not display this or other websites correctly.
You should upgrade or use an alternative browser.
You should upgrade or use an alternative browser.
5R55S swap
- Thread starter jah81592
- Start date
Elite Explorer members see no advertisements, no banner ads, no double underlined links,.
Add an avatar, upload photo attachments, and more!.
rocket 5979
Resident Gearhead
- Joined
- April 22, 2002
- Messages
- 4,017
- Reaction score
- 10
- City, State
- Lake Villa, Illinois
- Year, Model & Trim Level
- '03 XLT 4.6
Saturday was a heck of a day! Worked all day on this (really in between being disturbed by family,etc). I got the crossmember in,torque converter bolt to the flexplate,controller wired minus the positive wire. I still need to install a relay for the controller positive wire and mount the map sensor,otherwise the controller is wired. Ordered my driveshaft Friday and should be shipping Monday(today). I will install the starter this week as well. Hopefully the starter for the 'Stang and the truck are the same. The bolts match up but there is a little gap around 1 side. I will submit pics later this evening.
Hehehe, what? Who doesn't know what a MAP sensor is!?!?!?
") Had you stated that comment 10-15+ years ago then you probably would have had allot more people who knew what it was being that allot of speed density vehicles (before MAFS systems) were common then. Yeah, sometimes it is best if we tame the jargon down a little bit to everybody can understand what is going on. Do that again and you will get a
Had you stated that comment 10-15+ years ago then you probably would have had allot more people who knew what it was being that allot of speed density vehicles (before MAFS systems) were common then. Yeah, sometimes it is best if we tame the jargon down a little bit to everybody can understand what is going on. Do that again and you will get a  Hehe
Hehe - Joined
- June 17, 2004
- Messages
- 24,270
- Reaction score
- 4,741
- City, State
- Knoxville, TN
- Year, Model & Trim Level
- 98 Limited AWD 302
What's a BAP sensor then, back to mass air 101 class. Do we even have a BAP sensor on the OBDII vehicles? It's got to be in their somewhere.
rocket 5979
Resident Gearhead
- Joined
- April 22, 2002
- Messages
- 4,017
- Reaction score
- 10
- City, State
- Lake Villa, Illinois
- Year, Model & Trim Level
- '03 XLT 4.6
What's a BAP sensor then, back to mass air 101 class. Do we even have a BAP sensor on the OBDII vehicles? It's got to be in their somewhere.
I don't think we have a barometric sensor on any of these Ford OBD-II vehicles. I could be wrong though.
- Joined
- June 16, 2003
- Messages
- 31,592
- Reaction score
- 3,273
- City, State
- Humboldt, KS
- Year, Model & Trim Level
- 2000 Mounty
I don't think we have a barometric sensor on any of these Ford OBD-II vehicles. I could be wrong though.
Is it not one of the values incorporated in the Maf sensor Data?
rocket 5979
Resident Gearhead
- Joined
- April 22, 2002
- Messages
- 4,017
- Reaction score
- 10
- City, State
- Lake Villa, Illinois
- Year, Model & Trim Level
- '03 XLT 4.6
Is it not one of the values incorporated in the Maf sensor Data?
Not in the typical sense. They are able to extrapolate inferred barometric pressure though. For what Don is talking about the MAS systems do not "directly" measure barometric pressure itself.
jah81592
Explorer Addict
- Joined
- June 12, 2005
- Messages
- 1,500
- Reaction score
- 23
- City, State
- Corner, AL
- Year, Model & Trim Level
- 2001 Explorer Sport
Update
Got the relay wired,mounted the MAP sensor. Run into a little problem that I intially saw but didn't think too much about it. The cooler lines are different in size so the fittings are different. I removed the ones from my stock trans but they won't work. Got the starter on and it turns over. Actually cranked but shut off due to no cooler lines connected to the trans. I am custom fabricating a shifter bracket,should be finished today!
My driveshaft came in and it is a quality piece! I will get it mounted and finish up the fine details. Hopefully I will take it on a voyage this weekend. Pics will follow.
jah81592
Explorer Addict
- Joined
- June 12, 2005
- Messages
- 1,500
- Reaction score
- 23
- City, State
- Corner, AL
- Year, Model & Trim Level
- 2001 Explorer Sport
17May2007 pm-This evening, I finished looming the wiring harness and routed the vac line for the map sensor. I couldn't find the correct cooler fittings so I had to cut mine down and weld to the existing ones(from the 5R55S-i.e. make a fitting). Got the cooler lines installed. I fabbed up a new braket (using the stock and the one I purchased which was wrong. I installed the shifter bracket,connected the cable. Shifter works like it should. Installed the driveshaft. Looks good,really high quality piece, I highly really recommend Driveshaft specialists they were very speedy. Unfortunately, as stated previously, I had to go with a mild steel version (3.5 in w/ .065 tube size) because of the inability of being able to get an aluminum shaft with a slip yoke. My shaft has a flange on both ends so the slip yoke has to be integrated into the shaft. Being that Spicer is the only one with this offering (patented)+ in current bankruptcy, getting the parts to the shaft builder for assembly of an aluminum shaft my take 2wks or 6months, so you see the delimma I opted for plan B and a steel shaft it is. Later on I will be contemplating a Carbon Fiber shaft but @ $1400.00 neighborhood I had to stay away from that at this moment. I currently have alot invested in this project so I didn't need to add even more to the expense. Surprisingly the steel shaft is really light. Now I am waiting on a base tune for the tranny to be composed, so I have something to start with and then it is all me.
I am also waiting on my y-pipe to come in. The y-pipe is custom built by Jakee and I am going to be testing this for him. Once everything is worked out with the y-pipe (clearances and such) we will begin to offer these on my website for purchase. From what I understand they will be offered in stainless or mild steel. My current version will be mild steel but the final will be stainless.
Once the base tune is loaded and the y-pipe is installed I will be putting all the panels in the truck and running down the road(hopefully). It isn't going to happen this weekend like I originally anticipated. Oh well that is what comes with uchartered territory.
Jakee
Explorer Addict
- Joined
- May 6, 2006
- Messages
- 2,823
- Reaction score
- 6
- City, State
- Huntsville, Texas
- Year, Model & Trim Level
- 01 Sport
The Y-pipe should be on the truck (UPS) by 3-4 o-clock today. Sorry it took so long to get it to you.
Heck, i think you've made pretty good time on this project!
Heck, i think you've made pretty good time on this project!
jah81592
Explorer Addict
- Joined
- June 12, 2005
- Messages
- 1,500
- Reaction score
- 23
- City, State
- Corner, AL
- Year, Model & Trim Level
- 2001 Explorer Sport
The Y-pipe should be on the truck (UPS) by 3-4 o-clock today. Sorry it took so long to get it to you.
Heck, i think you've made pretty good time on this project!
You definately did!! I am just giving a step by step progress of the project. I really don't have the time to mess with the truck this weekend.I have a few blown mustangs to "toon"! Thanks for everything Jake! Much appreciated.

BTW-Powertrain Control Solutions can't get me a basetune till Monday. Currently I don't have anything at all to install into the controller. Even if I did have the y-pipe it still wouldn't do any good because I wouldn't be able to shift my tranny. As previously mentioned PTCS hasn't ever tuned the 5R55S so there aren't any base tunes available. Mine is the guinea pig. The base tune will essentially get me out of the driveway from there I will be solely on my own for the trans tuning(other than the tech support from PTCS). Not having the y-pipe isn't a problem at all. Thanks for all your hard work.
jah81592
Explorer Addict
- Joined
- June 12, 2005
- Messages
- 1,500
- Reaction score
- 23
- City, State
- Corner, AL
- Year, Model & Trim Level
- 2001 Explorer Sport
pics
Here is a series of pics in proper order of what I am currently doing or have done. These pics are showing the factory harness ready for integration of the PCS controller. While integrating the PCS controller into the existing wiring harness no wires were cut other than two(which had to be), only insulation removed in that area, terminal removed from the connector,soldered, heat shrunk and replaced.
Here is a series of pics in proper order of what I am currently doing or have done. These pics are showing the factory harness ready for integration of the PCS controller. While integrating the PCS controller into the existing wiring harness no wires were cut other than two(which had to be), only insulation removed in that area, terminal removed from the connector,soldered, heat shrunk and replaced.
Attachments


jah81592
Explorer Addict
- Joined
- June 12, 2005
- Messages
- 1,500
- Reaction score
- 23
- City, State
- Corner, AL
- Year, Model & Trim Level
- 2001 Explorer Sport
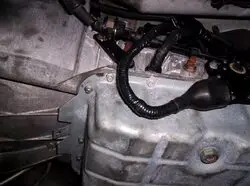
A few more example of the work coming together!! Quality connections and attention to detail. In this current phase of the project you better have a GOOD wiring schematic/diagrams of your vehicle. You don't want to mess around with not having the correct information.
Attachments


jah81592
Explorer Addict
- Joined
- June 12, 2005
- Messages
- 1,500
- Reaction score
- 23
- City, State
- Corner, AL
- Year, Model & Trim Level
- 2001 Explorer Sport
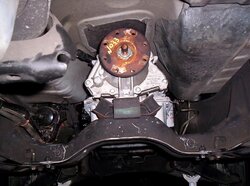
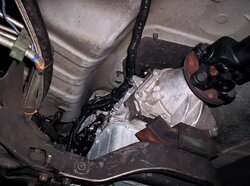
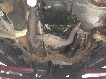
Here is the wiring coming together and the last pics is the trans mount and the trans range sensor. Overlook the purple wire it will be removed. The holes weren't perfect on the trans mount. Nothing a little bit of die grinder wouldn't take care of.
Attachments


jah81592
Explorer Addict
- Joined
- June 12, 2005
- Messages
- 1,500
- Reaction score
- 23
- City, State
- Corner, AL
- Year, Model & Trim Level
- 2001 Explorer Sport
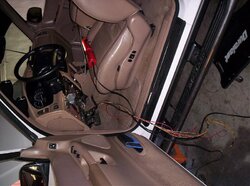
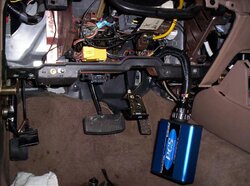
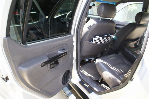
First two pics is of console, showing the Dial boost control and the PTCS controller programming cable.Last few pics is of the mock up status of where the controller will be located and just a shot of the trans controller.
Attachments


jah81592
Explorer Addict
- Joined
- June 12, 2005
- Messages
- 1,500
- Reaction score
- 23
- City, State
- Corner, AL
- Year, Model & Trim Level
- 2001 Explorer Sport
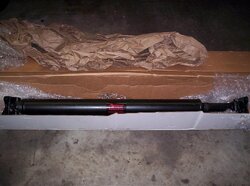
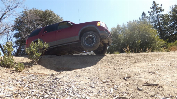
Attached is a few pics of the driveshaft and mounting. Visit driveshaft specialists at www.driveshaftspecialist.com
Jeff assisted me with all the questions and as stated previously they were excellent to deal with. Unfortunately, they don't offer a dealer program (I wish they did), so if you are interested in purchase you have deal direct! Call and talk to Jeff.
Jeff assisted me with all the questions and as stated previously they were excellent to deal with. Unfortunately, they don't offer a dealer program (I wish they did), so if you are interested in purchase you have deal direct! Call and talk to Jeff.
Attachments


jah81592
Explorer Addict
- Joined
- June 12, 2005
- Messages
- 1,500
- Reaction score
- 23
- City, State
- Corner, AL
- Year, Model & Trim Level
- 2001 Explorer Sport


jah81592
Explorer Addict
- Joined
- June 12, 2005
- Messages
- 1,500
- Reaction score
- 23
- City, State
- Corner, AL
- Year, Model & Trim Level
- 2001 Explorer Sport
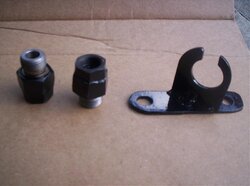
The next section was welding up the bracket and repairing my fitting problem previously mentioned. Pic 2 is what I had to work with. The cooler fittings were different between the S and the E! See post #89 for details.-j
Attachments


jah81592
Explorer Addict
- Joined
- June 12, 2005
- Messages
- 1,500
- Reaction score
- 23
- City, State
- Corner, AL
- Year, Model & Trim Level
- 2001 Explorer Sport


Elite Explorer members see no advertisements, no banner ads, no double underlined links,.
Add an avatar, upload photo attachments, and more!.
jah81592
Explorer Addict
- Joined
- June 12, 2005
- Messages
- 1,500
- Reaction score
- 23
- City, State
- Corner, AL
- Year, Model & Trim Level
- 2001 Explorer Sport


Featured images


Featured images
Similar Threads
- Replies
- 2
- Views
- 3,011