Fender Trimming Without hacking | Ford Explorer Forums - Serious Explorations

  • Register Today It's free!

Fender Trimming Without hacking

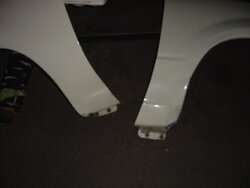
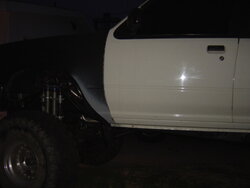
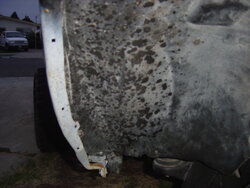
I have always needed more front fender room....

I bent my fenders jumping my truck when I shouldnt have, and at full stuff it would always hit. I didnt really want to put fiberglass on so I finally trimmed them.

I knew I would be dropping the truck down a little bit when I finally linked the suspension so I went as far as I could.

I even had to trim some of the floor out and rebuild it as well. It was all worth it though, I just need to do a litle bit of bondo work and paint them.

Here is what I started with....

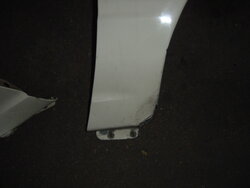
If you look close enough to the body line next to the door you can already see that it is bent. Trust me it got worse since this pic........
 

Attachments

  • Vertical ledge.JPG
    Vertical ledge.JPG
    59.6 KB · Views: 413
  • Truck is done from drivers side front (Hood Pins).jpg
    Truck is done from drivers side front (Hood Pins).jpg
    21.4 KB · Views: 391


Join the Elite Explorers for $20 each year.
Elite Explorer members see no advertisements, no banner ads, no double underlined links,.
Add an avatar, upload photo attachments, and more!
.


So here are the fenders after I got them off......
 

Attachments

  • DSC00763.JPG
    DSC00763.JPG
    60.3 KB · Views: 364
  • DSC00764.JPG
    DSC00764.JPG
    56.6 KB · Views: 376


Ok so the next part I dont exactly have pics for and I am very sorry..... BUT what I did was mark a nice smooth line coming off the curve of the fender going down toward the bottom of the fender near the doors.

I tried to make a nice smooth radius that would look good. I then used an air saw (it has a little blade like a jigsaw, but its an air tool) to trim the fenders out.

I Then cut the lip off of the piece I cut off and was able to use some of it for the lip re-building process. I also had to make some of my own to make the new lip longer. Since it goes back further it needed to be longer. (i Hope I am not losing anyone here) I used some material about a 1/16" thick and about 1.25 wide or so.

The KEY is to make the new fit as TIGHT as possible. If there is a gap it will pull and stretch the material of the fender and lip to fill the gap when you are welding. ( I found this out when I did the second fender)

So I tacked it every few inches and then went back and to fill in between tacks..... tack, tack, tack, in order to fill in while letting the material cool down between each tack. This will prevent warping.
 

Attachments

  • DSC00765.JPG
    DSC00765.JPG
    55.9 KB · Views: 376
  • DSC00766.JPG
    DSC00766.JPG
    53.9 KB · Views: 403


Now you can see the amount of floor board sticking out in the way.....

If you look close you can see the two holes at the bottom where the stock fender bolted..... I went so far back that I had to make a new mounting tab at the bottom and drill new holes for the fender to mount.

The next part was to cut the floor out...... I used a 1/4" air cut off wheel for this.
 

Attachments

  • DSC00767.JPG
    DSC00767.JPG
    57.8 KB · Views: 375
  • DSC00768.JPG
    DSC00768.JPG
    57.8 KB · Views: 369


Welding this back up was a *****.... In that last pic you can see the insulation between the double walled pieces.... This coupled with the tar used to seal seams made it fun to weld upside down on.....

I had to be carefull due to the constant flames I was having to put out.:rolleyes:
I used 1/16" thick metal to cut and make pieces to fill the floor... Then I welded them in.

* None of this effected the floor inside the cab at all.... *

I just had to be carefull not to do to much at once because of the heat and the carpet.

When I fist started I had the doors shut. Heh heh not a good idea at all... The toxic grey smoke that filled the cab was crazy!!!! I didnt take long either, about 10 seconds.

Anyway, here is the result, you can see where the inner fender well and how much room I gained.....
 

Attachments

  • DSC00769.JPG
    DSC00769.JPG
    59 KB · Views: 401
  • DSC00770.JPG
    DSC00770.JPG
    61.2 KB · Views: 368


I then pushed the inner fender well back and AMAZINGLY it fit perfectly. I just made a couple new screw holes on the bottom and it looked stock.


Now it just needs painted

Let me know what you guys think
 

Attachments

  • Driv side angle  fender trimmed.JPG
    Driv side angle fender trimmed.JPG
    58.5 KB · Views: 374
  • driv side fender  trimmed and finished.JPG
    driv side fender trimmed and finished.JPG
    59.5 KB · Views: 377
  • drivers side fender trim.JPG
    drivers side fender trim.JPG
    60.6 KB · Views: 392
  • drivers side front closer fender trim.JPG
    drivers side front closer fender trim.JPG
    58.7 KB · Views: 407


Here are a few more... There is a ton of room now.
 

Attachments

  • Drivers side front. fenders trimmed big picture.JPG
    Drivers side front. fenders trimmed big picture.JPG
    60 KB · Views: 398
  • pass side fender inside trimmed.JPG
    pass side fender inside trimmed.JPG
    59.7 KB · Views: 350


There is about a good 14" or so in here to the corner of the bottom of the fender there.
 

Attachments

  • driv side fender  trimmed and finished.JPG
    driv side fender trimmed and finished.JPG
    59.5 KB · Views: 368


dont bondo a wheeler ...looks good tho


I should probably add that this took me about 35 or so man hours, after work everyday for a week.

I sort have left out the steps of grinding and sanding with the air tools. Anyway, I took more time with the first fender (drivers side) and it is pretty much perfect. The pass side got a little rushed and it ended up with two small ripples near the edge of the lip.

A little paint prep and paint and it should be all good.


Awesome work as always. :cool: Kris G did something similar except he took an inch or two out of the entire radius of the fender. You may have to try that out once you lower it for links. :)


good job. looks real good!

do you have a sas thread by any chance?


good job. looks real good!

do you have a sas thread by any chance?

Thanks for the compliments!! I dont curently have a SAS thread, because I didnt do the sas myself. However, I have a dana 44 and dana 60 fullwidth from a 1979 f250 that are waiting to go in. I am going to do a full write up for everyone on it. So keep an eye open, It will be a triangulated 4 link in the rear and prob a 3 link in the front. I will either use airshocks or coilovers but not definately sure wich yet. I am leaning towards airshocks at the moment. Should be fun!

It will be soon but there are a few things that have to happen first.

including but not limited to....
-Supercharger install.
-New fuel cell in the rear center.


when you link it, move the axle foreward. Problem solved.


I can move it forward, but the whole idea was to get as much as possible because I am going to lower the truck as much as I can while still maintaining full flex. This extra room will give me some more room to lower. I will end up trimming the back also, probably just the rear not the door or anything.

Thanks for the compliments....
-Tim


Back
Top