awdrocks
Well-Known Member
- Joined
- April 30, 2005
- Messages
- 801
- Reaction score
- 0
- City, State
- Cancun
- Year, Model & Trim Level
- 2002 Eddie B.
Well I have been working on my X for the last couple of weeks. I originally started because I wanted to change my meth/water nozzle from my intake before the TB to my intake plenum after the supercharger. When I took off the plenum cover I discovered my manifold was covered in oil that has been sucked through my valve covers. So I decided to take off my SC to clean it up. And now I decided to just do a clean sweep on the entire engine bay and also rewiring my entire accessory electrical system.
Here are some pics of what I what I have done so far. Sorry for the large pics, I have no photo editing program right now.
When I first discovered the oil:

On an SC application under boost the oil gets sucked in from the valve cover


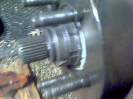
After cleaning the entire SC.

Getting ready to clean the mating surfaces and ports:


I carefully stuffed a shop towel down the ports, and scrubbed with a tooth brush with carb cleaner. The shop towels soaked up all the cleaner and oil. Changed the shop towel in each port about 5 times.

Then bought an inline air filter that I was going to install between the valve cover and the motor to catch some of the unwanted oil that makes it to the motor.

The thing is though that it can't catch it all. Some will make it by to the motor. I was planning on adding two or three filters until I pretty much eliminated all the oil. But then I decided to go this route:
Bought this oil catcher from Summit Racing. I will run both valve cover hoses to this catcher and eliminate oil into the motor 100%.

It will end up like this setup. My buddy bought this Mustang from Hardcore from one of the other mod sites.

Then I took off my valve covers:

I started by painting the nasty valve covers. I have changed color THREE times!!! Pain in the arse. First I painted everything red (that was before the clear coat and rubbing compound):


I then painted everything Ford blue. I painted EVERYTHING like the blue on the right. Then I discovered the darker Old Ford blue. So im in the process of changing everything again. I am sticking with the darker blue on the left:
I sanded everything with 800 grit first. Then under the sink wet sanded it all with 1,000, 1,500. Then did 4 base coats, then two clear coats. Then wet sanded the clear coat with 1,500 and got all imperfections out. Finished it off with a rubbing compound. Went over it twice with the rubbing compound.


Found this complete set of cam cover gaskets and rubber gourmets (sp) at NAPA for just $52.

Torqued down my heads to 75#'s. Then I decided to change my passenger side lash adjusters because that side was making a little valve train noise. I used the flathead screw driver technique to remove the followers (rockers) and then just took off the adjusters. Aways make sure the lobe on the cam is on its face or flatter part. Then you carefully crimp the adjusters on a vise or with some pliers so they have enough clearance to be popped back on, AFTER you have oiled them. SUPER simple. No need to use a spring compressor, waste of time and money. Do some research or drop me a line if anyone decides to do this before attempting it. Here is a pic of some adjusters off, new adjusters being soaked:


Now for the fun part. I'm doing MAJOR cleaning a organizing. I have literally taken everything off. I have taken off ALL the electrical tape around the loom from factory and replaced every inch of electrical tape. I'm on roll number 5. I have hand scrubbed
with a tooth brush and Dawn under a sink all the parts that come off. Rewired parts, put new connectors, loom, heat shields, wires ect where ever needed. My EX mechanic installed EVERYTHING totally sloppy. I can't believe my X lasted this long. Lucky I had a fire extinguisher under my feet.
BEFORE: Notice the trash bag under the meth reservoir to keep it from falling to one side. The pump is facing the firewall so I don't even have access to the pressure screw adjuster. It's under the reservoir.

AFTER: Took everything off. Turned the pump. Made brackets for the reservoir. Added the floater and changed the outlet position:


Tapped the intake plenum with its new meth/water nozzles from Snow Performance. I'll be injecting the meth after the SC now, directly into the stream of air going through the internal intercooler brick into the runners.

Then I moved on to the center section of the motor. Here I finished the injector and coil pack harness.
BEFORE:

AFTER:

Now for the fun part. I did this last night. I yanked ALL my electrical accessories and im starting from scratch. It was such a mess. They had actually wired TEN accessories to one single like 16 gauge wire to a single fuse position in my OEM fuse box. Well that fuse was blown, and the geniuses decided to wrap a wire around the fuse to close the circuit. The dam fuse was melted. I was so pissed when I saw that.
BEFORE:


AFTER:

BEFORE:

AFTER:

The only reason those relays are there is because I added them a couple weeks back when I did my electric water pump and aux motor fan.
BEFORE:

AFTER:

Here are some pics of what I what I have done so far. Sorry for the large pics, I have no photo editing program right now.
When I first discovered the oil:
On an SC application under boost the oil gets sucked in from the valve cover
After cleaning the entire SC.
Getting ready to clean the mating surfaces and ports:
I carefully stuffed a shop towel down the ports, and scrubbed with a tooth brush with carb cleaner. The shop towels soaked up all the cleaner and oil. Changed the shop towel in each port about 5 times.
Then bought an inline air filter that I was going to install between the valve cover and the motor to catch some of the unwanted oil that makes it to the motor.
The thing is though that it can't catch it all. Some will make it by to the motor. I was planning on adding two or three filters until I pretty much eliminated all the oil. But then I decided to go this route:
Bought this oil catcher from Summit Racing. I will run both valve cover hoses to this catcher and eliminate oil into the motor 100%.
It will end up like this setup. My buddy bought this Mustang from Hardcore from one of the other mod sites.
Then I took off my valve covers:
I started by painting the nasty valve covers. I have changed color THREE times!!! Pain in the arse. First I painted everything red (that was before the clear coat and rubbing compound):
I then painted everything Ford blue. I painted EVERYTHING like the blue on the right. Then I discovered the darker Old Ford blue. So im in the process of changing everything again. I am sticking with the darker blue on the left:
I sanded everything with 800 grit first. Then under the sink wet sanded it all with 1,000, 1,500. Then did 4 base coats, then two clear coats. Then wet sanded the clear coat with 1,500 and got all imperfections out. Finished it off with a rubbing compound. Went over it twice with the rubbing compound.
Found this complete set of cam cover gaskets and rubber gourmets (sp) at NAPA for just $52.
Torqued down my heads to 75#'s. Then I decided to change my passenger side lash adjusters because that side was making a little valve train noise. I used the flathead screw driver technique to remove the followers (rockers) and then just took off the adjusters. Aways make sure the lobe on the cam is on its face or flatter part. Then you carefully crimp the adjusters on a vise or with some pliers so they have enough clearance to be popped back on, AFTER you have oiled them. SUPER simple. No need to use a spring compressor, waste of time and money. Do some research or drop me a line if anyone decides to do this before attempting it. Here is a pic of some adjusters off, new adjusters being soaked:
Now for the fun part. I'm doing MAJOR cleaning a organizing. I have literally taken everything off. I have taken off ALL the electrical tape around the loom from factory and replaced every inch of electrical tape. I'm on roll number 5. I have hand scrubbed
with a tooth brush and Dawn under a sink all the parts that come off. Rewired parts, put new connectors, loom, heat shields, wires ect where ever needed. My EX mechanic installed EVERYTHING totally sloppy. I can't believe my X lasted this long. Lucky I had a fire extinguisher under my feet.
BEFORE: Notice the trash bag under the meth reservoir to keep it from falling to one side. The pump is facing the firewall so I don't even have access to the pressure screw adjuster. It's under the reservoir.
AFTER: Took everything off. Turned the pump. Made brackets for the reservoir. Added the floater and changed the outlet position:
Tapped the intake plenum with its new meth/water nozzles from Snow Performance. I'll be injecting the meth after the SC now, directly into the stream of air going through the internal intercooler brick into the runners.
Then I moved on to the center section of the motor. Here I finished the injector and coil pack harness.
BEFORE:
AFTER:
Now for the fun part. I did this last night. I yanked ALL my electrical accessories and im starting from scratch. It was such a mess. They had actually wired TEN accessories to one single like 16 gauge wire to a single fuse position in my OEM fuse box. Well that fuse was blown, and the geniuses decided to wrap a wire around the fuse to close the circuit. The dam fuse was melted. I was so pissed when I saw that.
BEFORE:
AFTER:
BEFORE:
AFTER:
The only reason those relays are there is because I added them a couple weeks back when I did my electric water pump and aux motor fan.
BEFORE:
AFTER:
")