Let me start out by describing my specific overhead display: Mine is in a '99 Explorer Limited with sunroof. The display provides digital compass bearings and temp. The housing also has the two 'spot' lights for driver and passenger.
If yours isn't exactly the same, but similar, I'll bet that the problem is identical to mine. This problem is related to solder failure, similar to the Mach radio display problem.
It's a resistor (or capacitor) that due to considerable heat, eventually loses its soldered contact at the board. You can confirm that this is the culprit by firmly pressing the button, thus putting slight pressure on the board housed inside the display housing. If the display fades in slightly then goes out - or stays on for a few hours/days, then goes back out, you have likely tweaked the board slightly and brought temporary contact to the problematic resistor.
The fix will take less than an hour if you're comfortable with soldering. If you've never soldered before, this may not be a good fix to learn on, because it is such a small component. I suggest finding an electronics guy to resolder the component. It's such a minor job that it shouldn't be much at all.
Anyway, what you'll need:
- Torx T-10 and driver.
- Soldering iron capable of small soldering repairs
- Desoldering braid (I didn't really need it, but for the perfectionist...)
- Good solder for small electronic work (silver based?) Radio Shack is a good resource.
- Magnifying glass. Preferably the kind with the 'helping hands' alligator clips, in which you can position the glass over the work. You'll need two hands for the solder.
Here are the steps:
1. Remove the overhead console. This is done by pulling back the trim around the sunroof (if equipped) just enough to expose the black tab
This tab holds the rear portion of the console in place when tucked behind the sunroof trim (since I don't know the non-sunroof application, you're on your own here). Mine had some sticky adhesive that keeps the trim in place. The console should drop down slightly at this point.
2. Gently pull on both sides at about the middle of the console. It's held in by two pressure clips. It should pop out of the roof fixture without too much force.
3. Disconnect the two harness connectors (possibly only one if not equipped with a sunroof).
4. Working on a flat surface, remove the Torx screws (11 total for sunroof models). There's no need to remove the two rearmost screws on the black plastic bracket, or the two screws holding the harness plug receptacle (Connector 1 - sunroof models).
5. Lift the black plastic insert housing the light bezel and buttons from the console surround.
The spotlights and temp/compass display board come out as one unit, as they are attached with connectors.
6. Unplug the connector from the white display housing
7. Using a small screwdriver, pry around each of the four retainers that hold the white plastic cover in place over the black bottom housing.
8. After lifting the white plastic cover from the black bottom housing, you'll be able to remove the circuit board with the display glass. Take care not to bend the display glass.
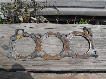
9. Now that you have the board removed, you can identify the failed component. With a magnifying glass, carefully check the integrity and the solders at each end of the resistors labeled "510". This is where I found the failure. Yours is likely at one or both of these. This photo is a closeup. Note that these resistors are only about 1/4" end to end.
10. As you can see, I'm not a master solderer, but it worked. There was one resistor that was clearly broken from it's original solder, but the one next to it wasn't looking too stable, so I resoldered both. These little suckers get pretty hot when the display is operating normally, so make sure that your solder is good. This is where you take your time, and make sure that you have a stable solder at all resoldered points. If it's not such a good solder, it will fail before too long. You can test your repair by plugging in the connector to the board, then plugging that directly to the harness in the car. If you get a display, you've fixed the problem!
11. Reassemble in reverse order. One thing to note, is that the small spotlights' housing have two small tabs that fit into the black 'center' housing that has the buttons, light cover, etc. You'll need to fit the spotlights into the housing first and foremost before reassembling the console.
12. Good Luck!
Although this worked for me and all others who tried it and got back to me, I can't guarantee that it will work for you. So attempt this at your own risk. Please post to the thread to let others know whether this worked for you.
 Have to wait now till daylight to search interior of my 01 Sport. If I can't find it, what's the best alternative replacement??:exp: