Completed Project - My 98 super charged EX | Page 14 | Ford Explorer Forums - Serious Explorations

  • Register Today It's free!

Completed Project My 98 super charged EX

Use this prefix for completed projects that are not "How to" articles or threads asking for help.
1998 Explorer 4.0 SOHC
Bought it with a melted alternator/wiring harness from a junkyard for $1,000
Fixed it, drove it for two weeks, then I boosted it.
Started with an M90 supercharger kit from www.Bansheesuperchargerkit.com
Upgraded to an M112 Lightning supercharger that was a prototype kit.
Next was the M122 off a 2012 GT500
I have reached 20 lbs of boost (with ARP head studs) and a 12.83 in a quarter mile.

Pictures
1. How it looked when I brought it home.
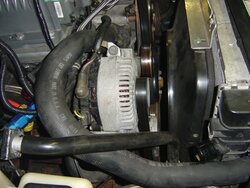
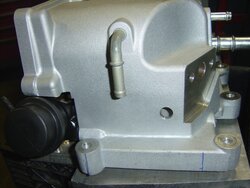
2.The M90 supercharger installed
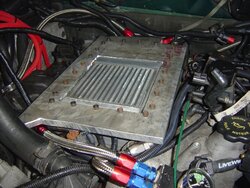
3.The GT500 supercharger installed
4.How it looks now
5.Wheelie
green ex.jpg
DSC02710.JPG
5.JPG
Lowered Rear.jpg
Exploder wheelie.jpg


Join the Elite Explorers for $20 each year.
Elite Explorer members see no advertisements, no banner ads, no double underlined links,.
Add an avatar, upload photo attachments, and more!
.


Join the Elite Explorers for $20 each year.
Elite Explorer members see no advertisements, no banner ads, no double underlined links,.
Add an avatar, upload photo attachments, and more!
.


Snout

[MENTION=61294]vroomzoomboom[/MENTION]
Optical Illusion.
That was a test fit after drilling all the holes, and tapping 12 more in the adaptor plate..
Then I took the supercharger apart and did a custom port, had to because the outlet opening was too far forward. I recreated the triangle opening right over top of the intercooler. I also drilled a hole in the back of the supercharger for the IAT. Believe it or not there was room back there.
The adaptor plate bolts to the lower intake box and uses
RTV Ultra copper (all I use for everything) to seal it up.
I just got done making a gasket for the supercharger to adaptor plate. Then I made another one for a template. I learned from the previous times to do that.
Now if it has to come off again I just trace the template on a piece of gasket material. 1/16 or thicker.
I am going to go bolt and seal up the adaptor plate now, then install the supercharger with gasket. I think that's where I will stop for today. I have been working on this since Thursday. My hand muscles are so sore from all the drilling and tapping and cutting and grinding. I have been off for two weeks on vacation, glad I am going back to work so I can relax. lol.


Funny

2000streetrod
That's funny.
That guys father found that in a junkyard for trains or something.
They started it up and blipped the throttle and blew the head gaskets.
I was going to photoshop that on my truck.
lol


Oh wow! Here's a wild question. If you can put a M122 on then why can't you put a 2.3L Wipple on? On the mustangs it has the same intake set up.


[MENTION=61294]vroomzoomboom[/MENTION], John is trying to make sure he stays one step ahead of us!


Whipple

Maybe it would fit.
Just having the same bolt pattern wont insure it will.
What whipple are you thinking of? Got a picture of it?
Cost can be prohibiting. I paid too much for this supercharger as a bundle with the intercooler radiator, MAF, and some other stuff (still got it cheap I guess) but if it goes bad then I can get another one off eBay pretty cheap.

I think a TVS (better supercharger) would be a direct replacement also.
I am just glad to finally getting around to making this set up work.
I bought the M122 on 4/2012


The Whipple is a dream right now. However, I figured that if a M122 will fit so will a 2.3L or 2.6. I'm sure a 3.0L will be a tight fit length wise. I've been told that a Whipple 2.3 would perform nicely on my engine but if a M112 or M122 drops in my lap I wouldn't be opposed to that either! lol

I have searched on Whipple's website for one and they have every model listed with all the dimensions. Originally I was thinking of the 3.0L and turning it a little slower.


Whipple

That Whipple 3.0 looks awesome! You got the built motor for it too.
It would probably blow my pistons right through the bottom of my oil pan.
Damn, this m122 just might do that.
One day I may build an engine for this truck.


Overcoming obstacles

There were a few things stopping me from installing this M122 when I got it off ebay back in April 2012.
One was my older intercooler set up. It did not allow easy removal and installation of the adaptor plate that attached the Lightning M112 to the lower intake manifold. Once I got the custom intercooler from bell and had a way to support it in the intake manifold with the aluminum block under the one side, I knew it would only be a matter of time till I would make an adaptor plate for the M122.
Another thing was the upper radiator hose. It was two pieces and had a metal elbow that was right in the way of the right front supercharger bolt mounting hole for the M122. Seeing 2000streetrod's upper hose gave me the insight to do away with the stock upper hose set up. I even picked up the same hose he has but I ended up coming across a 2003 sport track with a new carquest hose on it that looked like it would work. I bought it from the junkyard, I think it was 8 dollars if I recall.
Of course I could not see draining my coolant untill I was ready to install my metal lower thermostat housing. So I got busy drilling and tapping that for the two extra sensors I needed to install.
Some pics. They were all with the M112 still on.
1. Old hose set up
2. Test fitting hose
3. Test fitting hose again
4. Clearance
5. Clearance up close
 

Attachments

  • 4 clearance zoom in.JPG
    4 clearance zoom in.JPG
    139.7 KB · Views: 254
  • 3 clearance.JPG
    3 clearance.JPG
    139.2 KB · Views: 260
  • 2 short.JPG
    2 short.JPG
    140.7 KB · Views: 245
  • 1long.JPG
    1long.JPG
    142.6 KB · Views: 260
  • 1 old hose.JPG
    1 old hose.JPG
    146.5 KB · Views: 250


Old Hose

This is the one I took off.
 

Attachments

  • DSC09956.JPG
    DSC09956.JPG
    121.1 KB · Views: 244


Metal

I experimented with 1/2 inch fiberboard about a year ago but did not go any further. Since I changed the intercooler and it is slightly different in design I could no longer use either fiber board for a template. You can see that I have no artistic talent. I cant cut or walk a straight line. lol.
I decide to make as few cuts as possible, and make them straight ones when I could. I cut the plate down a little to get it close to what I needed. I used a cordless circular saw, was like cutting warm butter. I need a new blade now. lol.
pics
1. plate
2. lower intake manifold with intercooler
 

Attachments

  • 1 1 plate.JPG
    1 1 plate.JPG
    126.4 KB · Views: 270
  • 1 2 plate.JPG
    1 2 plate.JPG
    158.5 KB · Views: 248


Adaptor Plate

I notched a corner for another clearance issue. Then I took the old M112 plate and placed it overtop the new m122 plate. I drilled 3 bolt holes with a cordless drill and then bolted the two plates together. Then I put it on my drill press and finished drilling the rest of the 24 bolt holes that are needed to attach the plate to the RPCaster custom lower intake manifold. His intake manifold made this all possible.After all that I had to counter sink them by hand with my cordless drill. Still yet, I had to drill another 10 holes for bolting the supercharger to the plate, then I had to tap them. Then I had to drill and tap 2 more holes for the boost gauge port and Fuel pressure regulator vacuum/boost reference. Then there was the big square hole in the center where the intercooler sticks through and a (cough cough) hole for the boost bypass. I cant beleive how long it took to make this plate.
 

Attachments

  • 4 plate.JPG
    4 plate.JPG
    155.5 KB · Views: 253
  • 5 plate.JPG
    5 plate.JPG
    111.4 KB · Views: 261
  • 6 plate.JPG
    6 plate.JPG
    144.2 KB · Views: 256
  • 3 plate.JPG
    3 plate.JPG
    167.4 KB · Views: 247
  • 2 plate.JPG
    2 plate.JPG
    111.4 KB · Views: 248
  • 1 plate.JPG
    1 plate.JPG
    109.2 KB · Views: 248


Porting

The supercharger outlet was too far forward so I did some crude porting. I mean Crude!
Needed a place for the IAT too.
 

Attachments

  • porting 5.JPG
    porting 5.JPG
    138.2 KB · Views: 245
  • porting 4.JPG
    porting 4.JPG
    132.7 KB · Views: 258
  • porting 3.JPG
    porting 3.JPG
    142.9 KB · Views: 234
  • porting 2.JPG
    porting 2.JPG
    137.7 KB · Views: 230
  • Porting 1.JPG
    Porting 1.JPG
    126.7 KB · Views: 242
  • porting 6.JPG
    porting 6.JPG
    111.9 KB · Views: 233


Gaskets

Then there is gaskets to make. Make one and keep it as a template. You will need another at some point in time.
I am a heavy user of Ultra Copper RTV. I keep it in stock in my garage.
 

Attachments

  • 2.JPG
    2.JPG
    166.2 KB · Views: 255
  • 3.JPG
    3.JPG
    109.1 KB · Views: 250
  • 4.JPG
    4.JPG
    114.6 KB · Views: 252
  • 1.JPG
    1.JPG
    114.8 KB · Views: 251


Bolted down

Finally I get to bolt it down. Then attach the boost/vacuum hose for the gauge, and another one for the Fuel Pressure regulator. Nice tight fit. IAT connector hooked up. Belt installed, unplug crank sensor and crank it to see if belt stays on. I had it on the supercharger pulley so that there was 1 unused rib on either side of the belt. After cranking it over the belt came off the power steering pulley by a rib or two. I moved the belt to the further back position and cranked it again. All is well. If you shoot for the middle of the supercharger pulley and your measurements are off a little then you have the front or rear rib to move to. The supercharger pulley is a Metco hub for a Lightning or Cobra M112. Same inside diameter as the one for M122. I did not use the pulley or hub made for the GT500 for clearance issues.This one gives me more adjustment, you can see how far back on the shaft it is. I have a 2.7 and 2.8 pulley ring for it. i will test the 2.8 first since the belt seems to fit just right with it.
 

Attachments

  • 1.JPG
    1.JPG
    151.2 KB · Views: 355
  • 2.JPG
    2.JPG
    147.5 KB · Views: 260
  • 3.JPG
    3.JPG
    139.7 KB · Views: 260
  • 4.JPG
    4.JPG
    133.1 KB · Views: 255
  • 5.JPG
    5.JPG
    135.4 KB · Views: 280
  • 6.JPG
    6.JPG
    144.7 KB · Views: 256


very nice. i can appreciate how long that has taken. that and you have been keeping secretes from us lol. i am almost wanting to scrap the m112 idea for mine, and do the m122, but finding one up here will be impossible, and i really dont want to have another supercharger mailed to me from the u.s. another think i just noticed in the last few days was this. your truck, my truck, and a few others have the sound deading material on the firewall. some dont. i noticed this when i was helping dono put his intake back on last week. i then went and looked at andys build, his doesnt have it there either. so i was going to say, if you need more room behind the motor, pull the sound deading out. you should gain a 1/2. now with this new blower on, do you think you can put a stock hood back on?


Very nice indeed. Sometimes we need a vacation just to get things done at home! I'll be interested in if you get any belt slippage as well. Seems like a lot of blower for that engine!


now with this new blower on, do you think you can put a stock hood back on?

The stock hood will fit with plenty of room, one of the reasons I wanted to do this for so long. I did not want to post anything until I knew it was going to happen since I played around with the idea for a couple of years now. This time it just kind of all worked out. This m122 is probably too much supercharger for my V6, we will see. I also have a m112 off a cobra so if this is too much I will have to make another plate and switch to that. You guys with the V8's will destroy me if you run the same boost, there is no replacement for displacement and the V8 is a liter bigger.
I never noticed about the sound deadener that's good to know. How does it come off I wonder. Also wonder why it is there on some and not others.
Right now the only clearance issue I have is the wiper motor, I will post about that after I get time to work on it some more.


Join the Elite Explorers for $20 each year.
Elite Explorer members see no advertisements, no banner ads, no double underlined links,.
Add an avatar, upload photo attachments, and more!
.


Boost

Very impressive John! What is your target max boost with the M122? Your "vacation" has been very productive!

I don't really have a target. Just wanted to get rid of the ugly hood scoop.
A little more boost or the same boost with lower intake air temps (SC efficiency) is a side benefit. My goals were get rid of the ugly hood scoop that said "pull me over" or laugh at me, and I would like to pull a 12.99 in a 1/4 mile by the end of the year (in December when the air is cold).
My vacation started out slow, did some things around the house. Then I went to the junkyard and played around with that upper radiator hose and saw how it would eliminate one of my problems. Then I ordered the 1/2 inch aluminum plate. It did not show up till Thursday but I did the metal thermostat the day before. If I did not have to wait for the plate I probably would have it done.
Now it is back to work to relax. lol.


Back
Top