410Custom's builds a 2007 Ranger V8 - custom truck build - Project "Ranger Premier" | Page 22 | Ford Explorer Forums - Serious Explorations

  • Register Today It's free!

410Custom's builds a 2007 Ranger V8 - custom truck build - Project "Ranger Premier"

Guess who came for morning coffee?
171_081404_340000000.jpg


Momma and her two kiddos
171_081404_340000001.jpg


trying to sneak up on our crabapple tree at 6am....our dogs thwarted that attempt!! poor moosey maybe tomorrow

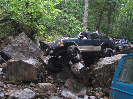
Working on the final install of the front suspension!!! WOOO HOOO!!
First up was to finish all the prep paint on exposed bare frame
171_081407_070000000.jpg


Our used Superlift drop brackets have some powder coat issues yuck
I couldn't bring myself to install like this so I had to peel and paint this one bracket.... the others will need similar someday, good future project!! (Hi Eddie yes I'm talking to you!)
171_081407_070000002.jpg


not perfect but way better
171_081407_070000001.jpg


All right now onto the good stuff.............

I have issue with True Travel instructions. They are telling us to re use the stock lower control arm mounting bolts

171_081411_250000002.jpg


Problem is this would be WRONG!!
The stock LCA bolts have a shoulder on them that DOES NOT FIT the True Travel LCA bushing and sleeve
If installed this way you would expand the metal sleeve into the bushing AND you would only be riding the sleeve on the shoulder portion of the factory bolt!! NOT GOOD IMO

171_081411_240000000.jpg


DOES NOT FIT
If you have this kit and installed it this way I personally would order some new bolts
You need 5" long, grade 8, 5/8" bolts, with 18 pitch fine thread, washers, lock washers, and nuts
rough thread 5/8" bolts will not fit the sleeves

ASK ME HOW I KNOW....

171_081411_250000003.jpg


This is not a fit make (Yoda speak)

New bolts 5/8" grade 8 Hardware, 5" length, 18 pitch, fine thread
171_082109_470000000.jpg


171_082109_470000001.jpg


Beefy, final Lca torque is done when truck is at ride height or you can tear your new bushings


Join the Elite Explorers for $20 each year.
Elite Explorer members see no advertisements, no banner ads, no double underlined links,.
Add an avatar, upload photo attachments, and more!
.


Once I had all the correct hardware I could finally hang the front suspension on the frame rails.
First I mocked up the drivers side with both shocks and knuckle so I could locate the brake line

171_081416_430000000.jpg


Drivers side brake line WHAT A FIASCO!! So when I was cutting out the factory suspension parts I nicked the drivers side brake line with my grinder. No biggie, its like a $15 part, right? WRONG! NO SUCH PART! You can buy the 3 other hard lines anywhere, the drivers side???? Dealer item only I'm guessing..... completely out of stock on the entire internet??? This is how my luck works people, welcome to my world.
So lucky I am well versed in making these brake lines. The drivers side was cut, prepped and re flared. Also carefully re bent to reach our desired brake line location

The stock Ford parts were used to hold the hard lines in place, carefully routed away from our new shock tower supports and the King coils
New holes were drilled in the frame and some self tapper torx bolts were used to hold them
171_081416_430000004.jpg


171_081432_290000000.jpg


end result drivers
171_081416_430000002.jpg


passenger

171_081416_430000001.jpg


ready for suspension!!
Superlift drop brackets installed with all new grade 8 hardware, 5/8" bolts through frame heavy duty. All fasteners final torqued, front diff hangers and brackets also final torque


171_081423_090000001.jpg


171_081423_090000002.jpg


checking all clearances
171_081423_090000003.jpg


All fasteners are treated with anti seize, spherical bearings, bolts, bushings, all of it
171_081426_170000000.jpg


171_081426_170000001.jpg


Drivers side mostly assembled, we are still waiting for RCV to come through with replacement CV axle so switch focus to pass side for now

Passenger side given same treatment, first brake line mounted, then everything cleaned and final assembly
171_081428_460000000.jpg


This time we include CV axle!!
171_081428_460000002.jpg


171_081428_460000001.jpg


Motorcraft wheel bearing installed with clean bolts and red loctite
171_081428_470000003.jpg


Preliminary ride height
171_081428_470000004.jpg


With all components now in place can look at limit strap and bump stop possible locations
The factory structure for the bump stop is still in place on purpose, this will give our bump can a good base
171_081432_290000001.jpg


potential LCA strike location
171_081432_290000002.jpg


171_081432_290000003.jpg


We are going to need some brakes
Eddie already sent me the paint to use on these new calipers
Powerstop drilled and slotted rotors
Raybestos new calipers factory coated
171_081435_260000000.jpg

Prepped for paint
171_081435_260000001.jpg


171_081435_260000002.jpg


2 coats of red, 2 coats of clear (clear not pictured here)

171_081448_190000000.jpg


171_081448_190000004.jpg


Notice we are using the 02-04 Sport / Sport trac front rotors. Our later generation Superlift knuckles have provisions for them hooray!
171_082130_500000000.jpg


However now the brake dust shields I have here do not clear?? Will have to source some proper ones or just live without them like I do on all of my personal trucks
171_082132_540000000.jpg


Passenger side DONE, ready for final torque on LCA and CV axle, then TIRE
171_081448_190000002.jpg


Ride height ish

171_081448_190000003.jpg


171_081448_190000001.jpg


EYE CANDY

Fun facts
every single one of these 16 King shock spacers had to be shaved down to fit the True travel shock tower and LCA mounts
Fun times
171_082133_420000000.jpg

Also King provides these nifty urethane bushings that protect the upper and lower spherical bearing, but only for the coilover?
I am asking Brett if we can get 8 more for the shock too? I put a liberal amount of marine bearing grease in order to help keep water out....

171_082133_420000003.jpg


171_082133_420000002.jpg


171_082133_420000001.jpg


The amount of suspensions parts on the project table is finally dwindling!
171_082138_350000000.jpg


Getting closer to rolling!
171_082142_150000000.jpg


ABS line routed
Tie rod end extension was also fully threaded with loc tite

171_082157_580000002.jpg


171_082157_580000003.jpg


171_082142_150000001.jpg


171_082157_580000004.jpg


Working on a little something to support our Superlift drop bracket kit
171_082138_350000001.jpg


Torsion bars maybe good at something after all!
171_082138_350000002.jpg


Solid stock! Cut at just the right angle + Factory t bar shields
171_082138_350000003.jpg


We are going to need some reinforcements and connecting bits
171_082138_360000004.jpg


One thing leads to another
171_082146_470000000.jpg


171_082150_220000000.jpg


and now our templates are scaled into AutoCAD and the dwg file is sent to my buddy
@fordpickupman
who cut these out for us from 1/4" plate.
We are bartering for 5.0 parts............ PERFECT!

THANK YOU!!!!!!! Teamwork makes the dream work

Commuter this time of year
171_082157_570000001.jpg
171_082157_570000000.jpg


Well done and awesome! Glad to see it all coming together - - and the pile on the parts table dwindling. . .


Thanks @Paul will get Eddie his truck asap!! This is his baby
I am not one of those shops where projects get left behind and lives are ruined, in fact when I started all of this that was why!! To be better and different then typical shops. At the same time I will not cut corners, try to build a truck that will be as good as it looks. I think Paul knows a thing or two about doing just that!!

More updates coming getting ready to final paint the rear axle and stick it back in


This is really interesting, I had this issue on my 2003 when I did my dixion brothers kit and could not use the stock bolts. But the 2007 I just installed a TTD kit on did not have the neck down on the bolts they were shanked correctly.

All right now onto the good stuff.............

I have issue with True Travel instructions. They are telling us to re use the stock lower control arm mounting bolts

View attachment 427139

Problem is this would be WRONG!!
The stock LCA bolts have a shoulder on them that DOES NOT FIT the True Travel LCA bushing and sleeve
If installed this way you would expand the metal sleeve into the bushing AND you would only be riding the sleeve on the shoulder portion of the factory bolt!! NOT GOOD IMO

View attachment 427140


DOES NOT FIT
If you have this kit and installed it this way I personally would order some new bolts
You need 5" long, grade 8, 5/8" bolts, with 18 pitch fine thread, washers, lock washers, and nuts
rough thread 5/8" bolts will not fit the sleeves

ASK ME HOW I KNOW....

View attachment 427141

This is not a fit make (Yoda speak)

New bolts 5/8" grade 8 Hardware, 5" length, 18 pitch, fine thread


Thanks for chiming in! It would be rather easy to torque these down not knowing they are not correct fit

The factory Lca bolts are a strange thing indeed, they are not 14mm and they are
Not 16mm, they are not 5/8 they have a metric head and nut. There is no such thing as a 10.9 class 15mm bolt. There is no way to purchase a bolt with that shoulder built in without going to ford. The entire true travel kit uses 5/8” hardware with 18 pitch threads so I was not surprised to learn they are the only bolt that properly fits the new lca bushings. I Re checked the true travel instructions they indeed tell us to Re use the factory lca bolts. Not going to work on our 07 ranger project (actually Built in 06)

I can tell you that the local hardware stores and bolt depot.com love me, I have developed quite a collection of fasteners going through these battles, we have a nice
Mini hardware store Going here in the shop
I don’t just buy one I buy a handful so I will always have extras… except when they are 9.49 each!!!!

These little things take time to research and locate the parts for… these are the battles that allow us to win the war. Once it’s done, it’s done correctly and we can be sure this truck is correct. My dad drilled it into my head and now I into yours, “there is only one way to do a job”


Thanks for chiming in! It would be rather easy to torque these down not knowing they are not correct for.

The factory Lca bolts are a strange thing indeed, they are not 14mm and they are
Not 16mm, they are not 5/8 they have a metric head and nut. There is no such thing as a 10.9 class 15mm bolt. There is no way to purchase a bolt with that shoulder built in without going to ford. The entire true travel kit uses 5/8” hardware with 18 pitch threads so I was not surprised to learn they are the only bolt that properly fits the new lca bushings. I Re checked the true travel instructions they indeed tell us to Re use the factory lca bolts. Not going to work on our 07 ranger project (actually Built in 06)

I can tell you that the local hardware stores and bolt depot.com love me, I have developed quite a collection of fasteners going through these battles, we have a nice
Mini hardware store Going here in the shop
I don’t just buy one I buy a handful so I will always have extras… except when they are 9.49 each!!!!

These little things take time to research and locate the parts for… these are the battles that allow us to win the war. Once it’s done, it’s done correctly and we can be sure this truck is correct. My dad drilled it into my head and now I into yours, “there is only one way to do a job”

Ha I hear ya on buying bolts. seems like something I do for every project. You might check out Mcmaster-Carr if you have not used them, better prices and next day shipping.


I was gonna suggest that as well


Thanks dudes I had been using Grainger for all of my spherical bearings. Our Polaris entire front suspension uses spherical bearings, wifes FJ has several heims and uniballs.... they wear out yearly if I'm not on top of it. I'm always buying sealed bearings and hardware, metal, consumables, tools....it's almost like a dream come true!!

I'll be sure to checkout Mcmaster carr as well, I know many dudes get their supplies from them.
I could go on and on about all of the cool homesteading stuff that goes on around here but that will have to wait! I have a chance to post some more update on the truck!!

171_111251_500000000.jpg


171_111251_500000001.jpg


I tried to upload some higher res pics of the finished pass side? Not sure if these are more clear

rear axle mock up
I needed to make a new attachment for our "mockshock" tool.
I still had threaded rod around so I made a longer bit with a larger bushing that will work for locating rear shock mounts as well as front
171_111301_470000001.jpg


171_111301_470000002.jpg


In action
171_111301_470000003.jpg


Ranger shock mounts are fun to locate. They are spaced 13" in from the disc brake backing plate to the center of the shock mount +/-.
The perch itself is located 13.75" from the backing plate of the axle to the inner most point of the perch (diff side)
Then they are set at 50 degrees from horizontal and they must line up and be in phase with the shock bolt.
The perch is then tack welded and the process repeated on the other side
Spring perches also tack welded in to position
The axle is then removed for final grinding, weld prep, welding, paint, new brake hard line, install new diff cover, e brakes, rear disc brakes installed and then it goes back in the truck for final time! I can then hopefully flex the suspension and measure for shocks.
171_111302_560000000.jpg


Had to grind all this smooth
171_111302_560000001.jpg


grinder was used for rough prep, dremmel used for final prep...then all metal parts cleaned, then finally welded!
New 60" 3/8" brake line will be bent up to match stock
171_111301_480000004.jpg


You can see CV axle end, this will be used on drivers side to hold wheel bearing together while truck is finished. No parts from RCV, no word from True Travel..... I will follow up AGAIN

171_111305_090000000.jpg


While is was happening the rear springs and hangers were removed. All holes drilled out for 3/4" grade 8 hardware, rails cleaned and painted.
Spring perches and shackles also getting some paint

171_111305_090000001.jpg

prep

171_111305_090000002.jpg

paint

171_111305_090000003.jpg


Soon she will be rolling!!

Ready for alignment and ride height adjustments
Once that happens she comes over to Bay 1 and gets on the lift :)


Are those RuffStuff shock mounts? I started out with those and modified them for my 8.8.

I get most of my hardware from a local hardware store that has just about every type of fastener there is. They have lots of grade 8 hardware up to 1.75" bolts. It's nice to take something over there and find just the right size bolt.


Yes they are and I had to modify them also

Instant gratification shopping is the best shopping


@410Fortune Is your mock shock made of 1/2" pipe and 1/2" all thread?


Yes I believe it is, built from stuff I had lying around in shop


All right back to the progress!!

Working on final touches for front suspension, rear suspension final install, heavy modifications to the rock sliders, and fabricating our new drop bracket suspension supports..... check it out

Drivers front is all assembled, time for our CV axle stub shaft to hold the wheel bearing together while we roll this around and wait for a CV axle solution from RCV?

171_161237_010000000.jpg


171_161237_020000003.jpg


shop dog, her name is "Ranger" of course yes a ranger can be a girl :)
171_161237_020000004.jpg


171_161237_010000001.jpg


Upper control arm bolts replaced with aftermarket camber adjusters

171_161243_320000000.jpg


171_161237_020000002.jpg


this will make alignments sooo much easier

Now to some fabrication, we are building supports using some stock pieces that will bolt onto the ranger and heavily support the front suspension drop brackets from wanting to fold backwards. With all the leverage of the torsion bar delete / coil overs and mid travel kit, large tires, all added to the Superlift drop brackets, it is a good idea to put back some structure..
Our buddy @FordTruckMan plasma cut some 1/4" plate tabs for us THANK YOU!
171_161243_320000004.jpg


Here is where the small ones go
171_161243_320000003.jpg


The back of the lower control arm drop bracket

The other ones go here
171_161250_240000000.jpg


with some trimming
171_161243_320000002.jpg


The now shortened torsion bar (solid stock) will land somewhere in here
171_161250_240000001.jpg


Parts ready for tack welding

In the meantime crappy picture of the 4406e transfer case in place
171_161243_320000001.jpg


but a picture none the less

The rock sliders were not going on this truck the way they were delivered. A few pages back we discussed this, these things are designed nice enough but they come with some major flaws that I will not allow on this Ranger!
Sliders like this should either be mounted to the body or the frame NOT BOTH, not unless your Ranger has solid body mounts??
The sliders the way they are shipped mounted to the frame, and were way too close to the body. When the truck flexes the sliders would strike the body seam on our ranger?? NO WAY!! We do not have a body lift on this truck, this is not acceptable. The sliders were sent with some whimpey outriggers, and although they may be strong, for us they were just not correct.
So we put MUCH thought into this. I say we because my good neighbor spends much time in the shop helping me out and we came up with this one together. The sliders now mount to the BODY ONLY
no frame attachments.
We used/modified the factory step mounts to make this happen. Then we cut and turned the slider "outriggers" to mate up with the rocker structure of our truck.

Check it out.....some teaser pics for you guys to wrap your heads around what's going on here, the passenger side is basically done I just need to get some longer bolts. The sliders now bolt to the body with 10 bolts, easy to remove for touch up.
We also tried to keep from disrupting the factory powder coat on these as much as possible while still:
-Making them strong enough to easily support the weight of the truck
-giving enough room for your foot to land on them to help enter the truck
-stick them out enough to help protect the paint from mud, snow, rocks, etc. Our front tires will be sticking out past the fender so every little bit helps

171_161254_190000000.jpg


171_161254_190000003.jpg


171_161303_380000000.jpg


mock up!
Factory front step supports were swapped side to side (drivers to passenger) because well they look and function better that way
171_161254_190000002.jpg


all 3 of these outriggers were then cut with some 45 degree angles that allowed us to turn them up 90 degrees, cut to length, drill some holes, source some square plastic caps, a little welding, some bolts and BOOM sliders that mount to the truck BODY / ROCKER with 5 supports and 10 bolts........ STRONG!!!!! (and proper!)

171_161303_380000001.jpg


Now back to the rear suspension final install, drivers side
I will take you through what is involved in swapping to the Chevy 64" spring, moving the factory hanger, and adding the Kartek flip shackle hanger all without removing the bed or dropping the fuel tank! Okay I cheated a little I did have to loosen the fuel tank to get all my bolts in

Check it out......

171_161306_510000002.jpg


Drivers front spring hanger, this sucker has been moved forward on the frame about 8"
The suspension /axle were mocked up and I know this is going to work out, so it is time to actually drill some holes.

center punch, small bit, 5/8" bit and my favorite uber cool Dewalt 90 degree drill, so handy!
171_161306_510000003.jpg


This is what it looks like from my perspective
171_161306_510000004.jpg


Now careful people, there is a plastic fuel tank right here! So I need some protection, no problem we always have some license plates hanging around the shop a plain ol Washington tag will work

171_161311_340000000.jpg


Checkout my new plates! Alabama and Tennessee!! So cool... you see we collect license plates.
Recently I sent my buddy @allmyEXes some 5.0 engine mount plates for cheap... in return he was nice enough to send me a couple of license plates! I have many tags from Colorado and the midwest, now Idaho, Washington and Montana....but nothing from the other side of the country! We will put these on display here on the property soon enough, I use plates for all sorts of cool homestead patch work

Back to drilling... all holes were drilled out to 5/8", frame rail was sanded, cleaned and prepped for paint.
Spring hanger and shackle also cleaned and painted
Gas tank was loosened to make it possible to get these bolts in. Also the fuel lines, wiring, brake line, EVAP lines all protected/re routed so they do not get in the way of the drill or bolts
171_161315_500000000.jpg


We need two thick washers here. Why? Because the Ranger rear frame is two pieces and the spring hanger overlaps the gap.
171_161315_500000001.jpg


The washers keep things nice and aligned.

171_161315_500000002.jpg


We can see them in action well on the other side (pass)
Nice eh?

Have to drill some holes for the new Kartek hanger also
171_161320_120000000.jpg


171_161322_590000000.jpg


Ready for a spring /shackle on the drivers side

171_161322_590000001.jpg


171_161320_120000001.jpg


The two bolts pictured above on the right MUST BE PUT IN PLACE because we cut the rivets that actually hold the two pieces of frame together

The passenger side has been done for a bit now, both springs just waiting for me to finish welding the rear axle up

Had to go to town to get some more C02/ Argon shielding gas..........I run two bottles and I cant believe I never filled the backup bottle all winter!

171_161322_590000002.jpg


The factory exhaust will go away, I left it in place to give me an idea of tailpipe routing and muffler location

More coming soon...............making daily progress on this truck


Join the Elite Explorers for $20 each year.
Elite Explorer members see no advertisements, no banner ads, no double underlined links,.
Add an avatar, upload photo attachments, and more!
.


More on the sliders

B265FE6B-A0B8-4314-B7BB-32CD672156C6.jpeg


AECC4476-FD4D-49D6-BD47-889B9472A182.jpeg


4E185652-AB4B-426E-BE80-6ED8EDDAC43A.jpeg


04A80D2C-CE64-4451-97DD-B740F00C46F5.jpeg


2BFA363B-2956-4F33-A479-8A536B543C1F.jpeg


7E594BC5-8D66-4E46-8DC3-DF417C76AA9A.jpeg


Back
Top