How to: - How To: AVM Hub Conversion, 2006 Ranger | Ford Explorer Forums - Serious Explorations

  • Register Today It's free!

How to: How To: AVM Hub Conversion, 2006 Ranger

Prefix for threads which are instructional.

Scott B.

Explorer Addict
Joined
February 15, 1999
Messages
2,822
Reaction score
28
City, State
GA
Year, Model & Trim Level
'93 Ranger XLT
History

In 1998, Ford changed the Ranger front suspension to a SLA style – identical to that found on Gen II Explorers (1995+) and Aerostar vans from 1989-ish. Identical except for one minor difference – the Ranger had locking hubs.

The factory hubs were called PVM – Pulse Vacuum Modulation, I believe. As the name implies, the hub is activated (locked) from engine vacuum. While this was an interesting idea, the design proved problematic and prone to failure.

As of mid-year 2000, Ford did away with the hubs, and switched the Rangers to the same live axle setup that is found on Explorers and Aerostars.

The locking hub design was also used in other parts of the world, and one company, AVM of Brazil, designed and manufactured stronger replacement hubs. These hubs did away with the vacuum actuation, and utilized the old “hand-turned knob” design.

Purpose

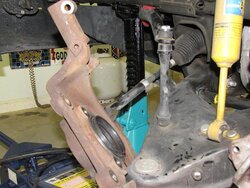
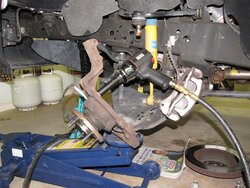
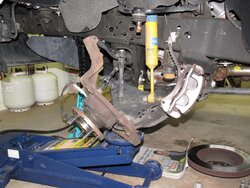
This article explains how to take advantage of Ford’s parts interchangeability and convert a live axle to a manual-locking hub axle.

Parts

NOTE: Parts reference a 1998 Ford Ranger, 4WD

Unit bearings – 2 required, left and right, with or without ABS
Unit bearing retaining bolts – 3 required per side – Ford W500544-S436
CV axle, left
CV axle, right
AVM hub set – 15001.70
Knuckle seats – National 710519
Lock rings – Ford F87Z-3B457-AA
 

Attachments

  • AVM2.JPG
    AVM2.JPG
    66.1 KB · Views: 8,694
  • avm5.JPG
    avm5.JPG
    81.2 KB · Views: 8,347
  • AVM3.JPG
    AVM3.JPG
    67.3 KB · Views: 8,544
  • avm4.JPG
    avm4.JPG
    93.7 KB · Views: 8,527


Join the Elite Explorers for $20 each year.
Elite Explorer members see no advertisements, no banner ads, no double underlined links,.
Add an avatar, upload photo attachments, and more!
.


Description

Support front of truck on jackstands, remove front wheels, brake calipers and mounting brackets, dust shield and rotors.

The following steps are for one side of the truck (photos show left side.) Right side similar.

Disconnect ABS wiring connector, if applicable.

Remove axle locknut (inside center of hub)

Using a hub puller, start pushing axle out of hub. Do not push axle all the way out – all you want to do is break the fit. (See photo)

Disconnect knuckle from upper ball joint. Support lower A-arm with a jack, as it has the load of the torsion bar on it.

Use hub puller to push axle out of the hub. (See photo)
 

Attachments

  • AVM1.JPG
    AVM1.JPG
    86.5 KB · Views: 8,189
  • avm6.JPG
    avm6.JPG
    90.7 KB · Views: 10,003
  • avm7.JPG
    avm7.JPG
    98.4 KB · Views: 8,140


Remove CV axle. The inboard end locks into the differential, so a short, quick pull is required. Alternatively, a pry bar could be gently used.

Remove the 3 bolts that attach the unit bearing. (Impact driver shown, but not needed.) Remove unit bearing.

Install seal in back of knuckle. Ensure surface of seal is below surface of knuckle. (See photo)

Replace axle seal on the side of the differential, if necessary.
 

Attachments

  • avm10.JPG
    avm10.JPG
    90.1 KB · Views: 8,024
  • avm9.JPG
    avm9.JPG
    101.9 KB · Views: 8,019
  • avm8.JPG
    avm8.JPG
    97.1 KB · Views: 9,160
  • avm11.JPG
    avm11.JPG
    88.3 KB · Views: 8,039


Install new CV axle. A strong, quick push will be required to insert and secure axle in differential. Work outside end into new seal in knuckle. (See photo)

Install new unit bearing, ensuring the ABS wire is routed so it will not be pinched by the brake dust shield. Make sure new, unused bolts are used to fasten the unit bearing to the knuckle. (See photo)

Reattach knuckle to upper ball joint.

Install lock ring in groove in axle. (See photo)

Wipe a small amount of grease on the inner splines of the unit bearing hub and the outer splines of the axle shaft.

Press locking hub into unit bearing, making sure the splines engage on both the axle and the bearing. Install dust shield, rotor, caliper mounting bracket, caliper and ABS wire. (See photo)

Lastly, have a front end alignment done - pulling it apart like this probably did not change anything, but it never hurts to make sure.
 

Attachments

  • avm12.JPG
    avm12.JPG
    91.9 KB · Views: 8,006
  • avm13.JPG
    avm13.JPG
    96.7 KB · Views: 8,539
  • avm14.JPG
    avm14.JPG
    80.2 KB · Views: 8,672
  • avm15.JPG
    avm15.JPG
    93.2 KB · Views: 8,042


The end result!
 

Attachments

  • avm16.JPG
    avm16.JPG
    79.1 KB · Views: 8,214


...Great writeup and long sought after...This will help many 98-00 Ranger owners (as well as newer model owners)...:biggthump

...So when are you going to take the Ranger out and test them new puppies??..:popcorn:


Scott, ensure the seal tightens snap ring against the inner surface of the unit bearing. There is a specific depth that seal needs to be at. If not you there will be no seal made with the CV. (I found out the hard way). There should be no free play at the knuckle end, any play should be controlled and feel as though you are pulling against a seal. (I know...obvious but not :))

One other thing, the small roller bearing that the CV rides on is serviceable. 80k is the interval but 20-30k in severe conditions can't hurt.

I have about 10k on my AVMs and I love them.

One thing that should be noted, this conversion could be performed on an ex too.


great work!! I'm adding this to my list of to-do's for my Ex....


...This would make a great stickie...If not here, it would make a great addition to the Ranger section...

...I would hate to see this get overlooked by those not knowing this is an option for not only the 98-00 (and apparently newer) Rangers but also for Explorers...

...Just thinking out loud...TIA...:notworthy:


AVM Conversion - 99 Mountaineer

Hey Scott,:usa:

Great write up ! Reading this inspired me to do this to my 99 Mounty. I have wanted to swap in a BW 1354 T-case for some time, but the live axle would kind of make it a half conversion. I did the brown wire mod a while ago so swapping the case wasn't a priority. This write up has got the wrenchin juices flowing again. I have acquired all of the parts but I have kind of a stupid question. The seal that goes in the back of the steering knuckle, I'm not sure which side faces the CV shaft. I'm guessing the flat side goes into the knuckle and the spring seal side faces the shaft, but at $40 a piece I'd hate to be wrong. Instructions from Ford just say to insert until it bottoms against the knuckle but no pics. Any input?

Thanks for the great write up, Al


Al,

The way you described it is the way I installed them. I did not have a Ford manual to go by, but looking at the parts, that was the way they fit together the best.

I don't know if there is a difference in the knuckles from the early years, but putting this seal in was a PITA. It did not want to fit. The best tool I found for installation was a large C-clamp, to press the seal in place.

$40 a piece? I think you can them cheaper from RockAuto. (And they carry National brand seals.)


I got them at NAPA. They had them in stock. All the local parts places were about the same price, but I didn't check rockauto.


...I just seen this is now a Sticky...And well deserved...:biggthump


Hey Guys,

I just finished this mod on my 99 Mountaineer. It was a relatively painless swap. Everything works great, with the Brown Wire Mod I now have true 2WD. This part( the brown wire mod ) is just temporary until my BW 1354 arrives, which should be this week hopefully. However a slight problem has arisen that I didn't think of. When I kill the brown wire, now that the front shaft is not turning I get the dreaded blinking 4-HI/4-Lo lights. The speed sensor is detecting the difference in front / rear shaft speeds as wheel spin and trying to correct it. Try as it may with the clutch not engaging its not going to happen. And this is causing the blinking light error. Now could accept this being this t-case is coming out, but this problem will continue with the new case because the new case is a manual and with the harness from the old case disconnected the GEM will still see a problem. Now I'm going to pick your collective brains. Here's my question. Is there a way around this. I'm probably going to cut the feeds to the lights anyway to rig in a range position sensor for the new case, but will this cause a problem for the GEM. It's still going to think there's a problem. Does this matter? I don't think the GEM is tied into the main computer module, is it? How about a GEM from a 2WD Ex of the same year. Everyone mull that over and see what you think.
Thanks much, Al


First result in my search for the conversion, nice write up. How is the strength of these? Are they as strong as what the warns were for the ttb d35? I'd like to do this to my truck since I want to lock the front, but thought I read on here that they're not as strong as just having the "live" axle type setup.


No, the AVMs are not as strong as the live axle setup.

Compared to the Warn hubs, I would the AVMs are not quite as strong - but I could be mistaken. One thing I do not like about the AVMs are the way they mount - the body is plastic, and it just pushes onto the hub. It looks like a weak link to me.

In my case, this truck doesn't see serious off-road use, so I don't foresee a problem. dkchrist has AVMs on his truck, and has not had any problems - so I don't worry too much about them.


Alright, thanks for the information.


Join the Elite Explorers for $20 each year.
Elite Explorer members see no advertisements, no banner ads, no double underlined links,.
Add an avatar, upload photo attachments, and more!
.


Hey all,

I may have answered my own question. I picked up a Gem module out of a 99 V8 Mounty at my local u-pull-it yard for $15. There are 2 different modules for the later gen II's. The V-6 Control Trac Ex'es use the 4x4 module. It says 4x4 Control trac a4wd on it. The V-8's use the 4x2 module because there is no input from or control of the transfer case since it is AWD and requires no driver or computer input. I replaced my 4x4 module with a 4x2 module from a V-8 Mounty and my blinking lights are no more. Also I haven't experienced any driveability issues either. My PATS seems to be working fine. My same key starts the truck and my THEFT light is normal. I figured for $15 I might as well try it, and I'm happy to report all seems well. I'll keep everyone updated of any problems that may come up, if any.
Thanks for all your input, Al


Back
Top