410Custom's builds a 2007 Ranger V8 - custom truck build - Project "Ranger Premier" | Page 5 | Ford Explorer Forums - Serious Explorations

  • Register Today It's free!

410Custom's builds a 2007 Ranger V8 - custom truck build - Project "Ranger Premier"

AINT THAT THE TRUTH!!!
Holy crap on the cam swappage...I've had that happen with oil filters...buy the good one, get home open box its a fram SOB
people suck
Get that Ranger fixed up with a good 5.0 and she will reward you


Join the Elite Explorers for $20 each year.
Elite Explorer members see no advertisements, no banner ads, no double underlined links,.
Add an avatar, upload photo attachments, and more!
.


It'll happen. Just working on the simplest/cheapest/quickest plan at the moment. Too much more of this mess and it'll be a choice between a truck and a marriage.

Simultaneously taking notes on the hurdles to converting to a 351 down the road once things settle down a bit on the homefront.


I'll have to post a picture of the pickup. Before I dove into the engine, I was concerned the problem wouldn't be obvious - all I had to go on was a pressure gauge that would drop to zero on the interstate (which I thought was a gauge problem initially) and some bottom end noise. As soon as the pan came off it was clear what had gone wrong.

Good question on the cam mixup. The only explanation I can come up with is that someone bought the Comp unit from Amazon and returned their TFS cam in the original box, then Amazon stuck it back on the shelf without checking it carefully. It had all the original instructions, stickers, etc packaged neatly in the box. I never thought to look any closer than that. Degreeing the cam would have made it obvious, but I was trying to keep things simple.

Lots of expensive and time consuming learning experiences.

I'm sorry to hear about that. I do recall the cam in the wrong box deal, that was Amazon?

I had new hub bearings I bought from Amazon a few years ago, both go bad. They were Raybestos, maybe $30 each(should have been a red flag), one went bad in about five weeks. I sent it back in the original box with instructions too. Then the other hub went bad a couple of weeks later. Guess what they sent as the replacement for that one? Yes, they sent the first one I had returned to them, obviously they mixed up the return items with good inventory.


Measured for pushrods
Prepped, cleaned the engine bay.
Ordered 6.300" 5/16' comp cams pushrod set of 16

So for hydraulic lifter GT40 heads with stock stamped steel rockers (1.6 ratio) and a performance camshaft you MUST measure for correct pushrod length
To do so you can order an adjustable pushrod from your fav speed shop / cam builder.
Comp cams sent me this checker, it worked out just fine.

Checking pushrod length with hydraulic roller lifters and pedestal mount style rockers,
You want to see two things:
1. Wear pattern is in the center of the valve stem tip
2. Wear pattern width is between .007 and .009 thousands of an inch (so 0.008 is perfect)

Basically with the stock rockers going back in I can already see where the wear pattern should be on the tip of each rocker arm is a worn shiny spot

The test:
- Using the stock pushrod, mount the pedestal rocker NEXT to the valve you are working on, this keeps the pedestal tray centered for your test
- Clean and lube the stock pushrod both ends, install into lifter bore.
- Mark the valve stem tip, dry erase marker, sharpie, I used some copper anti seize.
- Turn engine over (15/16 socket on crank bolt, clockwise) and make sure lifter in question is set on the base circle of the cam
- Install rocker arm and adjust by hand to zero lash
Zero lash means you can barely turn the pushrod anymore with your fingers.
- Now with torque wrench set to 18-20 ft lbs (19 ft lbs for me)
-Finally you want to make sure you reach your torque valve within 1/4-1 full turn of the rocker retainer bolt (torque wrench)
-Turn the engine over 2 full revolutions, your valve should open and close twice
-Remove rocker arm, check size and location of wear pattern


For me with the stock pushrod it took almost 2.5 turns of the torque wrench to reach 19 ft lbs, also the pattern was down low of center on the valve stem
The result is we need longer pushrods
Out comes the adjustable Comp cams unit adjusted until it was 6.3" long and put tape over the threads so it wont move during testing
Clean the valve stem and rocker arm, re apply marker on valve stem, lube the adjustable rocker arm and repeat the test


Guess what, perfect wear pattern, 0.008 wide and smack dab in the middle of the valve stem
Checked 3 more valves (2 on each bank)
Confirm I need 6.3" long pushrods, ordered from Amazon
Proper rocker arm geometry is ESSENTIAL to getting full performance from your engine (and making full manifold vacuum) Anytime you change heads, install a cam, etc you MUST MEASURE pushrod lenght!! every engine build is different.
(with that said most gt40 builds with a performance cam will result in stock length or on length longer being the perfect fit so 6.25 or 6.3")

Pics, stock pushrod 6.25"
171_191946_290000002.jpg


I have my ways :)

171_191946_280000000.jpg

171_191946_290000001.jpg


171_191945_200000001.jpg


171_191945_200000000.jpg

As good as it gets with stamped rockers, dead solid perfect:
171_191946_290000003.jpg


171_191946_500000000.jpg


171_191946_500000001.jpg


171_191946_290000004.jpg


171_191945_200000003.jpg


171_191945_200000002.jpg


Next time you see this truck it will be a V8

Oh yeah and somebody around here cough cough may or may not have picked up another build a CLEAN 98 ex cab 4.0 4x4 had some "slight" gasket issues...the 4.0 had 3 gallons of coolant in it, it was wet up to the throttle body!!
Shes getting a 5.0 also

171_191959_230000000.jpg


:bow:


Back to work....

Injectors arrived, hooray!
171_201904_340000000.jpg

engine bay prepped some more
The battery tray needed some help so I cleaned, neutralized the acid with a baking soda paste/wash.
171_201904_340000001.jpg

cleaned some more then coated with chassis saver to stop the rust
171_201904_340000002.jpg

171_201904_340000003.jpg


171_201904_340000004.jpg


Engine bay prepped some more, stock steering shaft boot was torn in a few spots so I replaced it with one from a 2007 Ranger donor
171_201912_510000000.jpg


The v6 engine mounts are in fantastic shape so we are going to keep them
All that is required is to drill one hold in the drivers side 5.0 engine mount plate
It is pretty easy to mark the location of the hole also, set in place and wiggle, it will mark itself. Center punch and drill, install engine plates back on the 302
171_201912_510000001.jpg


171_201912_510000002.jpg


171_201912_510000003.jpg


171_201912_520000004.jpg


171_201917_320000000.jpg


Transmission was cleaned of debris/loose dirt and stabbed to the engine
This transmission has been drained, the converter was drained for weeks, remember this is a Ford reman at some point in its life
front pump seal is cleaned and lubed, converter hub is cleaned and lubed, converter is seated on the trans and trans was married to the 5.0
171_201917_320000001.jpg


171_201917_330000002.jpg


171_201917_330000003.jpg


The whole enchilada is then hoisted and carefully set into the engine bay.. my stepson was visiting today so I took advantage of his offer to help and with two mechanics it is possible to get the correct angle and stab the engine and trans together


171_201917_330000004.jpg


171_201921_580000000.jpg


171_201921_580000001.jpg


Engine and trans are in!

Next is wiring and plumbing..............power steering high pressure line and 07 fuel line to 01 fuel rail are the next challenges to over come :)
I love a challenge


I'm amazed you got it over the core support so easily with the transmission attached. Mine has permanent scars from doing it that way. Maybe your lift just goes higher...

Nice trick on the V6 engine mount plates. Much easier than swapping over the mounts.


Tape, cardboard, blankets and then very carefully!!
The transmission must be at a pretty extreme angle to make it happen, this is a game of millimeters, only really possible with two people as you have to actually lift the front of the engine and pull down on the tail of the transmission at certain times to make it clear
The crank balancer and oil filter were removed, and the steering shaft disconnected to clear the header as it goes in
Have done this 10+ times so you pick up some tricks........


The balancer is probably what caused the issue for me. Good call.


So... Rangers have metal battery trays and Explorer 2nd gens have plastic. WTH Man!!! I really thought they had plastic as well. I also thought they was the same, but after looking at your pics, they aren't. Bummer as I was having thoughts of getting one at a Yard for the Ex. Nope.

I would never have been able to stab the engine with trans. That's pretty awesome how you managed that. Sure helps with getting the TC seated and bolted up. Very nice.

All these little extra's your doing are adding up to one nice job. Your a caring person who takes pride in your work, and man, is it showing!! Super job sir!


Beautiful!!! Just beautiful!!! I agree with gmanpaint, all the little touches.....spectacular!!!


It is pretty simple really, I just treat it as if it was my own
I dislike the way people (me) get treated at shops, so I set out to put an end to that and show people how a shop should treat you/your ride.... that was 25 years ago right when I inherited a certain 88 Bronco II

Thanks you guys!
We are just getting started here
Some obstacles to overcome now with the plumbing and wiring.........


This build has been in the works for some time.
After I relocated shop from Colorado to North Idaho, it seems the word has gotten out.

A good friend on the forums and now in real life friend / fellow Ranger owner and enthusiast is interested in having a "cool truck"
I just happen to know a place that loves to share visions and build cool modified RBV's, so I offered up my services and we struck a deal.

This build is taking place on a newish and therefore smaller Ford Ranger Forum, but since I am a moderator here at EF.com and I consider Explorer4x4.com my home away from home, it seems only proper to have this thread on both web sites. I will do my best to keep both threads updated the same.

Seems this super clean and freshly painted 2007 Ford Ranger 4x4 is in need of some tasteful upgrades, tired of being stock? I know we are!!

Some of the project goals for this custom build are:

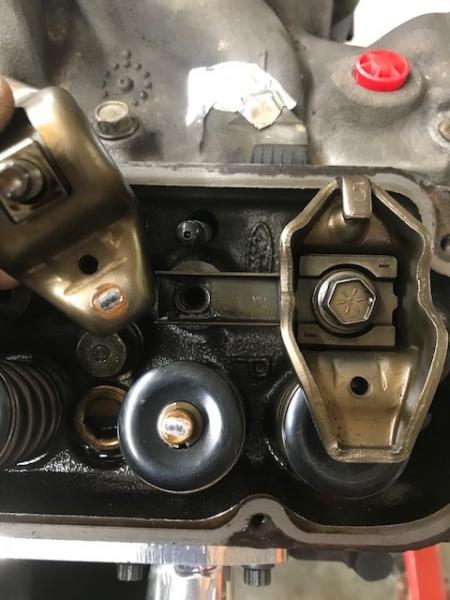
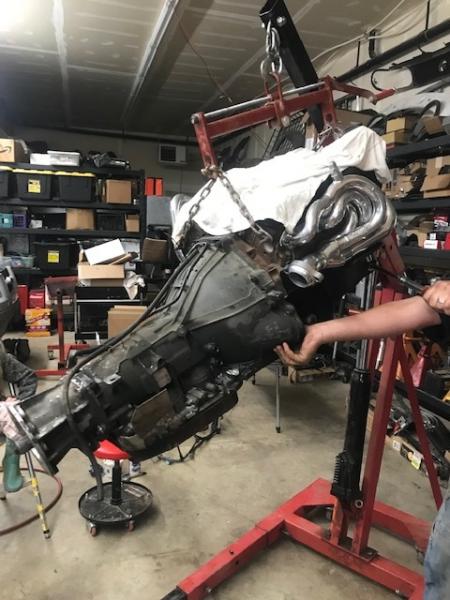
GT40p 302 V8 with performance camshaft
Torque Monster Headers
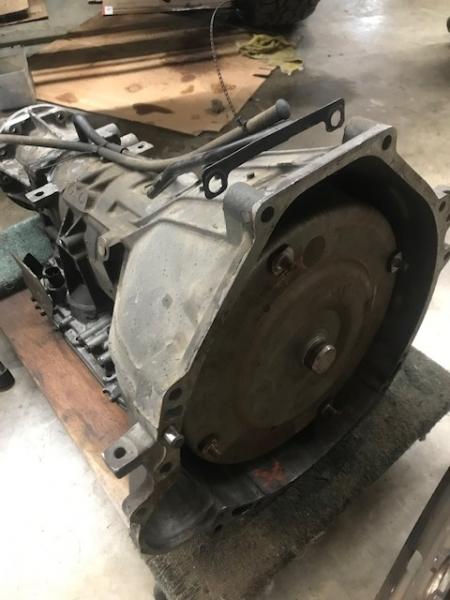
4r70w auto trans
4406E 4x4 transfer case
Full custom exhaust, drivetrain wiring, instrument cluster and interior wiring
4.88 gears, some sort of traction device in the rear axle
Disc brake explorer 31 spline 8.8
Superlift 5.5" with torsion bar delete / threaded body coilovers
(thanks @boominXplorer for the smokin good deal on a lightly used Superlift)
Deavers/ shackle hanger flip? we will see what budget allows. Spring over explorer axle for sure
35" tires
2014 Ford Edge heated leather seats
Gen II explorer center console
EATC hvac controls
Keyless entry
On board camera system, front, rear and sides
Ranger blinker mod
Emissions LEGAL in Washington State
LOTS and LOTS of Custom touches front to back

In order to pull off a build like this on a later model Ranger there are some serious obstacles to overcome and modifications needed. The PATS security system, the ABS braking system, emissions compliance, truck interface to a 98 PCM, and more can be a challenge when converting to the pushrod 302. I am no stranger to drivetrain swaps, custom wiring of electrical systems, and building full custom trucks, I welcome this project with open arms, just as if she was one of my own. (I can hear all the small voices now "410Fortune you better know what the hell you are doing!!") To the haters I respond the same as I always have ......."Calm yourself down...relax....I got this!"

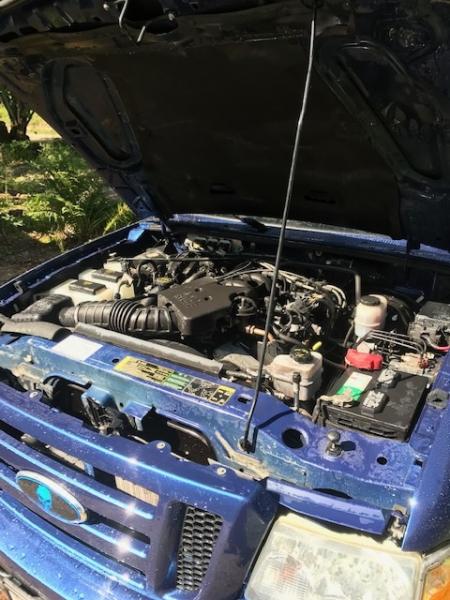
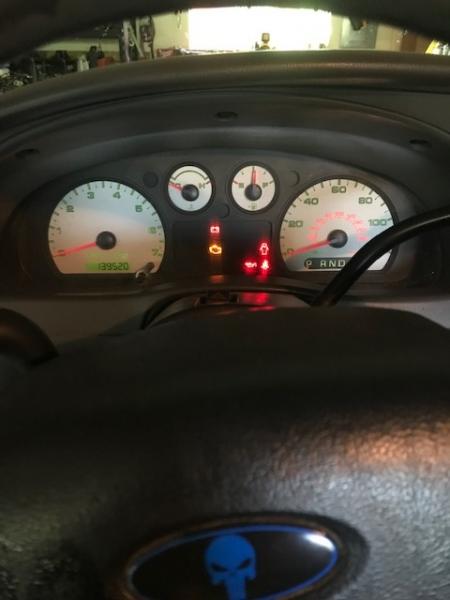
This 2007 truck is a show stopper, she was just re painted last year and with only 139K on the clock, she is in excellent condition.
However she looks, talks, and performs like a stock Ranger and STOCK SUCKS!!

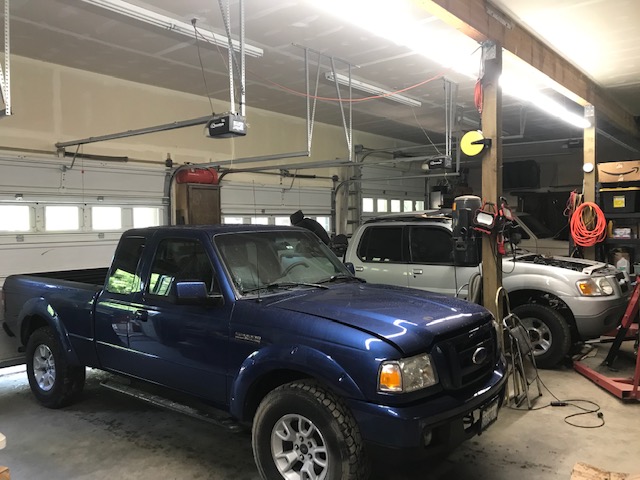
It is time to change all of that, so with some careful planning, a ton of saved up money and a reserved space front and center in my private custom Ford off road shop...follow along as I build up Eddie Money's (from Ranger-Forums.com) Project "Ranger Premier"

The truck was driven from the Seattle area to my home town here in North Idaho. We had a nice visit with the owner and talked about the possibilities and build goals. I showed off some of our custom creations here at the shop. The 2007 was left with me, I washed it, cleared my schedule and pulled her into the first bay where she will take center stage for the next few months as I build her up.

We have been planning this build for about a year now and the day has come, she is finally in the shop.....

171_032051_090000001.jpg


171_032051_090000000.jpg


171_032048_500000002.jpg


171_032048_500000003.jpg


171_032048_500000004.jpg
That’s a fun project
If you are close by I can volunteer some of my services to you


171_201917_330000004.jpg


171_201921_580000000.jpg


171_201921_580000001.jpg


Engine and trans are in!

Next is wiring and plumbing..............power steering high pressure line and 07 fuel line to 01 fuel rail are the next challenges to over come :)
I love a challenge
WOW THAT’s HOT


Well guys and gals, the reason there has been no big updates on the 07 in the last few weeks is because of research, I have been going through all of the options for powering/wiring this 07 truck.
I could easily wire it up to be a 98 explorer power distribution, drive train wiring, pcm, etc. I could have done this weeks ago and had all the wiring ready to go by now (option 1 see below)....but Mr. Magoo is a patient man and we are not in a rush so I took this opportunity to do some digging. I have been on EEC tuner forums, mustang forums, ranger forums etc searching for answers.

The problem with this is the 05+ can bus system will be lost, the instrument cluster, the smart power junction box, the restraints computer etc will have to go bye bye.
So I have been discussing and researching and have come to the point where we have 3 basic options:

1: Option one; Yawn.....wire the truck backwards to be a 98, this is a very good option and right up my alley since I have built many 96-01 style 5.0 conversions and their wiring. The work is easy, its all plug and play, park the explorer next to the ranger and start bolting in the wiring. I would of course still do a custom PCM and power harness, removing all the un needed wires and circuits. The PCM will need a custom under hood pocket to replace the 07 PCM location with the more traditional 96-01 style. Chop cut weld is required to mount the earlier pcm in this firewall. Or you can extend the PCM and put it where you want (glove box) I can do this with just about any shell of a vehicle I always joke I could "put a explorer 302 in a Miata", but then somebody did and it became a popular thing to do, so its not a joke anymore.

2: Option 2 is to fool the 07 into thinking it came from the factory with a V8. The V8 offered in 2007 was the 4.6L in the F150 and it still has a 4r70w variant, plus fully tune able with apps like torque pro and such, tuning the 07 pcm seems cheaper and easier then our older gen II stuff.. I know for a fact the older 4.6L PCM CAN BE USED to run a pushrod 302 as mustang guys have done in the past. In 96 the stang got the modular 4.6 but some people still had highly modified 302s and 351s, when the early 4.6 crapped out they would rip out the 4.6 and install a modified SBF, change the K member and its a bolt in deal....all the while keeping the mod engine /trans PCM in the car.
The goal here would be the 07 ranger would now think it was a 4.6 Ranger from Ford, and all the Can bus systems would be happy. This is a crap shoot, hoping that it works, $$$$ down a hole if it does not. This would keep everything on the truck side of things 07 including the pcm location

3. Option #3 is still a secret and will likely be the route we take. This route uses a custom PCM that will run the 302 and the 4r70w and be fully tune-able IN THE TRUCK!!!. I might still have to wire the truck backwards to be a 98 as far as power distribution, dash and instrument cluster are concerned as this PCM may or may not work with the 05+ can bus system.

A custom aftermarket or "hybrid" (*******ized by me) instrument cluster is very likely in this 07s future, keeping the stock 07 cluster with anything other then a 07-11 PCM would be near impossible

We will be pulling the trigger on one of these options VERY SOON, it has been ALOT of research and alot of work to decide

I am waiting on one more answer and then we will know. I eat sleep and drink Ranger wiring and conversions. so to me this is fun, others call me a *********
smile.png


Whichever route we take this may or may not be something others can do....every conversion is different. The good news for owners of 2005 and earlier trucks is they still have the 42 pin C110/112/115 plug under the hood and the pw1850 obd2 language, so installing a 302 is not nearly as complex in those trucks.

It is the 06+ factory can bus system that may or may not be happy with the earlier PW1850 OBD system, I don't "play" with other people's money, so research is the key here. If I had a 4.6 F150 to play with I would love to try and make this 07 think it was a 4.6 F150 from the factory but run the explorer pushrod 302 instead. If we go with option 3, I MIGHT be able to retain the factory wiring and can bus system...this is the great "unknown" but I am not afraid to try!

I can run any 5.0 PCM from 96-01 explorer they are my favorite because the awesome gt40 302 with MAS and its coil pack ignition, fuel injection and the PCM controls the auto trans.. The 96-97.5 pcm is the easiest because there is no PATS, but the EGR is different, so you have to be careful which one you decide to use based on the plumbing and wiring goals of your conversion.


Looking forward to seeing what you decide on:chug:


Join the Elite Explorers for $20 each year.
Elite Explorer members see no advertisements, no banner ads, no double underlined links,.
Add an avatar, upload photo attachments, and more!
.


Thanks Rick! Most of this is your fault!

After all if it wasn't for EF and then meeting Brett (20+ years ago now) then sorting out drive train conversion wiring on my first 4.0 swap we wouldn't be losing this sleep :)

In the mean time parts for the 07 have been rolling in!
Lawrence GPS ooooooh la la!, bluetooth stereo, 360 degree camera system...Mr Magoo has been busy at the shipping store.

I picked up a few things also, the pushrods came in, all aluminum radiator, the parts to build the fuel line, proper factory power steering hose that will bolt in, urethane trans mount, and more....

Here's a sneak peak:

171_241342_070000004.jpg


171_241342_070000003.jpg


171_241342_070000000.jpg


171_241342_070000001.jpg


171_241342_070000002.jpg


Updates coming


Back
Top