410Fortune 1988 Ford Bronco II Eddie Bauer 4x4 | Page 14 | Ford Explorer Forums - Serious Explorations

  • Register Today It's free!

410Fortune 1988 Ford Bronco II Eddie Bauer 4x4

The woods and outdoors are great, but you have to have the tools to survive in it well. I love the pictures, big toys/tools, and the Excursion. I was amazed by the underside of one of those when I saw one in a dealership, on a rack. The steering arms are massive.

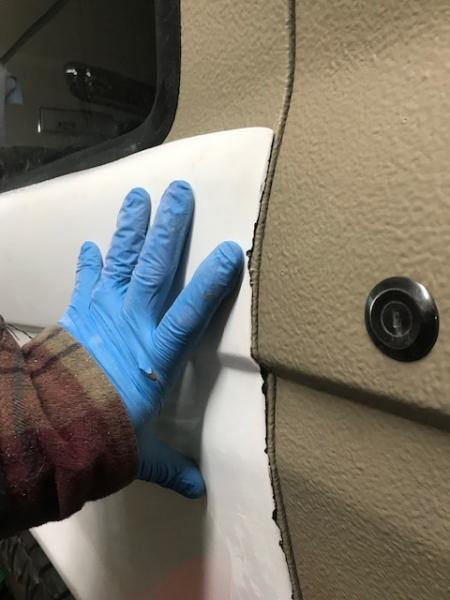
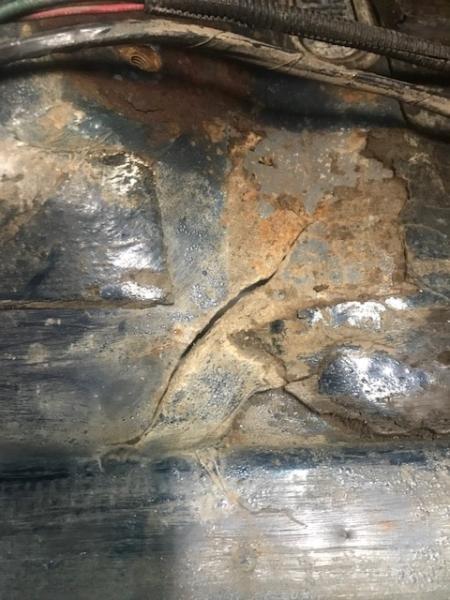
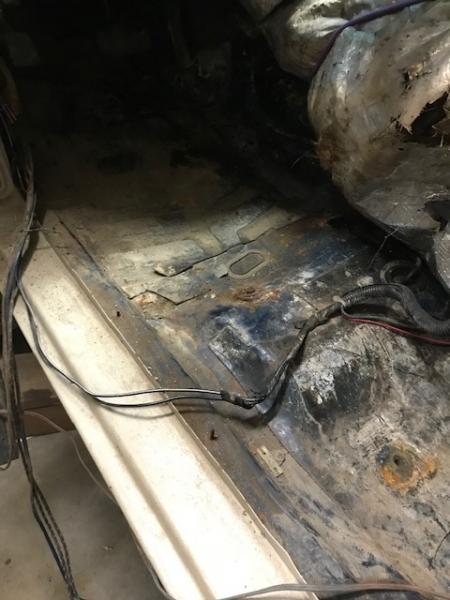
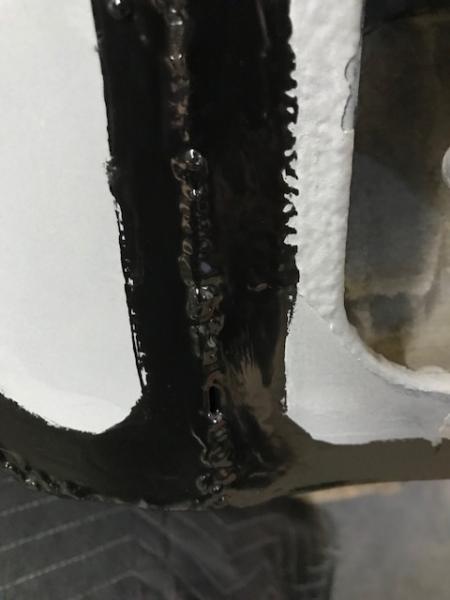
Use RTV instead of seam sealer if you can. The seam sealer is great to paint over, but it gets harder as it gets older, so it cracks and lets water into the seams(rust under any chassis). I used it on the inside in places of my 93, which was rolled and had some openings where frame work was done(pulled the right side body out). Ultra Black filled those and looks like new after 15 years.


Join the Elite Explorers for $20 each year.
Elite Explorer members see no advertisements, no banner ads, no double underlined links,.
Add an avatar, upload photo attachments, and more!
.


Lots of pictures, try to follow along :)
Bedside install / rust removal

Rust removal, old repair failed:
171_041148_260000000.jpg


171_041148_260000001.jpg


171_041148_260000003.jpg


171_041148_260000004.jpg


171_041150_380000000.jpg


171_041150_380000001.jpg


Now can hang bedside and check fitment
171_041150_380000002.jpg


much trimming required
171_041150_380000003.jpg


171_041150_380000004.jpg


better
171_041152_500000000.jpg


171_041152_500000001.jpg


Now need to enlarge wheel well opening to match fender
171_041152_500000002.jpg


oh yeah I use weld through primer on all parts before welding for corrosion prevention
171_041154_410000000.jpg


171_041154_410000001.jpg


cut out factory flare, leave enough metal to close the hole
171_041154_410000002.jpg


171_041154_420000003.jpg


171_041154_420000004.jpg


bottle jack will open up the fender a little and close the gap
171_041157_210000000.jpg


171_041200_320000002.jpg


combo of rivets and welding was used, then fiberglass over the whole she bang on the inside. I covered all welds and gaps with 2-3 coats of Chassis saver, the painted the quarter panels black because they will be hidden
Black silicoln was used to cover everything else to make sure water stays out!
171_041200_320000000.jpg


Tabs were coated with chassis saver and silicoln
171_041200_320000001.jpg


I also bent up some metal to fix the hole removing the rust had left behind.
The entire carpet kit was lifted up because it was soaking wet underneath
So the time had come to fix my floor pans as well, you see when you twist up a Bronco II off road for 20+ years the floor pans crack. Water gets in and your carpet kit gets soaked, then the rust comes.
So I took this opportunity to fix ALL THE RUST, close the holes and give her new life!
Lots of primer, lots of welding, lots of chassis saver, finally rust stop black paint and put it all back together


soaking wet under here for too long
I have aftermarket heat/noise mat and a Ranger rubber floor kit here. Before:

171_041206_070000000.jpg


171_041206_080000003.jpg


171_041206_080000002.jpg


171_041206_070000001.jpg


Cleaned all surfaces, removed all rust and began the repairs
171_041206_080000004.jpg


171_041209_140000000.jpg


171_041209_140000001.jpg


171_041209_150000002.jpg


171_041209_150000004.jpg


While I had the welder out I helped stepson remove a broken stud from his 5.0 sport trac project, thermostat housing bolt snapped
We used a piece of flat stock with a hole drilled in it to grab onto the broken stud with the weld, worked like a champ:
171_041209_150000003.jpg


Chassis saver:
171_041212_230000000.jpg


More holes/ body seams were repaired, welded shut. fiber glassed and chassis saver'd
171_041212_230000001.jpg


Big rust spot under pass floorboard
171_041212_230000002.jpg


171_041212_240000003.jpg


171_041218_380000002.jpg


This was covered a few more times then all painted black

171_041218_380000003.jpg


171_041218_380000004.jpg


I replaced both door seals on both sides

I also repaired all rust in the rest of the truck and drivers floor

171_041215_350000000.jpg


drivers:
171_041215_350000001.jpg


171_041215_350000002.jpg


171_041215_360000004.jpg


171_041218_380000000.jpg


171_041218_380000001.jpg


So it looks like I did not get pics of the finished floor on both sides but it came out awesome. All black no more rust, no more holes.
Then I went back and finished the bedside install. I installed a fold and tumble rear seat from a Samurai and converted the passenger seat from power to a manual slider so its easier to get kids in the back

Looks like this, new door seals! Hooray the old ones were still 1988
171_041233_140000000.jpg


Bedsides were attached for the final fit and all gaps and holes were covered, I fabricated inner fender guards from rubber conveyor belt materials
The drivers side rear quarter had more rust so I have to build a new inner bedside, I used some beefy 14ga steel for this repair and a plasma cutter. Again weld through primer, chassis saver, then finally black paint and silicoln to cover it all up

171_041236_210000000.jpg


171_041233_140000001.jpg


171_041233_140000003.jpg


171_041233_140000004.jpg


171_041236_210000001.jpg


This was all fiberglassed and chassis saver'd also painted black before interior went back in

getting to know my new welder, I LOVE IT
171_041240_210000001.jpg


171_041240_210000000.jpg


171_041240_210000003.jpg


171_041240_210000002.jpg


the new gaps:
171_041240_210000004.jpg


Time to fix the gaps:
171_041240_210000004.jpg


171_041243_260000003.jpg


171_041243_260000004.jpg


Cleaned up the wheel wells and re coated with bedliner and flexible undercoating
171_041245_100000000.jpg


Done:
171_041245_110000001.jpg


I also took some time to finally fix my custom coil buckets/shock mounts. On the passenger side the bucket had to go forward 1.5" the coil used to hit the bucket and drove me nuts
171_041245_110000003.jpg


My neighbor gave me his old Samurai seat, I recovered it for $20 at wal mart using new memory foam padding and a cheapo seat cover. This seat will only be needed for a few seasons, soon the kids will be too big for it
However the fold and tumble seat in a BII is pretty awesome
171_041245_110000004.jpg

So if it stays I may re cover it like a pro
I fabricated the brackets to make this work, seatbelts came from a 05 ranger (not pictured) and use factory BII seat belt bolt locations

While the interior was out I also dropped the headliner and re sealed my roof rack bars (bolted to truck)
the old Yakima cross bars were rusted out so I replaced them. I have had this roof rack since I was 18 years old (46 now) and it was installed on several cars before the BII. cross bars replaced with new from Yakima, new end caps and added my 50" curved light bar (matches the wifes FJ roof bar)
Pass seat was converted to a manual slider
drivers seat was fixed, I cut the old 2000 explorer feet off and welded them back to the seat in the correct location for the BII floor/seat attachment points

There is a bunch more that happened I did not get pics of BUT I can get some pics of the final interior and truck this week

Bedsides will be removed again so I can monstaliner them, at that time I will smooth the edges, fix the gel coat, etc
But for now the BII is back on the road with its Duff rear bumper, new roof rack, no more rust and no more holes!!
171_041250_000000002.jpg


So I have to replace my drivers rain gutter, that is the last spot of rot on the truck

I have a whole other BII roof a pillar section to use
After that (spring) I will re coat the whole truck in Monstaliner one more time
This winter is time to build sliders, front inner fender guards to match the rear
The side mirrors will get re coated, work continues always on the BII

Back to work!


I like the fiberglass and have considered it off-and-on over the years. The reason I don't do it is because I know I will crunch them the first trip out. The short wheelbase of the BII makes it easier to save the body.
Nice job on the rust repair. I had my floor and firewall split several years ago and I repaired it with stitching flat bar across it, like you did with your floor. Then I filled the crack in with silicone.


Thank you!

If the BII still saw trail duty (very much) it would have been no go on the glass sides, instead I would have removed the top and boat sided it!
But years ago we got rzr's and do our hard core stuff with those now (sold my 96 explorer and boat to get into the utv's)
The BII instead gets used daily on our nasty trail of a driveway, it is my main transportation during snow season, mud season, dust season and my daily driver/show truck.
In coming years I will use it (wife in the FJ) to take the family and explore our new stomping grounds; hundreds of thousands of acres of roads and trails all over North Idaho.
Due to the amount of mud and snow she will see I figured tire coverage + rust removal = cool wide body kit

Silicon to the rescue! I used a couple of tubes in the caulk gun on this repair....it is nice to have a complete dry interior again with sealed up weatherstripping and the tire is on the back! These are things I have not had on the BII for many many years. Time and money.....time and money Fall in love all over again with the truck that started this all

Right now I'm building a 07 Ranger, doing 5.0 in 98 Ranger and I have a 01 Sport trac that will be getting a explorer 306 engine I have with a 4.2 M5OD HD and 4406m :) So I had to sneak the BII in before the snow hits

3 years since I daily drove her much! Sure is nice to cruise to town in, I had to check at the stop light last week, the 302 runs so smoothly I could hardly tell she was running and that's with the solid engine mounts!

As weather permits I will wash her up and get some final pics of the interior and exterior, I like that the rear matches the front ....the fenders cover the tires much better now, overall I am pleased with the new looks. Of course it will be better when shes all one color again.

Eventually I want to pull the 302 to re seal it and get an atlas.
I will do the comp cam and possibly aluminum heads
I want the holley PCM in this truck
The front coil/shock setup is on its way out the door, coilovers with hoop/engine cage will be one of my next upgrades.

Other considerations are full width d44 ttb


pics all together

need to come up with some more utility mat for under the new back seat

171_042039_580000000.jpg


171_042039_580000001.jpg


171_042039_580000002.jpg


171_042039_580000003.jpg


Need to paint the metal dash mocha still and swap to 05 ranger steering wheel, build center console shifter cover/boot
Notice pull strap seat recline lever, no broken metal
171_042039_580000004.jpg


171_042043_310000000.jpg


171_042043_310000001.jpg


171_042043_310000002.jpg


171_042043_310000003.jpg


171_042043_310000004.jpg


I will be getting a sealed battery very soon
171_042045_460000000.jpg


Duff bumper works with stock plastics if you do it right
171_042045_460000001.jpg


171_042045_460000002.jpg


171_042045_460000003.jpg


10K two post lift installed
Whew that was a chore
hit some rebar in two of the holes, but shes in now!
171_272242_240000000.jpg

171_272242_240000001.jpg


171_272242_240000002.jpg


171_272242_240000003.jpg
171_272242_240000004.jpg

171_272244_590000000.jpg


Life just got easier!!


Excellent, you have to have a real lift for serious work. Congrats.

I do wish mine was taller, lifts(99%) seem to be made for short *******s, under about 5', not normal people. You hate having to bend your legs to look up and work on everything.


Congratulations on the lift. My buddy put one outside of his garage and wants to sell it to me. I have been thinking of installing it alongside the house. The weather here permits that. A shop nearby has half of their lifts outside in a fenced yard.

CDW, get yourself one of those rolling stools and lift the vehicle to the height you need to work.


FJ cruiser is in the air right now, this lift thing is too handy. It really takes some getting used to, I mean for my entire life I have been wrenching on these with a creeper/cardboard/on my back
Now you have this un easy feeling the whole thing is hanging in the air, I really have no idea what position to put my body in to get leverage, etc. It will take some time to get used to this!

Way tooo handy....working on suspension, brakes, tires I am a happy dude!! There are new tools I need now, a bunch of height adjustable stands, drain pans, jacks.......for sale one slightly used creeper :)

The FJ needs rear upper control arms and a trans mount. I am tired of replacing the crappy urethane bushings in the cheapo rough country rear links (bushings lasted 3 months this time!) so its either Manafre or Metal Tech rear upper control arms for us I like the Rokmen parts but they don't make uppers!!! WTF???.... Metaltech left a really really bad taste a few years back we had a heck of a time trying to order her Red Eye rear bumper from them, the delivery date was pushed back months, the promised price changed, the shipping was a disaster paid like $250 extra to have it dropped at our house and I still had to go downtown Denver to pick it up, getting the money back was a HUGE fiasco and there were parts missing....I was not happy....but they do make nice control arms for a good price, time to forgive? We shall see what the wife decides, this is her build :)

Now that this is done and waiting on parts the blue truck can come back over to bay 1 and meet the new lift!!

Neighbors are Chevy guys (being converted to Ford guys as we speak) They kept telling me the new lift is AC Delco blue....I had to prove them wrong
171_291044_130000000.jpg


171_291044_130000001.jpg


Yes the FJ can go much higher, but removing 35" tires I figured this was high enough. Right now the 220V supplyfor the lift comes from a small generator, next project will be to wire up the shop for more 220 outlets to a larger generator that is outside and put it on a switch. This way anytime you need to use the lift, welder or plasma cutter (220V) just plug it in and flip the switch. Off grid customs shop! We do not run the 220 stuff through the house batteries, welding can be bad for them.....


You'll love that lift more and more, but keep the chains lubed and watch for any leaks. Mine we had to rebuild the seals once, and the old seals we couldn't find records or replacements for, so machining one part for different seals was the answer.

I think you need to invest in some new ceiling lighting, LED's like most diners use now. They come in long lengths, say 8' each, and are very bright, use no transformers, and low wattage. That will brighten up the whole shop, put it on your wish list.


Thanks for the tips, I will keep it lubed. I still need to do some more adjustments to get both racks synchronized
I have your LED lighting covered
There are LED lights above all 3 bays in the shop and above all work stations. Plus there are snap on LED mobile lights for on the ground and hanging under hoods or under trucks, I bought about 10 of these things from Costco when they were $25
81yqYAubA7L._SL1500_.jpg


The previous owner installed those florescent tubes we never use them
I am using these from Amazon they are bright as SHI*
https://www.amazon.com/gp/product/B06XGBKDKZ/ref=ppx_yo_dt_b_search_asin_title?ie=UTF8&psc=1
I bought so many of them I have 3 left over I have not found a home for yet... when I first ordered them I was a bit worried as they are extremely light weight, turns out they are super durable and very very bright....they earned their 5 star reviews
71soxEx4KVL._SL1500_.jpg


Look at the FJ pics.......See the bright spot in the pic? Thats the overhead LED's for bay one.
See the second bay has the lights but they are not lit up? Same is true way back there for bay 3.....4 overhead LED's per bay.
The overhead fixtures and florescent tubes are on their way out as are the power door openers...this place is WAY off grid I am not sure what the previous owner was thinking. We are propane powered and sunshine powered here.

171_291044_130000000.jpg


171_272242_240000000.jpg


See the stupid 1980's office space florescent's are not lit....

He had garage door openers on all 3 bays and tons of florescent tubes, I think they were part of the "building package" when it was erected......useless for me they are all going to the crusher :)

What I need is some scaffolding or a man lift so I can get up there and remove the old junk....the ceiling is 12' high my ladders are not cutting it

I learned long ago to work on the light, after not having enough light one time when I did an oil pump on a GMC 2500 in the truck and had to drop the pan again because I pinched an O ring...I went all out on LED lights :)

As money allows I have been making this place my own.....LED lights are part of the recent technology that makes living like this completely off grid possible! We have cut our cost of living by 2/3 when compared to living in Conifer Colorado at 9000, our power bill in CO was sometimes $650 A MONTH.....that's half a years worth of propane for this place.


Sweet. I saw the big light output over the truck, but figured you hadn't done the whole shop yet.

My house garage is about 10' 9" high, I could not quite install my lift at home(though the garage door would have to have been enlarged too). So mine went to my best friend's house, I have to drive about 15 miles to use it.

I love LED lights and lower powered stuff, but have only gotten into the tools stuff so far. I bought the Makita handheld LED light last week, and can now use the Dewalt 20v or 60v batteries in it. Makita DML801 12 LED 18V Lithium Ion Rechargeable Flashlight Bare 696227050081 | eBay

The cool battery adapters showed up, for mixing the Dewalt/Makita/Ryobi/Craftsman tools I now have. I won't buy any more batteries except for Dewalt, and they are not excessively expensive for all but the 60v batteries. I have four of those coming as I mentioned before, we'll see if those pan out.


Join the Elite Explorers for $20 each year.
Elite Explorer members see no advertisements, no banner ads, no double underlined links,.
Add an avatar, upload photo attachments, and more!
.


For overhead ceiling work, you can't beat using one of these rolling bakers racks. You use body motion to move it along a smooth surface, so you don't have to be up/down if your alone. We call it "Rock & Roll" in the trades. I have lived a few weeks/months of my life on one of these over the decades.

Metaltech Multipurpose 6ft. Baker-Style Scaffold — 1,000-Lb. Capacity, Steel, Model# I-CISC | Northern Tool + Equipment

You can build on these, like full size scaffolding too. Handy to have and easy too store when broken down.

I'm super jealous of the new lift! That's so awesome. Congrats!


Back
Top