FAKRWEE Navajo 44 swap | Page 17 | Ford Explorer Forums - Serious Explorations

  • Register Today It's free!

FAKRWEE Navajo 44 swap

My new front end got in today. It's a custom Dynatrac 44 front axle assembly.

List of goodies include:
Reverse cut housing upgrade
Warn premium manual locking hub set
30 spline 3/4 ton alloy steel axles
Upgraded Disc brake Ass. 5.5.5
Ford coil spring bracketry
5:13 gears-reverse cut
ARB 3.92+ ver.
1310 dana 44 u-bolt style yoke
Heavy duty ends package
Heavy duty steel dif. cover
High clearance steering package
Width= 62 in.

I saved my pennies for quite awhile to be able to afford it but she's a beauty. I almost feel like not installing it.

I hope the pictures come out my battery started going dead.

The installer is fourxDr. in Burbank and Winter's designing the radius arms. We know they will be wristed but will not have pin's like bc broncos. I'll include pictures as we go along. Today they took apart the front end. I'm hoping the job will take about a month.:bounce:
 

Attachments

  • left side 1.jpg
    left side 1.jpg
    97.1 KB · Views: 1,967


Join the Elite Explorers for $20 each year.
Elite Explorer members see no advertisements, no banner ads, no double underlined links,.
Add an avatar, upload photo attachments, and more!
.


Then go for it:D If you already have an Air Locker or Detroit for the 8.8" though that's another $5-600 you would have to drop into the 9".

Most people have not went to full width axles. Hence the lack of need to swap rears. In most cases all that is needed is a redrill for the 5.5" bolt pattern or a set of alloy axle shafts which already have the proper pattern.

Anyway, I don't want to hijack this thread.


Join the Elite Explorers for $20 each year.
Elite Explorer members see no advertisements, no banner ads, no double underlined links,.
Add an avatar, upload photo attachments, and more!
.


I guess we just have to wait until Thaven to see how awesomely FAKRWEE performs. I wish I could make the trip again this year. I'll just have to wait for pictures. Waiting eagerly.


Hey Zensius, the Navajo is a TTB, I just get in the habit of calling everything that isn't live axle IFS. Rick's right an 8.8 is pretty stout. Jeepers love them. If you can get one free that's great.

I've been driving the rig around town and it handles pretty good. It's just a little squirly in the rear at highway speeds. I have to be careful when I exit the freeway that I'm not going too fast. :eek: 
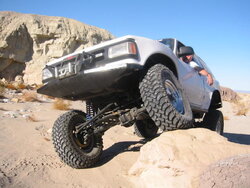
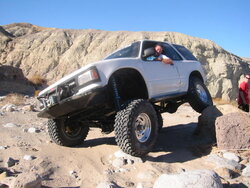
The real test will be this week at T-H.:D


Tom, THE TRUCK LOOKS INCREDIBLE!!!! Hope it's first trip is a success!!

ALYZ1FLR, like this?
xmem.jpg


Robb


OOOhh Yeaa!!!

That is exxzzzactlyy what I was thinking. Gotta go I gotta date with my torch. :hammer: I was thinking more along the lines of bolting solid, but that is real nice. How much clearance did you gain??


Thanks M. I just have to learn how to drive all over again.:eek:


Tom, I just checked this thread again for the first time in a long while and saw your newest pics on the previous page.

Iiiiiii LIKE it! :bounce:


Re: OOOhh Yeaa!!!

Originally posted by ALYZ1FLR
That is exxzzzactlyy what I was thinking. Gotta go I gotta date with my torch. :hammer: I was thinking more along the lines of bolting solid, but that is real nice. How much clearance did you gain??

I found an advantage to an SLA vehicle over a TTB vehicle when doing a SAS.

The rack and pinion crossmemeber on an SLA vehicle takes the place of the engine crossmember on a TTB vehicle. The engine mounts on a TTB vehicle are on the crossmember, so you can't just hack the crossmember away.

The brackets in that picture are stock ones that were used to hold the IFS differential in place.

So you can build a small crossmember using those mounts to act like the rack and pinion crossmember did.

There is no "gain" since the IFS differential is in their place, but it is significant since you are cutting out all the other existing brackets.

Back to the tread at hand....

The work looks GREAT!!!! How stable is it at full flex? You try to rock it back and forth at all while it was on the fork?


Hey CoryL, Thanks. We rocked it on the ramp and the fork lift and it felt stable. The rear Alcan leaf springs in the rear feel pretty mushy on the road. I might have to install a disco. The front handles well. We'll see how well and how stable she handles in the real world this week at T-H. Too bad you live so far away. Good luck with your monster project:thumbsup:


Tom, just took a look at your pictures in the Gallery, must say..looks awesome!! How did she perform? Worth the wait? Give us lot of details. Anything you would have changed in it?

Happy trails!!


Hey JoshC. She performed a lot better than I could have imagined. It does the 3 things I wanted it to do.

Flexes better with the 37's than when I had the 35's. A lot of chop-chop but it was worth it. The extra clearance is awesome.

The rig is stable as a rock on the trail. Even in the most off-camber positions she never felt like she was going over. I thought this was going to be a problem due to the almost 12's of lift it must have but it wasn't.

With the 5:13 gears and the Atlas II 4:3:1 I can count the nubs on the tires going over stuff. It crawls great. Can't wait to try it out in Arizona.:D Another neat thing about this setup is that going down even on the steepest angles, at one trail going strait down, all I do is put it in first and let it crawl down by itself. I never have to use the brakes at all. The RPM's will not go over 2100. As a matter of fact some times I have to give it gas going down hill.

The ram steering is awesome. It feels like a hot knife going thru butter when you turn even with the ARB engaged.

The only thing I would do different is not lose time playing around with all the different suspension options I did at the beginning and go strait to the 4 link and coilovers. Rick had told me but I didn't believe him. I could of shaved about 4 mos. off of the project. But I guess I'll always be a doubting Thomas.
 

Attachments

  • 115-1567_img.jpg
    115-1567_img.jpg
    45.9 KB · Views: 475


.
 

Attachments

  • 115-1568_img.jpg
    115-1568_img.jpg
    59 KB · Views: 462


Wow Tom that is great. I'm glad to see you like your monster. Have you decided what you are going to do with your spare tire yet?

Happy trails!!


Josh, I'm keeping it inside for balance. I want all the rigs weight between the axles for rock crawling. I'm building 2 boxes for the rear storage. One on the bottom which will hold the spare and hi-lift with a trap door in the rear to slide out the spare. And the other box on top of the first for tools and spare parts that opens from the back and top. It should be cool when I finish it.
:cool: 
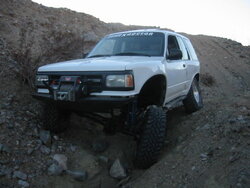
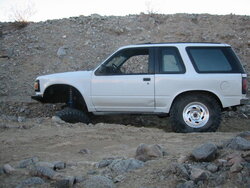
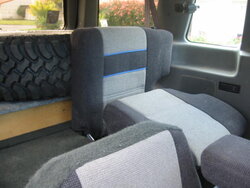
I'll post some pics.


What are the benefits of 4link coilovers vs radius arm coil sprung suspension for a truck in general?


Tom, I built a box behind my rear seat that holds tools, chains and my spare. It is 10" high and when I fold down the rear seat I have another piece that slides beteen it and the folded seats and makes enough room for me and my wife to put a queen size matress in and sleep. The only problem is: a 30 or 31 is all that will fit in it! Now I run 33s and I have to do something else for a full size spare. I don't understand where you are going to put a 37, unless you scratch the rear seat. Is it going where your auxilary tank is? By the way, your truck is the coolest. I would be interested in some pictures because I hate the swing out tire carrier on the bumper and on the roof it makes it all top heavy. Thanks


Soupbone. There are pros & cons for each. One of the big disadvantages to going 4 link coilovers is the price. It's a lot more expensive due to all the R&D hours and special fabrication that goes into this setup. But it is a more advanced and better system than the radius arm coil sprung suspension.

One of the big advantages of the 4 link is it permits you to move the axle foward as needed. In my case I wanted to run 37's with as much up travel as posible and with the coils I was limited. On the 1st Gen. X the coil bucket on the drivers side sits in an identation on the rail and can not be moved foward. With the coils at full stuff the 37's were jammed into the floorboard. By moving the axle foward about 3' in. I avoided having to do work on the floorboard. With the coilovers I didn't have to worry were to place the shocks for clearance.

Also with Radius arms your flex is limited due to binding. The only way around that is wristing one of the radius arms to free up the axle. Other than that it works well.


Hey Kirby N. I'll probably have to keep the rear seats folded when I go off road or just yank them out and use the hole for storage. Here's a picture of the setup I have right now. As you can see the rear seat is useless. I plan to leave them in for now and build 2 new boxes like the one I have in the pic, stacked. The bottom one will hold the spare and the Hi-lift and the top tools and spare parts. I'll experiment with removing the back seat as I go along. You know this is all experimenting and making it up as you go along.:D

What did you mean by auxilary tank. I eliminated the factory gas tank under the driver side and had a tank built were the spare used to go. It holds 28 gal. and helps balance out the rig.
 

Attachments

  • 115-1593_img.jpg
    115-1593_img.jpg
    59.6 KB · Views: 425


2
 

Attachments

  • 115-1594_img.jpg
    115-1594_img.jpg
    44.9 KB · Views: 427


3
 

Attachments

  • 115-1571_img.jpg
    115-1571_img.jpg
    60.3 KB · Views: 402


Join the Elite Explorers for $20 each year.
Elite Explorer members see no advertisements, no banner ads, no double underlined links,.
Add an avatar, upload photo attachments, and more!
.


4
 

Attachments

  • 9-flex rear.jpg
    9-flex rear.jpg
    67.1 KB · Views: 419


Back
Top