Gen 2 headlight upgrade | Ford Explorer Forums - Serious Explorations

  • Register Today It's free!

Gen 2 headlight upgrade

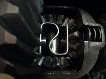
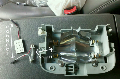
So I bought this pair of headlights for my 1997 Mountaineer:

driversheadlight.jpg


headlightpair.jpg


I bought these headlights on Ebay from the seller autoshoppes. I got them for $63 plus $22 shipping. They were returned items that had a little bit of damage in the mounting for the turn signal lights and one of the flourecent rings doesn't work. These sell new on Ebay for around $190+++. If you are looking for this exact model try searching Ebay for: explorer ccfl led projector

Personally, I wouldn't pay the extra $$$ for the LED and CCFL, but I got a great deal on these so. I think if you want the versions that use LEDs for the halo lights and don't have the LED crap driving light thing built in to them that you can get them for something like $140 for the pair.


I intend to document the upgrade process and give incremental light output pictures for the upgrade step by step. Here are the steps that I will be taking for this project:
1. Document the stock light output.
2. Install relays to power the lights from the battery
3. Document the stock light output with the relay modification.
4. Swap in my new headlights (With the original 55W H1 bulbs.
5. Document the new headlight output.
6. Swap in 35W 5000 HID H1 lights in the low beam.
7. Document the HID low beam.
8. Swap the 35W 5000 HID to the high beam position.
9. Document the HID high beam.


Join the Elite Explorers for $20 each year.
Elite Explorer members see no advertisements, no banner ads, no double underlined links,.
Add an avatar, upload photo attachments, and more!
.


1. Document the stock light output.

So I have found 2 places around my house that should allow me to reproduce this light experiment so that I should be able to give apples to apples comparasons of exactly what the difference in the light output is for all of the steps along the way.

I had my camera set to ISO400 with a 1/4 second exposure and no flash and minimum zoom position for all of these and all of the future pictures. For each picture I will sit my camera on top of my drivers side mirror so any glare from the windsheld is eliminated.


My stock 1997 Mountaineer headlights are the same as the Explorer headlights. Mine are a bit yellowed from time and such. I will examine the reflectors when I exchange them out for the new units.


Stock low beam:
97MountaineerstockheadlightsLOWBEAM.jpg


Stock high beam:
97MountaineerstockheadlightsHIGHBEAM.jpg


Stock both beams:
97MountaineerstockheadlightsBOTHBEAMS.jpg


Stock low beam pattern at 40’:
97MountaineerstockheadlightsLOWBEAMONWALLAT40.jpg


Stock high beam pattern at 40’:
97MountaineerstockheadlightsHIGHBEAMONWALLAT40.jpg


Stock both beams pattern at 40’:
97MountaineerstockheadlightsBOTHBEAMSONWALLAT40.jpg


Stock low beam pattern at 10’:
97MountaineerstockheadlightsLOWBEAMONWALLAT10.jpg


Stock high beam pattern at 10’:
97MountaineerstockheadlightsHIGHBEAMONWALLAT10.jpg


Stock both beams pattern at 10’:
97MountaineerstockheadlightsBOTHBEAMSONWALLAT10.jpg


I need to include some daytime pictures of what the stock headlights look like so they can be compared to the new headlights.

At some point I will probably add the stock light output for my wifes 1996 Explorer which feels like it has better lighting, but looks to be all stock. Her headlights are bretty clear and the reflectors look like they are in good shape.


2. Install relays to power the lights from the battery


I will add to this thread as I get the stuff to put in it!


3. Document the stock light output with the relay modification.


I will add to this thread as I get the stuff to put in it!


4. Swap in my new headlights (With the original 55W H1 bulbs.


I will add to this thread as I get the stuff to put in it!


5. Document the new headlight output.


I will add to this thread as I get the stuff to put in it!


6. Swap in 35W 5000 HID H1 lights in the low beam.


I will add to this thread as I get the stuff to put in it!


7. Document the HID low beam.


I will add to this thread as I get the stuff to put in it!


8. Swap the 35W 5000 HID to the high beam position.


I will add to this thread as I get the stuff to put in it!


9. Document the HID high beam.


I will add to this thread as I get the stuff to put in it!


link to that housing? how much is it? and does it replace the current 2 piece setup with the corner lights and blinker being in a separate housing? so its all in one housing?


How about a daytime pic of the front of the truck? Those look really nice!


Thank you very much for doing such an in-depth thread. We need more threads like this on here. Just a note though, if you do continue to use HIDs in those, you will probably want to make a new cut-off shield to get a better pattern. It will take a little trial and error, but you can refer to other HID projectors for guidance. Should be passable though, even without modifying them.

Anyone asking for price or where to get it, ebay, around $180


Wow, I got a whole lot of replies all in one day!

I bought these headlights on Ebay from the seller autoshoppes. I got them for $63 plus $22 shipping. They were returned items that had a little bit of damage in the mounting for the turn signal lights and one of the flourecent rings doesn't work. These sell new on Ebay for around $190+++. If you are looking for this exact model try searching Ebay for: explorer ccfl led projector

Personally, I wouldn't pay the extra $$$ for the LED and CCFL, but I got a great deal on these so. I think if you want the versions that use LEDs for the halo lights and don't have the LED crap driving light think built in to them that you can get them for something like $140 for the pair.

I havn't installed these yet, that is why I havn't updated the later posts with the updated pictures. I was hoping to install these befor this weekend, but no luck. Hopefully befor Halloween.

I will include before/after pics of how they look on my Monsterneer also. Good sugestion.


This could very well decide which housing i go with for my hid bulbs... I will definitely be looking for your results.. hopefully soon!


Well, the project will not go exactly as I originally planned. One of my bulbs in the stock housings has lost its low beam. What I will do to include the brfor/after for just the relay upgrade is to use my wifes 96 Explorer to demonstrate that. I am hoping to get the new hedlights in without the relay kit so I can do a befor/after on thoes with the relay kit. Unfortunatly I have to replace the water pump sometime this week with only 1 or 2 evenings to do that with so I am not sure I will be able to get to it prior to going to Fresno for a halloween party this weekend.


OK, the project is now back on track. I stole a bulb from the F350 to run until I get the relays in. I did run across something interesting, when I pulled the dead bulb out it was a Sylvania 9007 bulb with a light blue tinge. I am not sure that the blue tinge wasn't from the low beam blowing, I'll know when I pull the other side later on in the project.

I also ordered a pair of 35W digital slim 4300K HID's from ebay. The seller is sunshinexenon and their store is called Pro-AutoBuy. The kit described as "SLIM HID Xenon Replacement Digital Kit H1" $26 to my door!


please post some pics when done they look great but would like to see them on the car.


Join the Elite Explorers for $20 each year.
Elite Explorer members see no advertisements, no banner ads, no double underlined links,.
Add an avatar, upload photo attachments, and more!
.


That is my full intention. I recorded a set of pics for the stock lights with the relay harness. Unfortunatly I have had to add 2 variables in the to mix other than the relay harness.

1. I had to replace the drivers side bulb which definatly changes the output of that headlight in a bad way. Much less defined and more diffused light as you will see in the pictures. I think before I move on to replacing the headlight assemblies I will swap the bulbs from driver to passenger side and take another pattern picture to prove what I think I am seeing.

2. The place that I found to get a good idea of the pattern now has a light installed on it so it is no longer a good dark wall. I found a different place, but it is a light colored wall and I can only get one distance from the wall.

Probably will finish up the stock with relay stuff this weekend and post thoes pictures. Then I will be ready for the new headlights with halogens. I received the HIDs the other day so I will be ready to progress to that step as soon as I record the projector/halogen results.


Back
Top