-
Ford Explorer Community - Maintenance - Modifications - Performance Upgrades - Problem Solving - Off-Road - Street
Explorer Forum Covers the Explorer ST, Explorer Sport, Explorer Sport Trac, Lincoln Aviator,
Mercury Mountaineer, Mazda Navajo, Ford Ranger, Mazda Pickups, and the Ford Aerostar
Register Today It's free!
You are using an out of date browser. It may not display this or other websites correctly.
You should upgrade or use an alternative browser.
You should upgrade or use an alternative browser.
Completed Project Kirby's 1991 Ranger Build Up
- Thread starter Kirby N.
- Start date
Use this prefix for completed projects that are not "How to" articles or threads asking for help.
Elite Explorer members see no advertisements, no banner ads, no double underlined links,.
Add an avatar, upload photo attachments, and more!.
Kirby N.
Elite Explorer
- Joined
- February 6, 2001
- Messages
- 2,654
- Reaction score
- 465
- City, State
- Colorado Springs, CO
- Year, Model & Trim Level
- 1991 Ranger
I also completed the front mount. On this one I wasn't able to run a tube across because the gas tank was in the way.
Spent so much time on the notching. It took forever to get it to fit tight.
Then I tacked up the tube to see if I could make it fit under the bed and get it out wide enough that it would clear the leaf spring.
Then while it was tacked I took off the bed with the help of the lift and took it out and cycled the suspension to make sure everything would clear.
I was pretty happy an everything was symmetrical (tougher than you think)- but I was still worried about the thing flexing and I didn't want to run a tube across through the middle of the bed. SO i decided to add another mount. Triangulation if you will.
Kirby N.
Elite Explorer
- Joined
- February 6, 2001
- Messages
- 2,654
- Reaction score
- 465
- City, State
- Colorado Springs, CO
- Year, Model & Trim Level
- 1991 Ranger
for the middle mount, I was able to use another through tube. For this one, I didn't think it was needed to use a base plate also.
I am bolting and welding the plates on. Overkill.
I also found a good axle mount from ruff stuff and some upper tabs from them as well. Plenty of down travel and up travel.


You can also see mounts for limit straps for the rear. I dont have the hardware to mount them yet.
Got it all painted up.


I am really happy with them. I did have to heat up the exhaust and bend it a little to clear.
Then I took out the tent on friday. It handles all the weight up high so well now!!!

I am bolting and welding the plates on. Overkill.
I also found a good axle mount from ruff stuff and some upper tabs from them as well. Plenty of down travel and up travel.
You can also see mounts for limit straps for the rear. I dont have the hardware to mount them yet.
Got it all painted up.
I am really happy with them. I did have to heat up the exhaust and bend it a little to clear.
Then I took out the tent on friday. It handles all the weight up high so well now!!!
Kirby N.
Elite Explorer
- Joined
- February 6, 2001
- Messages
- 2,654
- Reaction score
- 465
- City, State
- Colorado Springs, CO
- Year, Model & Trim Level
- 1991 Ranger
In the meantime the next project arrived in the mail...


Just as purdy as I expected- but honestly bigger than I expected. It is huge in person. Stoked to put it in!
Just as purdy as I expected- but honestly bigger than I expected. It is huge in person. Stoked to put it in!
Kirby N.
Elite Explorer
- Joined
- February 6, 2001
- Messages
- 2,654
- Reaction score
- 465
- City, State
- Colorado Springs, CO
- Year, Model & Trim Level
- 1991 Ranger
The discerning eye might also have noticed an issue with my passenger brake rotor.


I grabbed a foot full of parking brake in the last snow storm to do a little spinny. I think I got carried away.
I have ordered another set of rotors and currently have them at a machine shop getting machined for 5 on 5.5.
I grabbed a foot full of parking brake in the last snow storm to do a little spinny. I think I got carried away.
I have ordered another set of rotors and currently have them at a machine shop getting machined for 5 on 5.5.
- Joined
- August 3, 2000
- Messages
- 35,116
- Reaction score
- 12,052
- City, State
- NORTH IDAHO, 7B
- Year, Model & Trim Level
- B2 "Slightly" Modified
- Callsign
- FOURTEN
soo much want!!!
Kirby N.
Elite Explorer
- Joined
- February 6, 2001
- Messages
- 2,654
- Reaction score
- 465
- City, State
- Colorado Springs, CO
- Year, Model & Trim Level
- 1991 Ranger
Ha! Thanks man. It has been really special. My dad has always wanted a big garage with a lift. The home he has lived in for 35 years was pretty worn out. He built it for my family when I was 4. Over Covid we built a new house for him and my mom to live thier life out in. They are 72 now. We put the garage he wanted on it and it is 2k sq feet and insulated and heated. Its Been really fun to work in with him. He was the general contractor and I did a lot of the work that was easy. It’s all slab on grade and we put big hallways in case they need to wheel down them. I did some sweet tile, marble and granite finishes. My mom got her kitchen and pantry that she has always wanted. They complained and thought it was too much the whole time, but now they love it and are proud of it.I need a garage like that
fordpickupman
Well-Known Member
- Joined
- March 18, 2011
- Messages
- 311
- Reaction score
- 263
- City, State
- Cascade, ID
- Year, Model & Trim Level
- 94 XLT
71 F250 Fummins
Love that Ranger!
Kirby N.
Elite Explorer
- Joined
- February 6, 2001
- Messages
- 2,654
- Reaction score
- 465
- City, State
- Colorado Springs, CO
- Year, Model & Trim Level
- 1991 Ranger
Here are some more pictures of the shocks mounted and traveling. The limiting straps look too long in these pictures- the only time they actually get utilized is when both wheels are drooped out at the same time- like when catching some air.


The compressed shock uses almost all of its compression travel. With a little more weight or speed it would completely use it. When I set it up, it didn't have the tent or the bad cage on- so I thought I had plenty of compression. once the weight was added it is getting pretty close to running out. I have considered doing something to bring the rear up a little because it does sag with the bed cage and the tent on- that would give me back some more compression. So far it is working well though. Also- the tire does not contact the shock on the top when articulated- it gets close.

I also dig how it looks in the wheel wells at ride height

The compressed shock uses almost all of its compression travel. With a little more weight or speed it would completely use it. When I set it up, it didn't have the tent or the bad cage on- so I thought I had plenty of compression. once the weight was added it is getting pretty close to running out. I have considered doing something to bring the rear up a little because it does sag with the bed cage and the tent on- that would give me back some more compression. So far it is working well though. Also- the tire does not contact the shock on the top when articulated- it gets close.
I also dig how it looks in the wheel wells at ride height
- Joined
- November 29, 2000
- Messages
- 10,633
- Reaction score
- 5,022
- Location
- USA
- City, State
- San Diego, PRofK
- Year, Model & Trim Level
- 1994 XLT
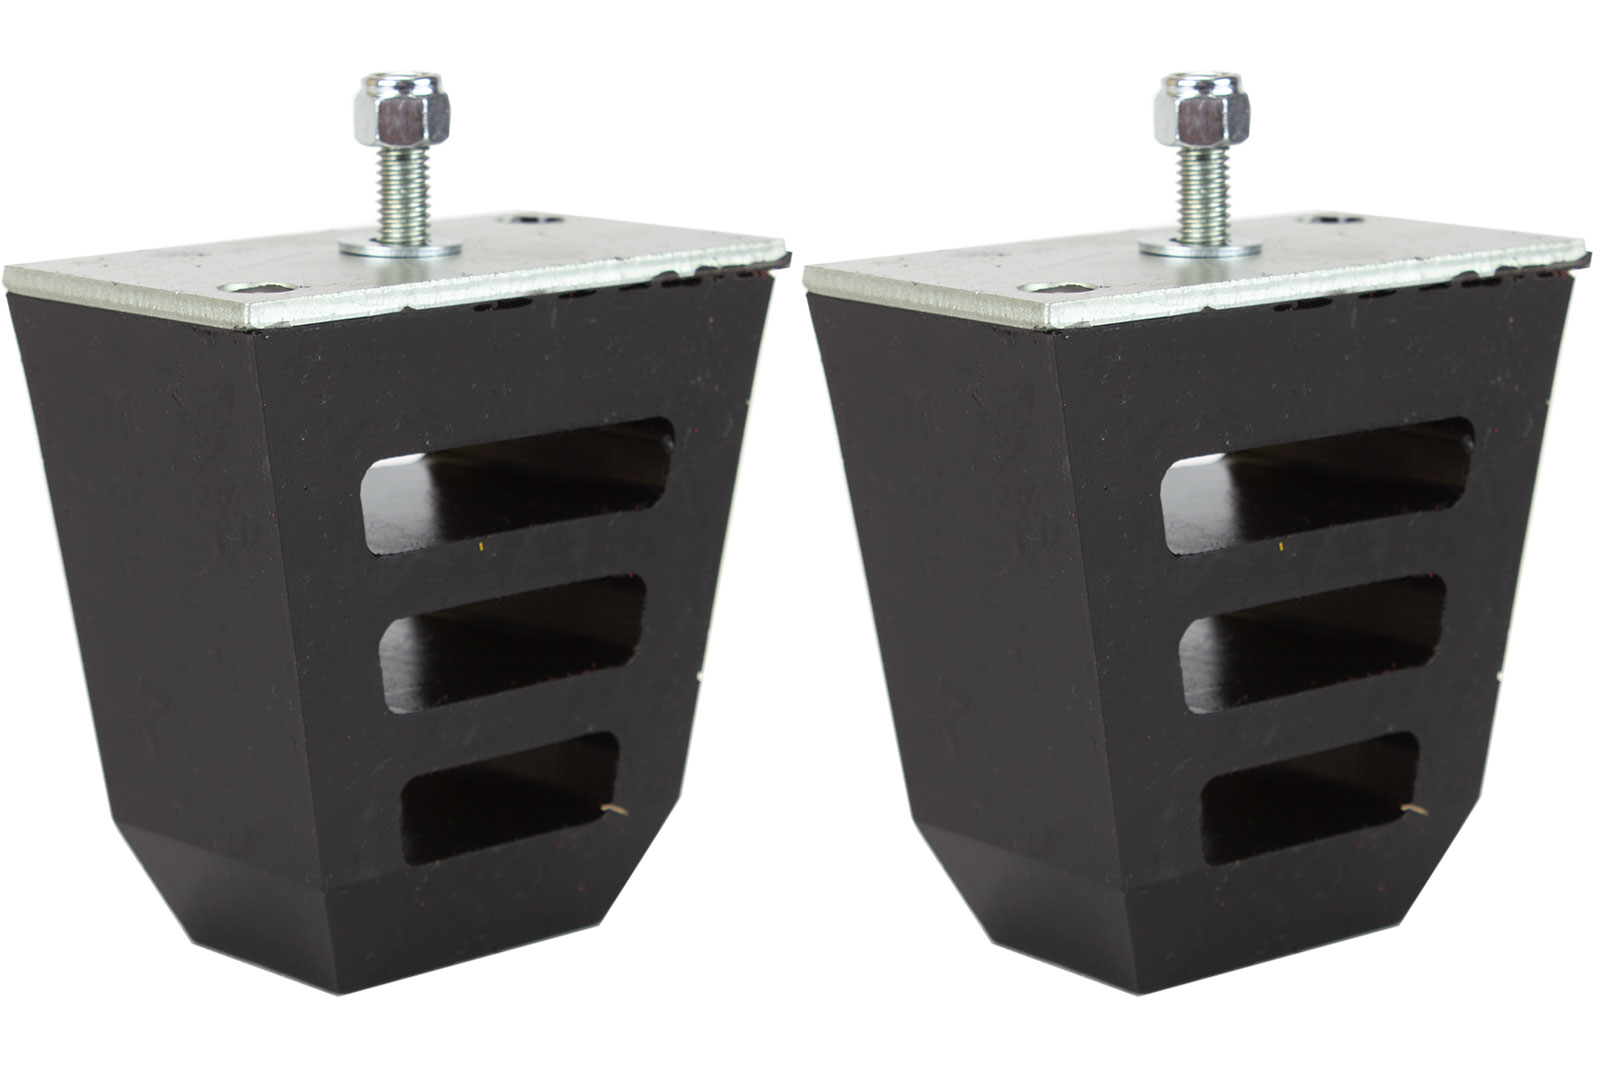
I have bump stops for my rear suspension. They are bolted to the bottom of the frame above the U-bolt plates.
Like these
 www.ruffstuffspecialties.com
Like these
Bump Stop Pair 4.5"x4.5"x2.5"
Check out the deal on Bump Stop Pair 4.5"x4.5"x2.5" at RuffStuff Specialties
- Joined
- November 29, 2000
- Messages
- 10,633
- Reaction score
- 5,022
- Location
- USA
- City, State
- San Diego, PRofK
- Year, Model & Trim Level
- 1994 XLT
My next mod will be air bumps up front and new rear shocks, Radflo to match the fronts. Then new front seats or a doubler....then...
- Joined
- August 3, 2000
- Messages
- 35,116
- Reaction score
- 12,052
- City, State
- NORTH IDAHO, 7B
- Year, Model & Trim Level
- B2 "Slightly" Modified
- Callsign
- FOURTEN
Oooooh new front seats!! What kind? Sport trac seats make awesome ranger seats
Some Mazda b4000 also have really nice seats
Some ranger dudes been using escape seats too
Or aftermarket!
Some Mazda b4000 also have really nice seats
Some ranger dudes been using escape seats too
Or aftermarket!
Kirby N.
Elite Explorer
- Joined
- February 6, 2001
- Messages
- 2,654
- Reaction score
- 465
- City, State
- Colorado Springs, CO
- Year, Model & Trim Level
- 1991 Ranger
Ok- I finally got some time to work on the doubler. I went to the pull and pay in the heat and pulled the donor parts.
I took parts from 2 2001 exploder sports.
First off, took the front off of a case- luckily it was already pulled.

Then I used my trusty sawzall to hack off the sides of the case- carefully making sure not to cut into the ring gear.

Then I wacked the case apart to get out the ring gear.

Next I compressed the little clip to get out the planetary gears.
Lastly, because my Tcase is a 1991- I know my internals are likely going to be 4 gear. I definitely wanted a 6 gear in both cases, so I grabbed another set of planetary gears out of another 2001 Exploder sport.

The time bomb SOHC worked in my favor- glad there was 2 trucks there I could grab parts off of and glad they both already had the cases out.
With this pile of parts, I can get the doubler assembled without pulling out my current transfer case and putting my truck out of commission while I put it together. I didn't feel bad about tearing apart 2 transfer cases either- the yard charged me $30 a piece for the planetary gears! WOAH. I was expecting $10.
I took parts from 2 2001 exploder sports.
First off, took the front off of a case- luckily it was already pulled.
Then I used my trusty sawzall to hack off the sides of the case- carefully making sure not to cut into the ring gear.
Then I wacked the case apart to get out the ring gear.
Next I compressed the little clip to get out the planetary gears.
Lastly, because my Tcase is a 1991- I know my internals are likely going to be 4 gear. I definitely wanted a 6 gear in both cases, so I grabbed another set of planetary gears out of another 2001 Exploder sport.
The time bomb SOHC worked in my favor- glad there was 2 trucks there I could grab parts off of and glad they both already had the cases out.
With this pile of parts, I can get the doubler assembled without pulling out my current transfer case and putting my truck out of commission while I put it together. I didn't feel bad about tearing apart 2 transfer cases either- the yard charged me $30 a piece for the planetary gears! WOAH. I was expecting $10.
Kirby N.
Elite Explorer
- Joined
- February 6, 2001
- Messages
- 2,654
- Reaction score
- 465
- City, State
- Colorado Springs, CO
- Year, Model & Trim Level
- 1991 Ranger
Next I started the assembly process:
I followed the instructions here:
They were spot on with the exception of the clip that holds the bearing in the front section- it was redesigned to mimic the factory design. Noted below.
Here are the parts on the table ready to go: (the shifting section was still in the box)

First, I got the front portion ready by applying some tape to the face to hopefully keep that purdy anodizing in good shape. Unfortunately, I did garf it up a little when it was all done. Luckily it will be hidden inside the transmission adapter.

Next I cleaned up the ring gear (sun gear I think) and pressed it into the front section- carefully putting the tapered section in first.


It is supposed to fit just above flush.
Next, I pressed the shaft out of the planetaries. This required removing a circlip before pressing them apart. The clip was a royal pain. Those clips took the longest part of assembly. I need a better set of pliers I guess.

The next step includes putting the original bearing that was pressed on the shaft on top of the planetary gear set into the case. The video instructions are not accurate on this step- behemoth has changed designs to use the original clip and retention setup that is the same as factory. This took a lot of head scratching and a call to behemoth for me to sort out.
Here is the channel the clip lives in:

And here is a picture with that clip in place. I got the clip from one of the donor cases- the one off my case would have been fine too.

Once that clip is in place, you slide in the original bearing. I priced new ones of these, and I could only find a japanese bearing and it was $60 so I decided the original bearing out of my donor would be fine. Then, as it was- but now with a new anodized case in the mix- you press the shaft back into the gear set and the bearing. There is also a thrust washer that goes in between the bearing and planetaries. Lastly, the stubborn little clip goes into place.

And then a seal goes in. I am going to wait on that.
Next step is the shift section. You slide the collared shift gear into the shift fork and set aside. I like the quality on this whole section of the case. Super nice.

Also- note the o-ring seal on this section. IT would have been acceptable to just use RTV, but I am impressed behemoth put in a seal. I hate RTV.


The last section is the favorite because it involved the Behemoth spud shaft. Beef.

It involves assembling the spud shaft over the rear section of the case with the vent, a new bearing and a some bushings. Its really similar to the front install, but with the custom shaft.
Finally, we have a complete doubler, ready to be bolted to the front of my existing transfer case and then figuring out some shifters.

Of course it will be taken apart to bolt the pieces to the case and glue them.
There are 4 oil passage holes that will allow the cases to share oil. as you clock the center shifting case, the holes line up with 4 holes, or 3 or 2. I have 4 holes aligned here and the shifter handle near the factory location. I dont know if this will be the final resting place, but its a good place to start mockup. You can also see the garf I made in the front case. Ugh.

I might get some time to start messing with it in the next week or two. However, I have a camping trip this weekend- so I probably won't want my truck to be down. I might just add some tube to the bumpers this week and mess with the doubler next week or so.
I followed the instructions here:
They were spot on with the exception of the clip that holds the bearing in the front section- it was redesigned to mimic the factory design. Noted below.
Here are the parts on the table ready to go: (the shifting section was still in the box)
First, I got the front portion ready by applying some tape to the face to hopefully keep that purdy anodizing in good shape. Unfortunately, I did garf it up a little when it was all done. Luckily it will be hidden inside the transmission adapter.
Next I cleaned up the ring gear (sun gear I think) and pressed it into the front section- carefully putting the tapered section in first.
It is supposed to fit just above flush.
Next, I pressed the shaft out of the planetaries. This required removing a circlip before pressing them apart. The clip was a royal pain. Those clips took the longest part of assembly. I need a better set of pliers I guess.
The next step includes putting the original bearing that was pressed on the shaft on top of the planetary gear set into the case. The video instructions are not accurate on this step- behemoth has changed designs to use the original clip and retention setup that is the same as factory. This took a lot of head scratching and a call to behemoth for me to sort out.
Here is the channel the clip lives in:
And here is a picture with that clip in place. I got the clip from one of the donor cases- the one off my case would have been fine too.
Once that clip is in place, you slide in the original bearing. I priced new ones of these, and I could only find a japanese bearing and it was $60 so I decided the original bearing out of my donor would be fine. Then, as it was- but now with a new anodized case in the mix- you press the shaft back into the gear set and the bearing. There is also a thrust washer that goes in between the bearing and planetaries. Lastly, the stubborn little clip goes into place.
And then a seal goes in. I am going to wait on that.
Next step is the shift section. You slide the collared shift gear into the shift fork and set aside. I like the quality on this whole section of the case. Super nice.
Also- note the o-ring seal on this section. IT would have been acceptable to just use RTV, but I am impressed behemoth put in a seal. I hate RTV.
The last section is the favorite because it involved the Behemoth spud shaft. Beef.
It involves assembling the spud shaft over the rear section of the case with the vent, a new bearing and a some bushings. Its really similar to the front install, but with the custom shaft.
Finally, we have a complete doubler, ready to be bolted to the front of my existing transfer case and then figuring out some shifters.
Of course it will be taken apart to bolt the pieces to the case and glue them.
There are 4 oil passage holes that will allow the cases to share oil. as you clock the center shifting case, the holes line up with 4 holes, or 3 or 2. I have 4 holes aligned here and the shifter handle near the factory location. I dont know if this will be the final resting place, but its a good place to start mockup. You can also see the garf I made in the front case. Ugh.
I might get some time to start messing with it in the next week or two. However, I have a camping trip this weekend- so I probably won't want my truck to be down. I might just add some tube to the bumpers this week and mess with the doubler next week or so.
Elite Explorer members see no advertisements, no banner ads, no double underlined links,.
Add an avatar, upload photo attachments, and more!.
- Joined
- August 3, 2000
- Messages
- 35,116
- Reaction score
- 12,052
- City, State
- NORTH IDAHO, 7B
- Year, Model & Trim Level
- B2 "Slightly" Modified
- Callsign
- FOURTEN
Gorgeous!! Will transform that beautiful ranger into an even more beautiful ranger
Explorer Features


Explorer Features
Similar threads
- Replies
- 15
- Views
- 1,322
- Replies
- 10
- Views
- 1,862
- Replies
- 25
- Views
- 14,726
- Replies
- 1
- Views
- 1,885
- Replies
- 17
- Views
- 3,266