ld50 Explorer mods revisited | Page 6 | Ford Explorer Forums

  • Register Today It's free!

ld50 Explorer mods revisited

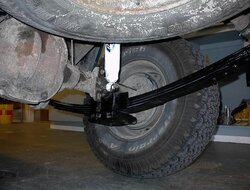
I think I have finished mucking with my rear shock mounts

Okay, true to their word Warrior made me up a new set of plates. I told them not to bother with the powdercoating because they just did not seem to care about raising the mount point for me even when I practically begged them to. So I figured I would be doing some alterations to them anyway, so I would paint them myself. I am happy they came through. That is good costomer service, and I value that. They were only out to correct the problem with my sway bar after all. ( he he, well we know nothing is gunna hit it now anyway)

Here they are
 

Attachments

  • new plates (1).jpg
    new plates (1).jpg
    29.6 KB · Views: 2,180


Join the Elite Explorers for $20 each year or try it out for $5 a month.

Elite Explorer members see no advertisements, no banner ads, no double underlined links,.
Add an avatar, upload photo attachments, and more!
.


You know I spent alot of time figuring what I would do here, and I hope I don`t let anyone down when I tell you that I didn`t mount the shocks to the plates after all. As a matter of fact my new plates are still sitting in the box they came in.


First I got some hardware together, I got a couple 5/8" bolts about three inches long, with only about two inches of thread on the end. Then after undoing my shocks, I used a couple washers and a nut to get this on the bottom end of the shock:
 

Attachments

  • shock mount rear to axle bottom bolt.jpg
    shock mount rear to axle bottom bolt.jpg
    23.6 KB · Views: 2,167


Then I used the brackets that had secured my sway bar to my axle as a mount point by drilling holes in them till it looked something like this:
 

Attachments

  • shock mount rear to axle.jpg
    shock mount rear to axle.jpg
    37.1 KB · Views: 2,187


Alright, THEN I had to get the top of the shock higher right? Or it would bottom out for sure. If you recall, I previously had modded the upper mounts to bring them lower.

So I just used the same idea and same hardware to mount it above the crossmember like so:
 

Attachments

  • shock mount rear to axle upper.jpg
    shock mount rear to axle upper.jpg
    39.2 KB · Views: 2,154


This mount method is probably only possible since I have the body lift in, and still is very close to bottoming the shocks. The piping is about 2 inches long and it`s no use going longer because the shock can`t fit through the hole anyway
 

Attachments

  • shock mount rear to axle both.jpg
    shock mount rear to axle both.jpg
    37.6 KB · Views: 2,223


I grabbed a forklift since I was at work and lifted one front side tire nice and high and used the floor jack to try to get a rear tire to stuff up the the point where they rub. I didn`t quite get there, and by my calculations was SOO close to bottoming.

I took a hammer to those brackets redneck style until I got them bent downwards till the mounts were lowered a little over 1/2 and inch while still being able to undo the mounts. I bolted a bolt through the holes with some strong, thick washers to maintan a flat mounting surface while I did the hammering, then played with it till the angle was right.

After that, it looks as if I have enough room to still stuff the tires as much as they can without worry. This is VERY cool, because now I have much more room to play with my droop later on (mua ha ha!)

It is also noteworthy to add that the amount that the shocks have to travel in relation to the stuffing and drooping of the tires is now reduced, since they are mounted closer to the diff. On the other hand, you would figure that this would cause more sway, but I have not yet noticed a difference in the feel of it.

Next episode:

My customized bra!


picked up a Ford bra for cheap and noticed it was made for a truck with the airdam on. Also it was made to cover the bumper which I don`t like, so I trimmed it to leave the bumper showing.
A few weeks later I got rid of it because it got full of mud and flapped on the hood part when I was on the street. I won`t post a pic now but it will be in the next few that you see.


Next direction on my mods!!!

Well, kinda funny that I played around with my shocks the other day because IT`S ALL CHANGING!

-Should add that there may be too much sway back there with the shocks moved in, don`t think I like that setup after all, and those spacers won`t help. oh well.

I`ve decided to do the world famous "Zimmerman mod" to my rear suspension. I got a killer deal on some Ranger main leafs, $30 CDN for both (that`s a couple bucks US!).
I got in touch with a guy off bc4x4.com and went there and watched him take a mount and shackle off of one of them, and suggested I give him an extra ten bucks since he only wanted twenty to begin with. He said he was just happy to help a fellow Ford enthusiast, but I felt like I was ripping him off! I must be nuts.
Anyway, that`s the direction I`m going now.

Tomorrow I am preparing for it by modifying my emergency brake cable to work with the mod, and lengthening my brake line to the rears while I`m at it. Got everything figured out in my mind at least. Got to have my emergency brake working for this to be a good mod.

I`ll probably make a bracket for the lower shock mounts to sit toward the wheels more, might even need longer ones, but we`ll see how it plays out.


~ Zimmerman rear spring mod ~

Well I did the Zimmerman the other day. In what seems to be an LD50 tradition, I did it alone, and got lots of pics for y`all. I did it a little differently too, so check it out.

First of all, I snapped a pic of my droop before starting:
 

Attachments

  • zimmerman before.jpg
    zimmerman before.jpg
    37.7 KB · Views: 2,164


So I did one side at a time, basically following proceedures I used for my add-a-leaf installation. This time I was able to save the bolts that secure the leaves together though.
I pried apart the binder that holds the leafs together towards the front, and determined where I would cut. To get a good cut line for all four cuts I used a ruler I had handy, and rested it against the loop and marked my cut.
 

Attachments

  • zimmerman 1.jpg
    zimmerman 1.jpg
    28.2 KB · Views: 2,157


I cut it with a cutting wheel on a hand grinder, and cleaned it up with a grinding wheel. I needed to make sure I would have a smooth edge for the leaf to slide on.
 

Attachments

  • zimmerman 2.jpg
    zimmerman 2.jpg
    36.4 KB · Views: 2,146


When I reassembled, I left out the overload leaf. There was 3 spacers between my leaves, two thick and one thin. I assembled like this, from top down:

-Ranger main-
-thick spacer-
-cut Ex main-
-thick spacer-
-Ex leaf-
-thin spacer-
-Ex leaf-
-add-a-leaf-

(No spacer between add-a-leaf and lowest ex spring)

I left out the overload to possibly increase stuffing flex AND I knew I would need a longer bolt to hold the leaves together if I didn`t, so that made it even easier to decide.

I put grease on all the spring ends that would contact each other and when it was all together, I cleaned it up a bit and sprayed some rust paint primer on them while I tackled the next problem.

That problem is keeping the springs from "splaying apart" while wheeling, and getting all out of align.

I dug some 1/4 inch steel plate from the scrap bin that was 3" wide, and cut it so it was approx. 4 inches wider than the space between my u-bolts. I cut some 6" long pipe nipples that the u-bolts would fit through, in half, and then used the u-bolts as a guide on where to weld the nipples to the plate.

Eventually I had this:
 

Attachments

  • zimmerman 5.jpg
    zimmerman 5.jpg
    33.9 KB · Views: 2,137


I used the grinder to shape a circular curve for the axle shaft until it would fit in place while allowing everything else to be bolted up tight.

Checking fit
 

Attachments

  • zimmerman 6.jpg
    zimmerman 6.jpg
    32.2 KB · Views: 2,361


When I had `er figured out, I bolted it up. The plate is very snug against the springs, and they won`t be moving sideways now.

I gave it all a blast of black rust paint to nicen it up, and it looks pretty:
 

Attachments

  • zimmerman 7.jpg
    zimmerman 7.jpg
    38.4 KB · Views: 2,159


I already lengthened my brake line with a three inch piece of hard line installed between the old hard line and the hose, nothing fancy.
I didn`t redo my emergency brake cable yet, but it will get ripped out for sure if I don`t.


I`ll get that brake cable set up in a few days, and will tackle the lower shock mounts again after I take her for a good romp. Trying to get out next weekend to test it out.

I did get a little lift out of this, I don`t know if it`s too much yet, but I figured if I want to bring it down then I will shorten my shackles.

It is a softer ride now, and a little bouncier back there. That`s all I can say at this point. I have to admit, there is going to be a lot of stress on that little ranger spring. I wonder how it will hold up when some good side to side stress is applied. I may be redoing this job every so often if they tend to bend.
-scratch that, if they get all screwed up I`ll go with OME springs or make my own pack.


Just an update!

Well I`m snowballing here and haven`t had time to post the three new mods I have on my truck!

I just wanted to say since the "Zimm", I have extended my brake cable and farted around out back of my work. (my very own test pit) I think I will leave the rear shocks just where they for now because man I tell ya, I`m almost getting full shock travel out of them just where they are mounted now. I don`t want to mess with them just yet, and It`s actually a pretty good setup after all.

I am wishing I cut my main leafs a little longer though. They`re not bending the Ranger leaf or anything yet, but it`s a worry I have that they might.

I should be back soon with pics of the brake cable setup, my new wheel spacer install, AND I now have a custom exhaust that I had put in. I had it planned, just not so soon.
ALSO I just might have my own front swaybar disconnect system made soon, I`m just trying to get my butt in gear.
I want to do some tough wheeling this weekend to see how everything holds up, so I`m getting my cuzin to come with me to Stave lake on Sunday and check a rocky trail out-or two.


New stuff

Swaybar disconnect

I decided to try just doing up one side that I could take apart while leaving one side hooked up.

I took the nuts off the "bone" that secures the bar to the TTB and sprayed some red marking paint on the threads that were showing. I used that to tell me where to drill some holes in the bolts.

Aftere the holes were drilled I used a couple of those keeper pins I had kicking around to hold it there. Any way:

Here`s what I did
 

Attachments

  • quick disconnects.jpg
    quick disconnects.jpg
    25.6 KB · Views: 2,111


Join the Elite Explorers for $20 each year or try it out for $5 a month.

Elite Explorer members see no advertisements, no banner ads, no double underlined links,.
Add an avatar, upload photo attachments, and more!
.


Emergency brake cable extension

First, what I needed to extend was the bracket just before the rear wheel, and then extend the cable itself.
* note. the brake cable system is self adjusting, there is no easy way of getting more slack out of the cable *

I grabbed some assorted pipe fittings and eventually had these pieces:
 

Attachments

  • second brake cable extension pieces.jpg
    second brake cable extension pieces.jpg
    32.6 KB · Views: 2,073


Featured Content

Back
Top