Swaybar link ends replacement | Ford Explorer Forums - Serious Explorations

  • Register Today It's free!

Swaybar link ends replacement

Berserkers360

Member
Joined
June 24, 2021
Messages
36
Reaction score
5
City, State
Texas city, Texas
Year, Model & Trim Level
03 Mercury mountaineer
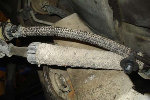
Tomorrow and Thursday I will switch out all my front and rear sway bar and links with the bushings ass they are no longer good the back ones have no bushings at all and the front one the last one is already showing signs of deteriorating. My question is would it be better to just cut them off since I will not be needing them I've already placed an order and have front and rear Moog sway bar and links and bushings. I have seen videos where the sway bar end links get rusted and just crack so to save me the trouble would it be better just to cut them or try to on screw them. Also how much voltage does a regular alternator handle or how can I check how many amps is my alternator


Join the Elite Explorers for $20 each year.
Elite Explorer members see no advertisements, no banner ads, no double underlined links,.
Add an avatar, upload photo attachments, and more!
.


It's easier to cut them. Just make sure the bushing washers aren't seized as well or you may have to cut again. Also have something to hold the sway bar in place on 1 side before you cut just in case it happens to spring back when the pressure is removed. As for the alternator, your voltage should be between 13.5 and 14.5 with the vehicle running at idle. 14. 0 to 14.4 is best. You can use a standard volt meter to check it. The red lead goes to the hot wire on the alternator and the black touches the case for ground. If you want to know the amperage, there may be a tag on it. I would say Google it for the vehicle but if you don't know if it's the original part from the factory, that info may not match. You would need an ammeter or Amp hook to do it yourself, or just take the car to any of the big box auto parts stores. They should be able to check it on the car.


It's easier to cut them. Just make sure the bushing washers aren't seized as well or you may have to cut again. Also have something to hold the sway bar in place on 1 side before you cut just in case it happens to spring back when the pressure is removed. As for the alternator, your voltage should be between 13.5 and 14.5 with the vehicle running at idle. 14. 0 to 14.4 is best. You can use a standard volt meter to check it. The red lead goes to the hot wire on the alternator and the black touches the case for ground. If you want to know the amperage, there may be a tag on it. I would say Google it for the vehicle but if you don't know if it's the original part from the factory, that info may not match. You would need an ammeter or Amp hook to do it yourself, or just take the car to any of the big box auto parts stores. They should be able to check it on the car.
Already checked the alternator. Thanks. Was asking, because I'm going to add an additional pusher fan in front of the condenser. As far as the sway bar endings tomorrow I will start and if any questions or something that I can't do ill post about it. I'm looking in researching it should be no difficult job I will be doing it alone and thanks for the tip to hold the sway bar


Already checked the alternator. Thanks. Was asking, because I'm going to add an additional pusher fan in front of the condenser. As far as the sway bar endings tomorrow I will start and if any questions or something that I can't do ill post about it. I'm looking in researching it should be no difficult job I will be doing it alone and thanks for the tip to hold the sway bar
You should have no problems adding the pusher fan. Just have it on its own circuit and fused or power it through a relay so as not to overload whatever circuit you tie into. Feel free to ask questions on the swaybar links. If I can't answer or don't answer quick enough, I'm sure somebody will.


You should have no problems adding the pusher fan. Just have it on its own circuit and fused or power it through a relay so as not to overload whatever circuit you tie into. Feel free to ask questions on the swaybar links. If I can't answer or don't answer quick enough, I'm sure somebody will.
Thank you very much. Tomorrow I'll begin with the front side first. The drivers side looks like it could still hold since somebody already replaced the Original endlink. But I'll just do it as well to have all four new. Is there a torque specification? All the videos I seen just say to thighten till the bushings start pressuring. As far is the fan , I bought 50 ft. Of black and red 18 gauge wire, an inline fuse wire 16 gauge. . Just need the switch with led and relay, is a 30 amp relay good?


Thank you very much. Tomorrow I'll begin with the front side first. The drivers side looks like it could still hold since somebody already replaced the Original endlink. But I'll just do it as well to have all four new. Is there a torque specification? All the videos I seen just say to thighten till the bushings start pressuring. As far is the fan , I bought 50 ft. Of black and red 18 gauge wire, an inline fuse wire 16 gauge. . Just need the switch with led and relay, is a 30 amp relay good?
When the bushings start to compress is fine.

30 Amp will work as long as the fan doesn't draw more than that.


When the bushings start to compress is fine.

30 Amp will work as long as the fan doesn't draw more than that.
Well it's about that time I start the swaybar end links. I'm also going to install a Kenwood ddx5901 HD that a homeboy gave me clear but I just can't figure it out I bought the harness and all but idk.


Well it's about that time I start the swaybar end links. I'm also going to install a Kenwood ddx5901 HD that a homeboy gave me clear but I just can't figure it out I bought the harness and all but idk.
Have fun. I am finishing up a clutch job on a Freightliner.

If you bought the harness, the wires should be color coded. Red, yellow, black for memory, 12v, and ground. Then grey, white, green, and purple for speakers, black stripped is negative, solid color is positive. Might have a blue wire or 2. 1 is for power antenna and the other is remote turn on for an Amp. If you have an orange or another color, it may be the illumination/dimmer wire to dim the display when you turn on headlights. Solder and heat shrink the connections if you can. If not try to use shrinkage butt connectors. Don't twist and tape. Seen cars burn to the ground from that. If you need more help, either post pictures for me to see what you do, or Google it. There is bound to be 1000's of videos on YouTube for it.
I've already finished the front sway bar end links. And I already took out the back once with the sway bar. Just waiting on Mr Amazon to show up and bring you my parts to change them in the meantime I'm going to start the radio stuff. Although yes there is a lot of Google and you too none of them show the exact way of a Mercury mountaineer premier edition, and it's either Ford Explorer expedition or some other Ford. But not mountaineer and it might be brothers and cousins but I just have to pay more attention I will post pictures if I need to and also my original rare DVD player don't work so I'm going to look into that too


I've already finished the front sway bar end links. And I already took out the back once with the sway bar. Just waiting on Mr Amazon to show up and bring you my parts to change them in the meantime I'm going to start the radio stuff. Although yes there is a lot of Google and you too none of them show the exact way of a Mercury mountaineer premier edition, and it's either Ford Explorer expedition or some other Ford. But not mountaineer and it might be brothers and cousins but I just have to pay more attention I will post pictures if I need to and also my original rare DVD player don't work so I'm going to look into that too

IMG_20210728_093734.jpg


Nice looking links. Never seen that style before.

The radio harness is gonna be the same whether it's Ford, Lincoln, or mercury. The only difference would be if you have a factory Amp and sub. Just Google your year, make, and model and you will find a diagram for your truck. Or search the forums. Should find them here too. But if you bought something like a Metra harness that plugs into the factory connectors, then that will connect color for color to the radios harness. If you have the factory sub, you will use the remote wire from the radios harness to connect the remote wire to the Amp. It only gets remotely complicated if you are cutting connectors off and hardworking it in, in which case find the diagram. Your mountaineer uses a Ford harness.
Right now I'm looking at my harness from the radio and all colors or the majority of them are not in my after market harness for example there's pink red and green all these colors that clearly are not shown anywhere look at the picture

IMG_20210728_130247.jpg


Thats the harness that plugs into the factory radio. You said you bought the harness. The one you bought will splice onto the harness of your aftermarket radio. If you are trying to connect the aftermarket radios harness directly to the factory harness, then you need the diagram. Send pics of all of your harnesses so that I can better direct you.
Right now I'm looking at my harness from the radio and all colors or the majority of them are not in my after market harness for example there's pink red and green all these colors that clearly are not shown anywhere look at the picture

Right now I'm looking at my harness from the radio and all colors or the majority of them are not in my after market harness for example there's pink red and green all these colors that clearly are not shown anywhere look at the picture

View attachment 340934


Nice looking links. Never seen that style before.

Those are Moogs newer design, where the bushing is hard, hollow, plastic, and makes noise. Various people have come up with better alternatives but since this type doesn't compress or wear the same, he should really keep an eye on tension and nut tightness in case the nut starts to unscrew. Some people advise installing the bolt with the nut facing down towards the road so if it comes off, less likely to lose the whole bolt before you notice.

Unfortunately the way Moog redesigned this "problem solve" with a sleeve integral to the nut, it is not as easy as just reusing the bolts and nuts with a conventional bushing if the bushings fail, will need new nuts and washers for the threaded end... maybe save the old washers to clean and reused and get new nuts if the bushings need replaced later.


I was not aware of such nonsense. When I did my links and bushings, I used energy suspension. Same old design, but red polyurethane bushings. Held up pretty well so far.


Thats the harness that plugs into the factory radio. You said you bought the harness. The one you bought will splice onto the harness of your aftermarket radio. If you are trying to connect the aftermarket radios harness directly to the factory harness, then you need the diagram. Send pics of all of your harnesses so that I can better direct you.
This is the harness i bought. The colors are the universal. The colors on my Merc are way different

IMG_20210728_151226.jpg


Those are Moogs newer design, where the bushing is hard, hollow, plastic, and makes noise. Various people have come up with better alternatives but since this type doesn't compress or wear the same, he should really keep an eye on tension and nut tightness in case the nut starts to unscrew. Some people advise installing the bolt with the nut facing down towards the road so if it comes off, less likely to lose the whole bolt before you notice.

Unfortunately the way Moog redesigned this "problem solve" with a sleeve integral to the nut, it is not as easy as just reusing the bolts and nuts with a conventional bushing if the bushings fail, will need new nuts and washers for the threaded end... maybe save the old washers to clean and reused and get new nuts if the bushings need replaced later.


Yeah I was noticing when I got them but I really needed something cheap for the meantime because it was making a lot of noise and my back sway bar links and sway bar it's just loose hang in there so it'll be temporarily this week I hit good hours at work plus I cashed 40 hours of PTO so hopefully I could redo this with the better endlinks. Also I saw a offer you can't resist since I'm looking for brakes as well they have the full set front and back rotor disc and brake pads for 100 some I will post a link


Amazon product ASIN B07GT7SJZB


This is the harness i bought. The colors are the universal. The colors on my Merc are way different

View attachment 340942
Ok. Don't worry about the colors on your merc. I will explain what you bought.

The big connector has the red, yellow, and black. Those are (red) switch or ignition power that tells the radio to turn on, 12v memory (yellow) which maintains your clock and radio presets, and ground (black), self explanatory. The orange is the illumination or dimmer wire. Your aftermarket head unit may or may not have that. It dims the display at night when you turn on your headlights. The white and gray are the front speakers, and green and purple are rear speakers. Connect all of the above wires to your aftermarket head units harness. Will explain the rest in another post in just a few minutes.


Yeah I was noticing when I got them but I really needed something cheap for the meantime because it was making a lot of noise and my back sway bar links and sway bar it's just loose hang in there so it'll be temporarily this week I hit good hours at work plus I cashed 40 hours of PTO so hopefully I could redo this with the better endlinks. Also I saw a offer you can't resist since I'm looking for brakes as well they have the full set front and back rotor disc and brake pads for 100 some I will post a link


Amazon product ASIN B07GT7SJZB
Everyone's entitled to their own opinion but mine is that Detroit Axle parts are generic chinese import junk. I'd get a major brand rotors, and pads is a long topic onto itself but I've been happy with Autozone Duralast Gold ceramics, which have a lifetime warranty so pay once and free pads for life thereafter, though I got them years ago as first replacement set so "for life" was a longer amount of time (similar major brand ceramics are cheaper on Rock Auto or Amazon w/o a lifetime warranty), and if you tow a lot then severe duty semi-metallics may be the better option.

Front swaybar end links, when (not if) my newer design Moogs fail again, I'm definitely doing it the way Swhawaii did his, already have the larger diameter sway bar bolts (lifetime replacement from Autozone but I didn't want their crap bushings so bought Moog before realizing they had changed the bushing design) but those larger diameter bolts/sleeves/washers/nuts kit can be hand in a kit on Rock auto for under $10 (plus S/H), then I'd just not use the bushings in the kit, instead those oversized Energy Suspension listed in the topic below:


Join the Elite Explorers for $20 each year.
Elite Explorer members see no advertisements, no banner ads, no double underlined links,.
Add an avatar, upload photo attachments, and more!
.


This is the harness i bought. The colors are the universal. The colors on my Merc are way different

View attachment 340942
The connector with 1 blue wire should be for a power antenna, which you most likely don't have.

The last connector allows you to hook up the factory Amp and sub. The 2 blue/white strip wires are the remote turn on for the Amp. That will connect to the matching wire on your aftermarket head units harness. You may have to connect that black wire along with ground on the big connector as well. The red and white plugs connect to the pre-amp outputs directly on the back of your aftermarket head unit. Those give your Amp the bass signals to pass on to the sub. If your aftermarket head unit has to sets of those, use the ones marked for rear, if it has 3, use the set marked for sub.

If you have any other questions, feel free to ask.


Back
Top