SOHC Engine Removal/Rebuild/Install - Done! | Page 3 | Ford Explorer Forums - Serious Explorations

  • Register Today It's free!

SOHC Engine Removal/Rebuild/Install - Done!

Update:
Not much progress to-date. My allergies and family issues prevented work on the ST most of last month. I did mange to strip down the top off the engine, labeled everything, got the passenger side header studs and header off and did some other minor stuff.

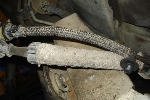
Right now I'm struggling with the stupid EGR tube on the driver's exhaust manifold. Bought a 27mm wrench, but the nipple that is screwed into the cast iron header started spinning (rather than the EGR tube's nut). I figured out the nipple can be held with a 1" wrench (which I had) and I was able to brace the 1" wrench against the frame while trying to loosen the EGR tube nut, but it won't budge, even soaking it in penetrant for several days and hitting the 27mm wrench with a BFH and has not helped. I'm picking up a new bottle of MAP gas today, but I'll probably end up using the whole bottle trying to get the nut hot enough, as a lot of the heat will get sucked up by the cast iron header. I tried removing the header mounting studs and taking the oil dip stick tube loose (the dip stick tube moves around easily, but I couldn't get it out, maybe if I remove the engine mount plate first?). While I could move the header around quite a bit I don't think it's going to come out with the EGR tube attached, as it's catching on something. If heat doesn't get the EGR tube nut loose I may decide to cut the tube (don't want to do this but... we'll see what happens).


Join the Elite Explorers for $20 each year.
Elite Explorer members see no advertisements, no banner ads, no double underlined links,.
Add an avatar, upload photo attachments, and more!
.


Hit her with the heat. You will get about 30 seconds of turn time. then hit her again until she is off. Buggered my shoulder up pretty good trying to do it with pb blaster before I went to the torch and turn.


Hit her with the heat. You will get about 30 seconds of turn time. then hit her again until she is off. Buggered my shoulder up pretty good trying to do it with pb blaster before I went to the torch and turn.

Thanks. I'll give it a try.


I went through the fender skirt as well. Far more room down there then going from above. Mine is on the passenger side as well, which does free up a bunch of space.


I went through the fender skirt as well. Far more room down there then going from above. Mine is on the passenger side as well, which does free up a bunch of space.

Mine EGR tube is on the driver's side (Job 2). I removed the inner plastic fenders to get better access on both sides and unbolted the heat shield over the fuel filter. Fortunately I was able to jam the 1" wrench against the frame, so I don't need to hold that one. The 27mm wrench I bought is fairly long, so the brake booster is in the way of a full 1/4 turn on the EGR's nut, but I can get a good 1/8 turn perhaps a bit more if I angle the wrench a little towards the front. It rained yesterday and for part of the day today, so I didn't have a chance to heat up the nut. I've also got stuff to do tomorrow and then there's 5 acres of grass to be cut this week. I'll let you know how I make out as soon as I can get back to it.

How long did you heat the nut before you got it to move? I have patience as long as I can make even a little progress. I bolted the d/s exhaust header back to the head with 3 of the rear studs/nuts to support it.


Heat it up good make it glow then hurry up and get the wrench on it if you did get it to move a little or not I would go and put some transmission fluid on it now to soak overnight


I got a little done today before the rain that's coming for the next 3 days. One of the things on the list was to remove the starter motor, which was easy enough.

@david4451 - I also want to take the starter's wiring harness loose from the engine. It looks like there's some sort of plastic push-in clip that goes into a hole in the side of the engine, however I'm not able to pry it out. Are you familiar with what I'm referring to?

Living in GA we get these mud wasps that use every available hole they can find to lay their eggs and then fill the holes with mud. I thought it was too early in the season to worry about these pests, but I was wrong. They mudded in both of the small EGR tubes. I'll clear them out when I get the EGR tube off. I then blocked off every other now disconnected hose to keep them out of there. I swear if it wasn't for humans having things with small holes these wasps would go extinct! They get into everything.


Hi Phil, the starter wiring has a Christmas tree plastic clip attached to engine holding wiring. I also couldn't get it out, just detach with some force from plastic, once engine is out this will "unscrew". I didn't use this attachment when I returned wiring to starter.

There is also a clip bolted to engine mount, that's easy to see.

Same here with those mud wasps, their a real pain!


We got the mud daubers

download.jpeg


Hi Phil, the starter wiring has a Christmas tree plastic clip attached to engine holding wiring. I also couldn't get it out, just detach with some force from plastic, once engine is out this will "unscrew". I didn't use this attachment when I returned wiring to starter.

There is also a clip bolted to engine mount, that's easy to see.

Same here with those mud wasps, their a real pain!

Hey David,
Okay re the plastic xmas tree type clip. I've never encountered one that unscrewed before. I'll just cut the tape holding it on the starter motor harness and reattach it later. I just didn't want to break it. I did see the bracket bolted to the motor mount and unbolted it. I have still to get the oil dipstick to pull out though. I think I need to remove/loosen the engine mount plate first. Weather permitting I hope to get the EGR tube out tomorrow. Thanks for your help.

I've decided to give the Sport Trac to my daughter once the engine is repaired or replaced. She's been looking for a good used vehicle for almost 2 years now, but we can't find anything decent in her budget. By the time I'm done with the engine I'll have had my hands on every part of the ST and other than the engine it's been a pretty decent vehicle for the past 15K. I don't really need it and as long as she lets me borrow it if I need it I think that will be the best outcome for the ST. With all the parts and effort I've got in it I just couldn't bring myself to scrap it. Fixing it up for my daughter should give me more of an incentive to get it back on the road faster. I'll take back her '00 Mountaineer, which I gave her 7 years ago, and sell it for whatever I can get for it. It ain't pretty anymore and it's got a lot of miles now, but it's been a very reliable vehicle, so I should be able to get $1200-$1500 for it (it being a V8).


Don't forget a pre oiler a must


If my memory serves me correctly, once single bolt on dipstick tube is removed it pulls out with some effort.

When reinstalling engine put dipstick tube in place before engine in truck, it's really difficult to see where it goes if engine is back in place.


If my memory serves me correctly, once single bolt on dipstick tube is removed it pulls out with some effort.

When reinstalling engine put dipstick tube in place before engine in truck, it's really difficult to see where it goes if engine is back in place.

The one bolt on the dipstick is out and it moves around quite easily, it just wont pull out. Bad angle maybe? I think if I remove the engine mount plate I should be able to pull the dipstick out. I'll put a jack under the engine using a piece of wood if necessary.

Did you put the plastic bag with the foam inside back in when you reinstalled the intake manifold? IDK if it's for noise reduction or heat reduction.


I've read about this bag, but my ST never had one, maybe coz it's an export model?


I've read about this bag, but my ST never had one, maybe coz it's an export model?

It (where the bag goes) looks like it would be a great place to hide a kilo of cocaine.

Update:
Well the rain held off today so I decided to try heating up the EGR nut. Working from the side, I hit it with MAP gas for probably 5 mins, put the big wrench on it an pushed. I heard a tiny squeak but it didn't really move a noticeable amount. I heated it for another 2 mins and got another squeak out of it. Then I heated it for another min or so and hit the wrench with my BFH. The wrench move maybe a 16th of an inch, but the EGR tube moved with the nut and I was concerned it might bend the 2 small pipes that stick up for the DPFE, because they started touching the valve cover. I did this 2 more times until the wrench was hitting the steering shaft and the nut hadn't turned enough to get a new purchase on the nut.

Next I crawled under the truck and was able to get another angle on the nut. I was also able to get better leverage on the wrench from underneath. I kept heating and pushing on the wrench and eventually I was getting a good 1/4 turn each time and it was getting easier (but not easy) to move the wrench each time. That damn nut fought me all the way until the final thread and then it finally let go. I was afraid that once it came off the red-hot pipe would fall in my face, so I finished off the last little bit from the side again, and it's a good thing I did, as it pretty much fell off after the last thread. It does not appear the the threads are damaged or that the DPFE pipes bent, so it should be reusable once I clean up the threads and coat them with anti-seize. Lastly, the exhaust manifold easily came out through the bottom. Next will be to remove the clutch fan, radiator, accessories and accessory brackets, but I need to see what the weather brings tomorrow. It's supposed to rain quite a lot the next 2 days, but I'm making progress.


Hell yea Yeeyeee


While you're in the groove, crack the cylinder head bolts before you take the engine out. They are also very tight and require a long breaker bar, it will be a more difficult fight on an engine stand!


Join the Elite Explorers for $20 each year.
Elite Explorer members see no advertisements, no banner ads, no double underlined links,.
Add an avatar, upload photo attachments, and more!
.


While you're in the groove, crack the cylinder head bolts before you take the engine out. They are also very tight and require a long breaker bar, it will be a more difficult fight on an engine stand!

Yes. I thought of that already.


Back
Top